
User manual


- 8 -
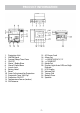
PRODUCT INFORMATION
PACKAGING CONTENTS
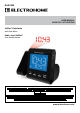
• Projection Dual Alarm Clock Radio with Auto Time Set
• Backup Battery “CR2032”
• Instructional Manual
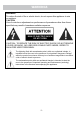
ATTENTION
1. Do not plug or unplug the power cable if you have wet hands.
2. If you are not planning to use the unit for an extended period of time, disconnect
the power cable from the wall outlet.
3. When disconnecting the power cord from the wall outlet. In order to avoid
damage to the power cord and electric shock, do not pull on the cord; pull rmly
at the base of the plug.
POWER CONNECTION
1. Plug the AC power cord into a household AC outlet.
2. Clock display will ash “3” indenitely.
3. Unit will go to Zone 3, which is the default setting, and correct time will
be displayed.
SETTING THE TIME ZONE (FACTORY PRESET TO ZONE “3”- EST)
Press the >> / YEAR / DST(18) or << / MONTH - DAY (17) to select time zone 1-6.
Press MODE (19) to conrm when the correct time zone appears on the display.
Reset the time zone:
Press SNOOZE/SLEEP/TIME ZONE(3) and hold for 3 seconds to change the time zone
when you are in dierent location.
SETTING DST – Daylight Savings Time
Press >> / YEAR / DST (18) and hold for 3 seconds to toggle on and o the
DST function.
RESET
The RESET(9) is located on the back of unit. Use a ballpoint pen to press it whenever
you change the batteries, or unit is not performing as expected. This will return all
settings to default value, you will lose any stored data (alarm and clock settings).
OPERATING INSTRUCTIONS
Zone 1 Newfoundland
Zone 2 Atlantic time
Zone 3 Eastern time
Zone 4 Central time
Zone 5 Mountain time
Zone 6 Pacic time