TUMBLE ACTION WASHER Use & Care Guide Machine à laver par culbutage Guide de L’utilisateur www.frigidaire.
Table of Contents Important Safety Instructions............................2-3 Washing Procedures.........................................4-6 Stain Removal...................................................6-7 Common Washing Problems..................................8 Care and Cleaning...................................................9 Avoid Service Checklist........................................10 Warranty ............................................................11 Français..........................
This Owner's Guide provides general operating instructions for your washer. It also contains information about features for several other models. Your washer may not have every feature included here. Use the washer only as instructed in this Owner's Guide and the Operating Instructions card included with your washer. Avoid fire hazard or electrical shock. Do not use an adaptor plug or extension cord or remove grounding prong from electrical power cord.
Washing Procedures Follow the guidelines below for preparing the wash load. Read the Operating Instructions card for operating your specific model. Always read and follow fabric care and laundry product labels. To reduce the risk of fire, electrical shock, or injury to persons, read Important Safety Instructions, page 2, before operating this washer. • • • 1. Sort laundry into loads that can be washed together. Sort laundry into loads that can be washed together.
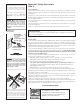
Washing Procedures (continued) 5. Add detergent, bleach and fabric softener to automatic dispenser following these steps: A. OPENING AND CLOSING C. LIQUID BLEACH THE DISPENSER DRAWER • If desired, measure out the recommended amount of • Slowly open the dispenser drawer by first sliding the safety liquid chlorine bleach (not to exceed 1/3 cup (80 mL)) latch to the right, then pulling the drawer out until it and pour it into the center compartment labeled stops. "Liquid Bleach" and marked with this symbol .
Washing Procedures (continued) 6. Set cycle selector knob and washer controls according to type, size, and soil level of each load. (See Operating Instructions for your specific model controls.) 7. Start the washer. Close the washer door and pull out the cycle selector knob. For your safety, the door will automatically lock during the entire wash cycle. The Door Lock indicator light will remain lit until the cycle ends. • • • • • Washer will fill and tumble.
Follow fabric care label instructions. For successful stain removal: • Remove stains promptly. • Determine the kind of stain, then follow the recommended treatment in the stain removal chart below. • To pretreat stains, use a prewash product, liquid detergent, or a paste made from granular detergent and water. • Use cold water on unknown stains because hot water can set stains. • Check care label instructions for treatments to avoid on specific fabrics.
Common Washing Problems Many washing problems involve poor soil and stain removal, residues of lint and scum, and fabric damage. For satisfactory washing results, follow these suggestions provided by The Soap and Detergent Association. PROBLEM POSSIBLE CAUSES SOLUTIONS PREVENTIVE MEASURES Blue stains •Undiluted liquid detergent or fabric softener dispensed directly onto fabric. •If caused by detergent, mix 1 cup (240 ml) white vinegar with 1 quart (.95 L) water in a plastic container.
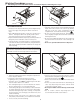
Care and Cleaning Outside • • • Figure 1 • When washing is completed, wipe top and sides of washer with a damp cloth. Turn water faucets off to prevent pressure build-up in the hoses. As needed, clean the cabinet with mild soap and water. Never use harsh, gritty or abrasive cleansers. If door or console becomes stained, clean with diluted chlorine bleach [1/2 cup (120 ml) in 1 quart (.95 L) water]. Rinse several times with clear water.
Avoid Service Checklist Before calling for service, review this list. It may save both time and expense. The list includes common concerns that are not the result of defective workmanship or materials in this washer. OCCURRENCE POSSIBLE CAUSE / SOLUTION NOISE "Clicking" noise. • A normal sound made by the timer. High pitch "jet engine" noise. • A certain amount of motor whine is normal during the spin cycle. Rattling and clanking noise.
Major Appliance Warranty Information Your appliance is covered by a one year limited warranty. For one year from your original date of purchase, Electrolux will pay all costs for repairing or replacing any parts of this appliance that prove to be defective in materials or workmanship when such appliance is installed, used and maintained in accordance with the provided instructions. Exclusions This warranty does not cover the following: 1.