FNC53 EN OVEN USER MANUAL
www.electrolux.com CONTENTS 1. SAFETY INFORMATION...................................................................................... 2 2. SAFETY INSTRUCTIONS.....................................................................................4 3. PRODUCT DESCRIPTION................................................................................... 6 4. BEFORE FIRST USE............................................................................................ 6 5. DAILY USE...........................
ENGLISH 3 responsible if an incorrect installation and use causes injuries and damages. Always keep the instructions with the appliance for future reference. 1.
www.electrolux.com • • Do not use harsh abrasive cleaners or sharp metal scrapers to clean the glass door since they can scratch the surface, which may result in shattering of the glass. If the supply cord is damaged, it must be replaced by the manufacturer, its Authorised Service Centre or similarly qualified persons in order to avoid a hazard. 2. SAFETY INSTRUCTIONS 2.1 Installation WARNING! Only a qualified person must install this appliance. • Remove all the packaging.
ENGLISH • Do not let the appliance stay unattended during operation. • Deactivate the appliance after each use. • Be careful when you open the appliance door while the appliance is in operation. Hot air can release. • Do not operate the appliance with wet hands or when it has contact with water. • Do not apply pressure on the open door. • Do not use the appliance as a work surface or as a storage surface. • Open the appliance door carefully.
www.electrolux.com • Remove the door catch to prevent children and pets to get closed in the appliance. • Use original spare parts only. 2.7 Service • To repair the appliance contact an Authorised Service Centre. 3. PRODUCT DESCRIPTION 3.1 General overview 1 2 3 4 5 6 7 11 5 4 3 2 1 8 9 10 3.2 Accessories • Wire shelf For cookware, cake tins, roasts.
ENGLISH 5. DAILY USE WARNING! Refer to Safety chapters. 5.1 Activating and deactivating the appliance It depends on the model if your appliance has knob symbols, indicators or lamps: • The indicator comes on when the oven heats up. • The lamp comes on when the appliance operates. • The symbol shows whether the knob controls the oven functions or the temperature. 1. Turn the knob for the oven functions to select an oven function. 2. Turn the knob for the temperature to select a temperature. 3.
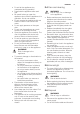
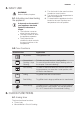
www.electrolux.com A A) Window B) Dial C) Settings knob B C Setting the time of day To set the time of day, push and turn the settings knob counterclockwise (in the direction indicated by the arrow), until the clock hands are in the necessary position. Do not turn the settings knob clockwise. After you set the time, let the settings knob move to its initial position or carefully pull back. Normal setting Turn the settings knob counterclockwise, until shows in the window.
ENGLISH 7.2 Safety thermostat Incorrect operation of the appliance or defective components can cause dangerous overheating. To prevent this, 9 the oven has a safety thermostat which interrupts the power supply. The oven activates again automatically when the temperature drops. 8. HINTS AND TIPS WARNING! Refer to Safety chapters. The temperature and baking times in the tables are guidelines only. They depend on the recipes and the quality and quantity of the ingredients used. 8.
www.electrolux.com 8.
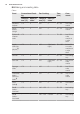
ENGLISH Food Conventional Cooking Fan Cooking Tempera- Shelf poture (°C) sition Tempera- Shelf poture (°C) sition Biscuits / pastry strips one level 140 3 140 - 150 Biscuits / pastry strips two levels - - Meringues 120 Buns1) 11 Time (min) Comments 3 30 - 35 In a baking tray 140 - 150 2 and 4 35 - 40 In a baking tray 3 120 3 80 - 100 In a baking tray 190 3 180 3 15 - 20 In a baking tray Eclairs 190 3 170 3 25 - 35 In a baking tray Plate tarts 180 2 170 2 45 - 7
www.electrolux.com Food Scones1) Conventional Cooking Fan Cooking Tempera- Shelf poture (°C) sition Tempera- Shelf poture (°C) sition 200 190 3 3 Time (min) Comments 10 - 20 In a baking tray Time (min) Comments 1) Preheat the oven for 10 minutes.
ENGLISH Food Conventional Cooking Fan Cooking Tempera- Shelf poture (°C) sition Tempera- Shelf poture (°C) sition Time (min) Comments English 210 roast beef, well done 2 200 2 70 - 75 On a wire shelf Shoulder of pork 180 2 170 2 120 - 150 With rind Shin of pork 180 2 160 2 100 - 120 Two pieces Lamb 190 2 175 2 110 - 130 Leg Chicken 220 2 200 2 70 - 85 Whole Turkey 180 2 160 2 210 - 240 Whole Duck 175 2 220 2 120 - 150 Whole Goose 175 2 160 1 150 -
www.electrolux.com Food Quantity Pieces (g) Tempera- Time (min) ture (°C) 1st side 2nd side Fillet steaks 4 800 max. 12 - 15 12 - 14 4 Beef steaks 4 600 max. 10 - 12 6-8 4 Sausages 8 - max. 12 - 15 10 - 12 4 Pork chops 4 600 max. 12 - 16 12 - 14 4 Chicken (cut in 2) 2 1000 max. 30 - 35 25 - 30 4 Kebabs 4 - max. 10 - 15 10 - 12 4 Breast of chicken 4 400 max. 12 - 15 12 - 14 4 Hamburger 6 600 max. 20 - 30 - 4 Fish fillet 4 400 max.
ENGLISH 15 Fruit Food Temperature (°C) Time (h) Plums 60 - 70 Apricots Shelf position 1 position 2 positions 8 - 10 3 1/4 60 - 70 8 - 10 3 1/4 Apple slices 60 - 70 6-8 3 1/4 Pears 60 - 70 6-9 3 1/4 9. CARE AND CLEANING WARNING! Refer to Safety chapters. 9.1 Notes on cleaning • Clean the front of the appliance with a soft cloth with warm water and a cleaning agent. • To clean metal surfaces, use a usual cleaning agent. • Clean the appliance interior after each use.
www.electrolux.com The oven door can close if you try to remove the internal glass panel before you remove the oven door. CAUTION! Do not use the appliance without the internal glass panel. 1. Open the door fully and hold the two door hinges. 4. Put the door on a soft cloth on a stable surface. 2. Lift and turn the levers on the two hinges. 5. Release the locking system to remove the internal glass panel. 6. Turn the two fasteners by 90° and remove them from their seats. 3.
ENGLISH 17 9.6 Replacing the lamp Put a cloth on the bottom of the interior of the appliance. It prevents damage to the lamp glass cover and the cavity. 90° 7. First lift carefully and then remove the glass panel. 1 2 WARNING! Danger of electrocution! Disconnect the fuse before you replace the lamp. The lamp and the lamp glass cover can be hot. CAUTION! Always hold the halogen lamp with a cloth to prevent grease residue from burning on the lamp. 1. Deactivate the appliance. 2.
www.electrolux.com 10.1 What to do if... Problem Possible cause The oven does not heat up. The oven is deactivated. Remedy Activate the oven. The oven does not heat up. The Minute Minder + End of Set the Minute Minder + Cooking programmer is not End of Cooking programset. mer. Refer to the chapter "Clock functions". The oven does not heat up. The fuse is released. Make sure that the fuse is the cause of the malfunction. If the fuse releases again and again, contact a qualified electrician.
ENGLISH 11.3 Electrical installation 11.1 Building In min. 550 20 600 The manufacturer is not responsible if you do not follow the safety precautions from the Safety chapters. 558 16 114 min. 560 6 19 589 This appliance is supplied only with a main cable. 573 11.
www.electrolux.com 12. ENERGY EFFICIENCY 12.1 Product Fiche and information according to EU 65-66/2014 Supplier's name Electrolux Rex Model identification FNC53BA FNC53GR FNC53GX FNC53R FNC53S FNC53X Energy Efficiency Index 104.8 Energy efficiency class A Energy consumption with a standard load, conventional mode 0.89 kWh/cycle Energy consumption with a standard load, fanforced mode 0.
ENGLISH • Cooking with fan - when possible, use the cooking functions with fan to save energy. • Keep food warm - if you want to use the residual heat to keep the meal 21 warm, choose the lowest possible temperature setting. 13. ENVIRONMENT CONCERNS Recycle the materials with the symbol . Put the packaging in applicable containers to recycle it. Help protect the environment and human health and to recycle waste of electrical and electronic appliances.
www.electrolux.
ENGLISH 23
867304785-C-502014 www.electrolux.