
User manual


you operated the hob correctly. If not the
servicing by a service technician or dealer
will not be free of charge, also during the
warranty period. The instructions about
the Service Centre and conditions of
guarantee are in the guarantee booklet.
8. INSTALLATION
WARNING!
Refer to Safety chapters.
8.1 Before the installation
Before you install the hob, write down the
information bellow from the rating plate.
The rating plate is on the bottom of the
hob.
Serial number ...........................
8.2 Built-in hobs
Only use the built-in hobs after you
assemble the hob into correct built-in units
and work surfaces that align to the
standards.
8.3 Connection cable
• The hob is supplied with the
connection cable.
• Replace the damaged mains cable only
with the spare parts cable. Speak to
your local Authorised Service Center.
WARNING!
All electrical connections
must be made by a qualified
electrician.
CAUTION!
Do not drill or solder the wire
ends. This is strictly
forbidden!
CAUTION!
Do not connect the cable
without cable end sleeve.
Two-phase connection
1. Remove the cable end sleeve from
black and brown wires.
2. Remove an insulation of the brown
and black cable ends.
3. Apply a new wire end sleeve of 1.5
mm² on each cable end. (special tool
required).
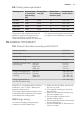
Cable cross section
N
L1
N
L
230V~ 400V 2~N
L2
One-phase connection - 230 V~ Two-phase connection - 400 V 2 ~ N
Green - yellow Green - yellow
N Blue and grey Blue and grey N
L Black and brown Black L1
Brown L2
www.electrolux.com16