LI 1070 E ................................................ .............................................
electrolux Electrolux. Thinking of you. Share more of our thinking at www.electrolux.com CONTENTS Safety information Safety instructions Product description Control panel First use Daily use Helpful hints and tips Washing programmes 2 3 4 6 7 7 10 11 Consumption values Care and cleaning Troubleshooting Technical data Installation Building in Environment concerns 14 14 18 20 20 23 24 Subject to change without notice.
electrolux 3 • Obey the maximum load volume of 7 kg (refer to the “Programme chart” chapter). • If the supply cord is damaged, it must be replaced by the manufacturer, its service agent or similarly qualified persons in order to avoid a hazard. • The operating water pressure (minimum and maximum) must be between 0,5 bar (0,05 MPa) and 8 bar (0,8 MPa) • The ventilation openings in the base (if applicable) must not be obstructed by a carpet.
electrolux • The first time you use the appliance, make sure that there is no leakage. Use Warning! Risk of injury, electrical shock, fire, burns or damage to the appliance. • Use this appliance in a household environment. • Obey the safety instructions on the detergent packaging. • Do not put flammable products or items that are wet with flammable products in, near or on the appliance. • Do not touch the glass of the door while a programme operates. The glass can be hot.
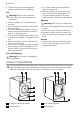
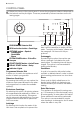
electrolux 5 5 Drain pump 6 Adjustable feet 7 Drain hose 8 Power supply cable 9 Inlet hose 10 Adjustable feet for appliance level Detergent dispenser drawer Compartment for detergent used for prewash and soak phase or for stain remover used during the stain action phase (if available). The prewash and soak detergent is added at the beginning of the wash programme. The stain remover is added during the stain action phase. Compartment for powder or liquid detergent used for main wash.
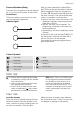
electrolux CONTROL PANEL Below is a picture of the control panel. It shows the programme selector dial as well as the buttons and the pilot lights. These are presented by relevant numbers on the following pages. 1 1 PROGRAMME Selector Dial 2 SPIN reduction button -Centrifuga 3 OPTIONS button - Opzioni: – Prelavaggio – Quotidiano – Breve 4 EXTRA RINSE button - Extra Risciacquo 5 START/PAUSE button -Avvio/Pausa 6 DELAY START button - Delay 7 Indicator Lights 2 3 4 5 6 7 fabrics from creasing.
electrolux 7 Partenza Ritardata (Delay) The start of the programme can be delayed by 3, 6 or 9 hours by means of this button. Avvio/Pausa This button allows you to start or to interrupt the selected programme. Indicator lights 7.1 7.2 After you have pressed the button 5, the light 7.1 (In funzione) illuminates to indicate that the appliance starts the programme. The light 7.2 (Porta bloccata) indicates that the door is locked.
electrolux Measure out the detergent and the fabric softener Pull out the dispenser drawer until it stops. Measure out the amount of detergent required, pour it into the main wash compartor in the appropriate compartment ment if the selected programme/option it requires (see more details in «Detergent dispenser drawer»). chosen. You can change this value by pressing the corresponding button. The green pilot light of the button 5 starts to flash.
electrolux 9 You must select this option after you have set the programme and before you start the programme. You can cancel or modify the delay time at any moment, before you press button 5. Selecting the delayed start: 1. Select the programme and the required options. 2. Select the delay start by pressing the button 6. 3. Press button 5: – the machine starts its hourly countdown. – The programme will start after the selected delay has expired.
electrolux If a programme or an option that ends with water left in the tub has been selected, the pilot light 7.3 remains on and the door is locked to indicate that the water must be emptied out before opening the door. Follow the below instructions to empty out the water: 1. Turn the programme selector dial to . 2. Select the draining or spinning programme. 3. Reduce the spin speed if needed, by pressing the relevant button. 4. Press button 5. At the end of the programme, the pilot light 7.
electrolux 11 Detergents and additives Good washing results also depend on the choice of detergent and use of the correct quantities to avoid waste and protect the environment. Although biodegradable, detergents contain substances which, in large quantities, can upset the delicate balance of nature. The choice of detergent will depend on the type of fabric (delicates, woollens, cottons, etc.), the colour, washing temperature and degree of soiling.
electrolux Programme - Maximum and Minimum Temperature Cycle Description - Maximum Spin Speed - Maximum Fabrics Load - Type of Laundry Options ECO3) 40° Main wash - Rinses - Spin Spin at maximum 1000 rpm Max. load 7 kg Coloured cotton This programme can be selected for slightly or normally soiled cotton items. The temperature will decrease and the washing time will be extended. This allows to obtain a good washing efficiency so saving energy.
electrolux 13 Programme - Maximum and Minimum Temperature Cycle Description - Maximum Spin Speed - Maximum Fabrics Load - Type of Laundry A mano 30° - Cold Main wash - Rinses - Spin Spin at maximum 1000 rpm Max. load 2 kg Special programme for delicate fabrics with «hand washing» care symbol. Options Detergent Compartment SPIN NO SPIN RINSE HOLD Mix 20° 4) 20° Main wash - Rinses - Spin Spin at maximum 900 rpm Max. load 3 kg Special programme for cotton, synthetic and mixed fabrics with light soil.
electrolux CONSUMPTION VALUES The data of this table are approximate. Different causes can change the data: the quantity and type of laundry, the water and ambient temperature. Programmes Load (kg) Energy consumption (kWh) Water consumption (litre) Approximate programme duration (minutes) Remaining moisture (%)1) Cottons 60 °C 7 1.35 67 150 60 Cottons 40 °C 7 0.85 67 140 60 Synthetics 40 °C 3 0.55 42 90 37 Delicates 40 °C 3 0.55 63 65 37 Wool/Hand wash 30 °C 2 0.
electrolux 15 Cleaning the dispenser drawer The detergent dispenser drawer should be cleaned regularly. The washing powder and additive dispenser drawer should be cleaned regularly. Remove the drawer by pressing the catch downwards and by pulling it out. 1 2 Important! Do not clean the drum with acidic descaling agents, scouring agents containing chlorine or iron or steel wool. 1. Remove any rust deposits on the drum with a cleaning agent for stainless steel. 2.
electrolux 2. If it is necessary, wait until the water has cooled down. A 6. Remove foreign bodies and fluff from the filter seat and from the pump impeller. Check carefully whether the pump impeller rotates (it rotates jerkily). If it doesn’t rotate, please contact your Service Centre. B 3. Place a container close to the pump to collect any spillage. 4. Release the emergency emptying hose (B), place it in the container and remove its cap cover 5.
electrolux 17 has finished the cycle, and is empty. When refitting the pump cover, ensure it is securely retightened so as to stop leaks and young children being able to remove it. Cleaning the water inlet filters If you notice that the machine is taking longer to fill, check that the filter in the water inlet hose is not blocked. 1. Turn off the water tap. 2. Unscrew the water inlet hose. 3. Clean the filter in the hose using a hard bristle brush. 4. Screw the hose back onto the tap. 5.
electrolux TROUBLESHOOTING Certain problems are due to lack of simple maintenance or oversights, which can be solved easily without calling out an engineer. Before contacting your local Service Centre, please carry out the checks listed below. During machine operation it is possible that the red pilot light of button 5 blinks to indicate that the machine is not working. It is possible to recognize the machine fault by the number of button 5 light flashes.
electrolux 19 Problem Possible cause/Solution The machine does not empty and/or does not spin: The drain hose is squashed or kinked (the button 5 red light blinks). • Check the drain hose connection. The drain filter is clogged (the button 5 red light blinks). • Clean the drain filter. An option or a programme that ends with the water still in the tub or a that eliminates all the spinning phases has been selected. • Select the draining or spinning programme.
electrolux Problem Possible cause/Solution Spinning starts late or the machine does not spin: The electronic unbalance detection device has cut in because the laundry is not evenly distributed in the drum. The laundry is redistributed by reverse rotation of the drum. This may happen several times before the unbalance disappears and normal spinning can resume. If, after 10 minutes, the laundry is still not evenly distributed in the drum, the machine will not spin.
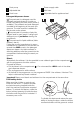
electrolux 21 5. Open the porthole. Remove the polystyrene block fitted on the door seal. Remove from the drum the objects supplied with the machine. 2. Remove the power supply cable and the draining hose from the hose holders on the rear of the appliance. 6. Fill the smaller upper hole and the two large ones with the corresponding plastic plug caps supplied in the bag containing the instruction booklet. 3. Unscrew the three bolts. 2 1 4. Slide out the relevant plastic spacers.
electrolux Accurate levelling prevents vibration, noise and displacement of the machine during operation. 4. Connect the hose to a tap with a 3/4” thread. Always use the hose supplied with the appliance. Caution! Never place cardboard, wood or similar materials under the machine to compensate for any unevenness in the floor. After having levelled the appliance, tighten the lock nuts. The inlet hose must not be lengthened.
electrolux 23 The drain hose may be extended to a maximum of 4 metres. An additional drain hose and joining piece is available from your local Service Centre. BUILDING IN Overview This appliance has been designed to be built into the kitchen furniture. The recess should have the dimensions shown in Fig. 1. Fig. 1 - width 595-598 mm - thickness 16-22 mm The height X depends on the height of the adjacent furniture's base (Fig. 3). Fig. 3 16-22 mm 600 mm min. 596 mm 560 mm 555 mm X Ø 35 mm 416 mm min.
electrolux A (steel disk + rubber ring) into the inner side of the door. Its position must correspond to the magnet B on the appliance (Fig. 6). Fig. 4 Warning! Do not remove the screw C. 1 2 Fig. 6 A B c) Mounting the door Fix the hinges to the appliance by means of the M5x15 screws. The hinges can be adjusted to compensate for possible uneven thickness of the door. To align the door perfectly it is necessary to loosen the screw, adjust the door and tighten the screw A again (Fig. 5).
electrolux 25 Ecological hints To save water, energy and to help protect the environment, we recommend that you follow these tips: • Normally soiled laundry may be washed without prewashing in order to save detergent, water and time (the environment is protected too!). • The machine works more economically if it is fully loaded. • With adequate pre-treatment, stains and limited soiling can be removed; the laundry can then be washed at a lower temperature.
electrolux
electrolux 27
www.electrolux.