LI 1470 E ................................................ .............................................
electrolux Electrolux. Thinking of you. Share more of our thinking at www.electrolux.com CONTENTS Safety information Safety instructions Product description Control panel First use Personalisation Daily use Helpful hints and tips 2 3 4 6 8 8 8 11 Washing programmes 13 Consumption values 15 Care and cleaning 16 What to do if… 19 Technical data 22 Installation 22 Environment concerns 25 Building in 26 Subject to change without notice.
electrolux 3 • Obey the maximum load volume of 7 kg (refer to the “Programme chart” chapter). • If the supply cord is damaged, it must be replaced by the manufacturer, its service agent or similarly qualified persons in order to avoid a hazard. • The operating water pressure (minimum and maximum) must be between 0,5 bar (0,05 MPa) and 8 bar (0,8 MPa) • The ventilation openings in the base (if applicable) must not be obstructed by a carpet.
electrolux • The first time you use the appliance, make sure that there is no leakage. Use Warning! Risk of injury, electrical shock, fire, burns or damage to the appliance. • Use this appliance in a household environment. • Obey the safety instructions on the detergent packaging. • Do not put flammable products or items that are wet with flammable products in, near or on the appliance. • Do not touch the glass of the door while a programme operates. The glass can be hot.
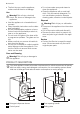
electrolux 5 5 Drain pump 6 Front adjustable feet 7 Water drain hose 8 Mains cable 9 Water inlet valve 10 Back adjustable feet Detergent dispenser drawer Compartment for detergent used for prewash and soak phase or for stain remover used during the stain action phase (if available). The prewash and soak detergent is added at the beginning of the wash programme. The stain remover is added during the stain action phase. Compartment for powder or liquid detergent used for main wash.
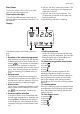
electrolux CONTROL PANEL Below is a picture of the control panel. It shows the programme selector dial as well as the buttons, pilot light and the display. These are presented by relevant numbers on the following pages. 1 2 1 Programme selector dial 2 TEMPERATURE button (Temp.) 3 SPIN REDUCTION button (Centrifuga) 4 EASY IRON button (Stiro Facile) 5 EXTRA RINSE button (Extra Risciacquo) Programme Selector Dial It allows you to switch the appliance on/off and/or to select a programme.
electrolux 7 Start Pause This button allows you to start or to interrupt the selected programme. Door locked pilot light The pilot light 9 illuminates when the programme starts and indicates if the door can be opened: • light on: the door cannot be opened. The machine in working or has stopped with water left in the tub. • light off: the door can be opened. The programme is finished or the water has been emptied out. • light flashing: the door is opening Display 7.4 7.5 7.
electrolux • Super Quick • Refresh • Super Refresh When selecting a programme on the display appears an icon indicating the degree of soiling automatically proposed by the machine. (see «Child Safe7.5: Child safety lock ty Lock» paragraph). Table of symbols = Cold Wash = No Spin = Door locked └ ┘ = Child Lock FIRST USE • Ensure that the electrical and water connections comply with the installation instructions. • Remove the polystyrene block and any material from the drum.
electrolux 9 Pull out the dispenser drawer until it stops. Measure out the amount of detergent required, pour it into the main wash compartor in the appropriate compartment ment if the selected programme/option it requires (see more details in «Detergent dispenser drawer»). At the end of the programme the selector dial must be turned to position , to switch the machine off.
electrolux Select the Delay Start by pressing button 6 Before you start the programme, if you wish to delay the start, press the button 6 repeatedly, to select the desired delay. The relevant pilot light goes on. The selected delay time value (up to 20 hours) will appear on the display a few seconds, then the duration of the programme will appear again. You must select this option after you have set the programme and before you press button 8.
electrolux 11 Interrupting a programme Press the button 8 to interrupt a programme which is running, the corresponding green pilot light starts blinking. Press the button again to restart the programme. Cancelling a programme to cancel a proTurn the selector dial to gramme which is running. You can select now a new programme. Opening the door After the programme has started (or during the delay time) the door is locked, if you need to open it, set first the machine to PAUSE by pressing the button 8.
electrolux with a special detergent then rub in the soap and water. Oil based paint: moisten with benzine stain remover, lay the garment on a soft cloth and dab the stain; treat several times. Dried grease stains: moisten with turpentine, lay the garment on a soft surface and dab the stain with the fingertips and a cotton cloth. Rust: oxalic acid dissolved in hot water or a rust removing product used cold.
electrolux 13 WASHING PROGRAMMES Programme - Maximum and Minimum Temperature - Cycle Description - Maximum Spin Speed Maximum Fabrics Load - Type of Laundry Options Cotoni 90° - Cold Main wash - Rinses Maximum spin speed 1400 rpm Max. load 7 kg - Reduced load 3 kg 1) White and coloured cotton (normally soiled items). SPIN NO SPIN EASY IRON EXTRA RINSE TIME MANAGER Cotoni + Prelavaggio 90° - Cold Prewash2) - Main wash - Rinses Maximum spin speed 1400 rpm Max.
electrolux Programme - Maximum and Minimum Temperature - Cycle Description - Maximum Spin Speed Maximum Fabrics Load - Type of Laundry Risciacqui Rinses Maximum spin speed 1400 rpm Max. load 7 kg With this programme it is possible to rinse and spin cotton garments which have been washed by hand. The machine performs 3 rinses, followed by a final long spin. The spin speed can be reduced. 3) Mix 20° 20° Main wash - Rinses - Spin Maximum spin speed 900 rpm Max.
electrolux 15 Programme - Maximum and Minimum Temperature - Cycle Description - Maximum Spin Speed Maximum Fabrics Load - Type of Laundry Detergent Compartment Options Cotoni Eco + Prelavaggio 90° - 40° Prewash2) - Main wash - Rinses Maximum spin speed 1400 rpm Max. load 7 kg White or coloured cottons with prewash phase. This programme can be selected for normally soiled cotton items with stains. The temperature will decrease and the washing time will be extended.
electrolux Programmes Wool/Hand wash 30 °C Load (kg) Energy consumption (kWh) Water consumption (litre) Approximate programme duration (minutes) Remaining moisture (%)1) 2 0.25 55 60 30 Standard cotton programmes Standard 60 °C cotton 7 1.01 52 180 52 Standard 60 °C cotton 3.5 0.78 44 149 52 Standard 40 °C cotton 3.5 0.61 44 140 52 1) At the end of spin phase. Off Mode (W) Left On Mode (W) 0.10 0.
electrolux 17 1 2 2. Run a washing cycle without any washing to clean off any cleaning agent residues. Programme: Short Cotton Programme at maximum temperature and add approx. 1/4 measuring cup of detergent. Door seal Check from time to time the door seal and eliminate eventual possible objects that could be trapped in the fold. Flush it out under a tap, to remove any traces of accumulated powder. To aid cleaning, the top part of the additive compartment should be removed. Clean all parts with water.
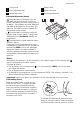
electrolux 4. Release the emergency emptying hose (B), place it in the container and remove its cap cover 6. Remove foreign bodies and fluff from the filter seat and from the pump impeller. Check carefully whether the pump impeller rotates (it rotates jerkily). If it doesn’t rotate, please contact your Service Centre. 5. When no more water comes out, unscrew the pump cover (A) by turning it anti-clockwise and remove the filter. Use pliers, if necessary.
electrolux 19 has finished the cycle, and is empty. When refitting the pump cover, ensure it is securely retightened so as to stop leaks and young children being able to remove it. Cleaning the water inlet filters If you notice that the machine is taking longer to fill, check that the filter in the water inlet hose is not blocked. 1. Turn off the water tap. 2. Unscrew the water inlet hose. 3. Clean the filter in the hose using a hard bristle brush. 4. Screw the hose back onto the tap. 5.
electrolux display and some acoustic signals sound every 20 seconds to indicate that the machine is not working: • : problem with the water supply. • : problem with the water draining. Problem • : door open. Once the problem has been eliminated, press the button 8 to restart the programme. If after all checks, the problem persists, contact your local Service Centre. Possible cause/Solution The washing machine does not start: The door has not been closed. • Close firmly the door.
electrolux 21 Problem Possible cause/Solution There is water on the floor: Too much detergent or unsuitable detergent (creates too much foam) has been used. • Reduce the detergent quantity or use another one. Check whether there are any leaks from one of the inlet hose fittings. It is not always easy to see this as the water runs down the hose; check to see if it is damp. • Check the water inlet hose connection. The drain hose is damaged. • Change it with a new one.
electrolux Problem Possible cause/Solution Spinning starts late or the machine does not spin: The electronic unbalance detection device has cut in because the laundry is not evenly distributed in the drum. The laundry is redistributed by reverse rotation of the drum. This may happen several times before the unbalance disappears and normal spinning can resume. If, after some minutes, the laundry is still not evenly distributed in the drum, the machine will not spin. • Redistribute the laundry.
electrolux 23 5. Fill the smaller upper hole and the two large ones with the corresponding plastic plug caps supplied in the bag containing the instruction booklet. 2. Remove the power supply cable and the draining hose from the hose holders on the rear of the appliance. 3. Unscrew the three bolts with the supplied spanner. 2 Positioning Install the machine on a flat hard floor. Make sure that air circulation around the machine is not impeded by carpets, rugs etc.
electrolux 4. Connect the hose to a tap with a 3/4” thread. Always use the hose supplied with the appliance. Water inlet An inlet hose is supplied and can been found inside the machine drum. Do not use the hose from your previous machine to connect to the water supply. Important! This appliance must be connected to a cold water supply. 1. Open the porthole and extract the inlet hose. 2. Connect the hose with the angled connection to the machine. Do not place the inlet hose downwards.
electrolux 25 tying it to the tap with a piece of string or attaching it to the wall. • In a sink drain pipe branch. This branch must be above the trap so that the bend is at least 60 cm above the ground. • Directly into a drain pipe at a height of not less than 60 cm and not more than 90 cm. The end of the drain hose must always be ventilated, i.e. the inside diameter of the drain pipe must be larger than the outside diameter of the drain hose. The drain hose must not be kinked.
electrolux BUILDING IN Overview This appliance has been designed to be built into the kitchen furniture. The recess should have the dimensions shown in Fig. 1. Fig. 3 16-22 mm X Ø 35 mm Fig. 1 416 mm 600 mm min. 596 mm 560 mm 555 mm 22±1,5 mm 14 mm min. 820 mm 595-598 mm 818 mm 75 mm 60 mm 100 mm 170 mm Preparation and assembly of the door The appliance is originally prearranged for the assembly of a door opening from right to left (Fig. 2). Fig.
electrolux 27 If the door has to be opened from left to right, invert the position of the plates E, the magnet D and the plate C. Mount the counter-magnet D and the hinges A as previously described (Fig. 7). Fig. 5 Warning! Do not remove the screw B. A Fig. 7 B D d) Counter-magnet The appliance is prearranged for a magnetic closure of the door. To enable a correct operation of this device, it is necessary to screw the counter-magnet A (steel disk + rubber ring) into the inner side of the door.
www.electrolux.