PX780 EN HOB USER MANUAL
www.electrolux.com CONTENTS 1. SAFETY INFORMATION...................................................................................... 2 2. SAFETY INSTRUCTIONS.....................................................................................4 3. PRODUCT DESCRIPTION................................................................................... 7 4. DAILY USE.......................................................................................................... 7 5. HINTS AND TIPS...............
ENGLISH 3 injuries and damages. Always keep the instructions with the appliance for future reference. 1.1 Children and vulnerable people safety • • • • • • • This appliance can be used by children aged from 8 years and above and persons with reduced physical, sensory or mental capabilities or lack of experience and knowledge if they have been given supervision or instruction concerning use of the appliance in a safe way and understand the hazards involved. Do not let children play with the appliance.
www.electrolux.com • • • • Remove any spillage from the lid before opening. Let the hob surface cool down before closing the lid. If the supply cord is damaged, it must be replaced by the manufacturer, an authorized Service or similarly qualified persons in order to avoid a hazard. Where the appliance is directly connected to the power supply, an all-pole isolating switch with a contact gap is required.
ENGLISH • Use the correct electricity mains cable. • Do not let the electricity mains cable tangle. • Make sure that a shock protection is installed. • Use the strain relief clamp on the cable. • Make sure the mains cable or plug (if applicable) does not touch the hot appliance or hot cookware, when you connect the appliance to the near sockets • Do not use multi-plug adapters and extension cables. • Make sure not to cause damage to the mains plug (if applicable) or to the mains cable.
www.electrolux.com WARNING! Risk of damage to the appliance. • Do not keep hot cookware on the control panel. • Do not let cookware to boil dry. • Be careful not to let objects or cookware fall on the appliance. The surface can be damaged. • Do not activate the cooking zones with empty cookware or without cookware. • Do not put aluminium foil on the appliance. • Use only stable cookware with the correct shape and diameter larger than the dimensions of the burners.
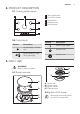
ENGLISH 3. PRODUCT DESCRIPTION 3.1 Cooking surface layout 2 1 3 1 2 3 4 5 Semi-rapid burner Dual Crown burner Rapid burner Auxiliary burner Control knobs 4 5 3.2 Control knob Symbol Symbol Description Description minimum gas supply no gas supply / off position internal crown ignition position / maximum gas supply double crown 4. DAILY USE WARNING! Refer to Safety chapters. A 4.1 Burner overview B D A B A) B) C) D) C Burner cap Burner crown Ignition candle Thermocouple 4.
www.electrolux.com WARNING! Be very careful when you use open fire in the kitchen environment. The manufacturer declines any responsibility in case of the flame misuse. 1. Push the control knob down and turn it counterclockwise to the maximum gas supply position ( ). The flame will switch on in the two burner crowns of Dual burner. To light the internal crown of the Dual burner push down the control knob and turn it clockwise to the maximum position ( ). 2.
ENGLISH CAUTION! Make sure that the bottoms of pots do not stand above the control knob, otherwise the flame heats the control knob up. CAUTION! Make sure that pot handles are not above the front edge of the cooktop. CAUTION! Make sure that the pots are placed centrally on the burner in order to get maximum stability and to get lower gas consumption. Burner Diameter of cookware (mm) Rapid 160 - 260 Semi-rapid (rear left) 120 - 220 Semi-rapid (front left) 120 - 180 Auxiliary 80 - 180 9 5.
www.electrolux.com and dry them. If necessary, remove stubborn stains with a paste cleaner. 3. After you clean the pan supports, make sure that they are in correct positions. 4. For the burner to operate correctly, make sure that the arms of the pan supports are aligned with the centre of the burner. 6.3 Cleaning the hob • Remove immediately: melted plastic, plastic foil, and food with sugar. If not, the dirt can cause damage to the hob.
ENGLISH 7.2 If you cannot find a solution... warranty period. The instructions about the Service Centre and conditions of guarantee are in the guarantee booklet. If you cannot find a solution to the problem yourself, contact your dealer or an Authorised Service Centre. Give the data from the rating plate. Make sure, you operated the hob correctly. If not the servicing by a service technician or dealer will not be free of charge, also during the A 7.
www.electrolux.com Choose fixed connections or use a flexible pipe in stainless steel in compliance with the regulation in force. If you use flexible metallic pipes, be careful they do not come in touch with mobile parts or they are not squeezed. Also be careful when the hob is put together with an oven. Make sure that the gas supply pressure of the appliance obeys the recommended values. 8.3 Injectors replacement 1. Remove the pan supports. 2. Remove the caps and crowns of the burner. 3.
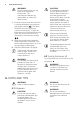
ENGLISH 8.4 Adjustment of minimum level To adjust the minimum level of the burners: 1. Light the burner. 2. Turn the knob on the minimum position. 3. Remove the knob. 4. With a thin screwdriver, adjust the bypass screw position (A for external crown and B for internal crown). A B 13 • Do not pull the mains cable to disconnect the appliance. Always pull the mains plug. • There is a risk of fire when the appliance is in connection with an extension cable, an adapter or a multiple connection.
www.electrolux.com 8.9 Possibilities for insertion A The panel installed below the hob must be easy to remove and let an easy access in case a technical assistance intervention is necessary. Kitchen unit with door 10 mm 86 mm 3 mm 30 mm 86 mm A 60 mm min 20 mm (max 150 mm) A B A) Removable panel B) Space for connections B A) supplied seal B) supplied brackets CAUTION! Install the appliance only on a worktop with flat surface.
ENGLISH BURNER Ø BYPASS 1/100 mm Dual (external crown) 57 Rapid 42 Semi-rapid 32 Auxiliary 28 15 9.3 Other technical data Gas original: G20 (2H) 20 mbar = 13 kW TOTAL POWER: Gas replacement: G30 (3+) 28-30 mbar = 902 g/h G31 (3+) 37 mbar = 886 g/h Electric supply: 230 V ~ 50 Hz Appliance category: II2H3+ Gas connection: G 1/2" Appliance class: 3 9.
www.electrolux.com 10. ENERGY EFFICIENCY 10.1 Product information according to EU 66/2014 Model identification PX780UOV Type of hob Built-in hob Number of gas burners 5 Energy efficiency per gas burner (EE gas burner) Left rear - Semi-rapid 52.2% Right rear - Rapid 55.6% Centre middle - Dual 52.0% Left front - Semi-rapid 52.2% Right front - Auxiliary not applicable Energy efficiency for the gas hob (EE gas hob) 53.
ENGLISH 17
www.electrolux.
ENGLISH 19
867315355-A-432014 www.electrolux.