TT 993 ................................................ .............................................
www.electrolux.com CONTENTS 1. 2. 3. 4. 5. 6. 7. 8. 9. 10. 11. SAFETY INSTRUCTIONS . . . . . . . . . . . . . . . . . . . . . . . . . . . . . . . . . . . . . . . . . . . . . . . . . . 3 PRODUCT DESCRIPTION . . . . . . . . . . . . . . . . . . . . . . . . . . . . . . . . . . . . . . . . . . . . . . . . . 5 CONTROL PANEL . . . . . . . . . . . . . . . . . . . . . . . . . . . . . . . . . . . . . . . . . . . . . . . . . . . . . . . 5 PROGRAMMES . . . . . . . . . . . . . . . . . . . . . . . . . . . . . . . . .
ENGLISH 1. 3 SAFETY INSTRUCTIONS Before the installation and use of the appliance, carefully read the supplied instructions. The manufacturer is not responsible if an incorrect installation and use causes injuries and damages. Always keep the instructions with the appliance for future reference. 1.1 Children and vulnerable people safety WARNING! Risk of suffocation, injury or permanent disability.
www.electrolux.com from the mains socket. Contact the Service to replace the water inlet hose. 1.3 Use • This appliance is intended to be used in household and similar applications such as: – Staff kitchen areas in shops, offices and other working environments – Farm houses – By clients in hotels, motels and other residential type environments – Bed and breakfast type environments. WARNING! Risk of injury, burns, electrical shock or fire. • Do not change the specification of this appliance.
ENGLISH 2. PRODUCT DESCRIPTION 2 1 11 10 8 9 7 6 3 5 4 1 Upper spray arm 7 Rinse aid dispenser 2 Lower spray arm 8 Detergent dispenser 3 Filters 4 Rating plate 9 Cutlery basket 10 Lower basket 5 Salt container 11 Upper basket 6 Water hardness dial 3. CONTROL PANEL 1 2 Auto Off 3 Delay 4 Program.
www.electrolux.com 4.
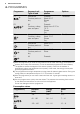
ENGLISH Programme1) Duration (min) Energy (kWh) Water (l) P4 55 - 65 1.0 - 1.2 10 - 11 P5 30 0.8 9 P6 14 0.1 4 7 1) The pressure and the temperature of the water, the variations of the mains supply, the options and the quantity of dishes can change the values. Information for test institutes For all the necessary information for test performance. send an email to: info.test@dishwasher-production.com Write down the product number (PNC) that is on the rating plate. 5.
www.electrolux.com 5.3 Multitab Activate this option only when you use the combi detergent tablets. This option deactivates the use of rinse aid and salt. The related indicators stay off. The programme duration can increase. How to activate the Multitab option 1. Press Multitab, the related indicator comes on. If you stop to use the combi detergent tablets, before you start to use separately detergent, rinse aid and dishwasher salt, do these steps: 1. Set the water softener to the highest level. 2.
ENGLISH 9 6.1 Adjusting the water softener Water softener adjustment Water hardness German degrees (°dH) French degrees (°fH) mmol/l Clarke degrees Manual Electronic 47 - 50 84 - 90 8.4. - 9.0 58 - 63 2 1) 10 43 - 46 76 - 83 7.6 - 8.3 53 - 57 2 1) 9 37 - 42 65 - 75 6.5 - 7.5 46 - 52 21) 8 29 - 36 51 - 64 5.1 - 6.4 36 - 45 21) 7 23 - 28 40 - 50 4.0 - 5.0 28 - 35 21) 6 19 - 22 33 - 39 3.3 - 3.9 23 - 27 21) 51) 15 - 18 26 - 32 2.6 - 3.
www.electrolux.com 6.2 Filling the salt container 1. 2. 3. 4. 5. Turn the cap counterclockwise and open the salt container. Put 1 litre of water in the salt container (only for the first time). Fill the salt container with dishwasher salt. Remove the salt around the opening of the salt container. Turn the cap clockwise to close the salt container. CAUTION! Water and salt can come out from the salt container when you fill it. Risk of corrosion.
ENGLISH 11 7.1 Using the detergent A 1. B 2. 30 3. MAX 4 + 32 - 1 20 C 4. 5. 7.2 Setting and starting a programme The Auto Off function To decrease the energy consumption, this function automatically deactivates the appliance a few minutes after: • You have not closed the door to start the programme. • The programme is completed. Setting mode For some settings it is necessary that the appliance is in setting mode.
www.electrolux.com Cancelling the programme Press Cancella. The display shows programme P1. Make sure that there is detergent in the detergent dispenser before you start a new programme. At the end of the programme When the programme is completed, the display shows 0:00. 1. Press the on/off button or wait for the Auto Off function to automatically deactivate the appliance. 2. Close the water tap. Important • Let the dishes become cold before you remove them from the appliance.
ENGLISH • Make sure that the spray arms can move freely before you start a programme. 8.4 Before starting a programme Make sure that: • The filters are clean and correctly installed. • The spray arms are not clogged. 13 • The position of the items in the baskets is correct. • The programme is applicable for the type of load and for the degree of soil. • The correct quantity of detergent is used. • There is dishwasher salt and rinse aid (unless you use combi detergent tablets).
www.electrolux.com 6. 7. Make sure that the filter (B) is correctly positioned under the 2 guides (C). Assemble the filter (A) and put it back in filter (B). Turn it clockwise until it locks. An incorrect position of the filters can cause bad washing results and damage to the appliance. 9.2 Cleaning the spray arms 9.4 Internal cleaning Do not remove the spray arms. If the holes in the spray arms are clogged, remove remaining parts of soil with a thin pointed object.
ENGLISH Problem 15 Possible solution Make sure that the pressure of the water supply is not too low. For this information, contact your local water authority. Make sure that the water tap is not clogged. Make sure that the filter in the inlet hose is not clogged. Make sure that the inlet hose has no kinks or bends. The appliance does not drain the water. Make sure that the sink spigot is not clogged. Make sure that the drain hose has no kinks or bends. The anti-flood device is on.
www.electrolux.com 6. Adjust the released quantity of rinse aid. 7. Fill the rinse aid dispenser. 11. TECHNICAL INFORMATION Dimensions Width / Height / Depth (mm) Electrical connection Refer to the rating plate. Voltage 596 / 818 - 898 / 550 220-240 V Frequency 50 Hz Water supply pressure Min. / max. (bar / MPa) (0.5 / 0.05 ) / (8 / 0.8 ) Water supply 1) Cold water or hot water2) Capacity Place settings 12 Power consumption Left-on mode 0.10 W Off-mode 0.10 W max.
ENGLISH 17
www.electrolux.
ENGLISH 19
117910570-A-482012 www.electrolux.