Use & Care Guide 18”Built-In Dishwasher (675000610595 & 2011/05)
Finding Information Table of Contents Finding Information ...................................... 2 Make a Record for Future use .................... 2 Internet ....................................................... 2 Table of Contents ....................................... 2 Safety ............................................................. 3 Important Safety Instructions .................... 3 Questions? .....................................................3 Feature Overview ........................
Safety Important Safety Instructions Please read all safety instructions before using your new Electrolux dishwasher. This symbol will help alert you to such dangers as personal injury, burns, fire, and electrical shock. • Read all instructions before using your dishwasher. • Use your dishwasher only as instructed in this Use and Care Manual. • This manual does not cover every possible condition and situation that may occur.
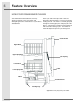
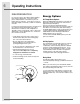
Feature Overview HOW YOUR DISHWASHER CLEANS Your dishwasher illustrated below, cleans by spraying a mixture of hot, clean water, and detergent against the soiled surfaces of your dishes and tableware. Each cycle starts with a pre-drain. Next, the dishwasher fills with water to a level even with the heating element. This water is constantly pumped through the rotating spray arm and sprayed on the dishes. Soiled water is pumped out and replaced with clean water during a cycle.
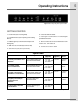
Operating Instructions Appearance may vary from your model. GETTING STARTED 1. Check Filter (See Cleaning Filter) 6. Select desired OPTIONS. 2. Load dishwasher (See Preparing and Loading Dishes). 7. See Page 11 for instructions on connecting the portable dishwasher. 3. Add detergent (See Dishwasher Dispenser & Detergents). 8. Run hot water faucet nearest dishwasher until water is hot. Turn water off. 4. Add rinse aid, if needed (See Rinse Aid). 9. To Start, close door to latch. 5.
Operating Instructions DISH PREPARATION It is not necessary to rinse dishes before putting them into the dishwasher. Just remove large pieces and quantities of food, bones, pits, etc. Empty glasses and cups. It may be necessary to presoak or lightly scour firmly cooked-on or bakedon foods. Food such as mustard, mayonnaise, vinegar, lemon juice and tomato-based products may cause discoloration of stainless steel and plastics if allowed to sit for a long period of time.
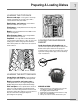
Preparing & Loading Dishes LOADING THE TOP RACK Glasses and cups—Place glasses and cups against outside pins at an angle. Cups with a concave bottom will collect water. Small plates and saucers—Place dishes between middle two rows of pins. Plasticware—Load plasticware in the top rack to avoid melting. Bowls—Place bowls between the middle 2 rows of pins facing down. Miscellaneous items—Place long handled knives and utensils in top rack.
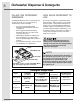
Dishwasher Dispenser & Detergents FILLING THE DETERGENT DISPENSER HOW MUCH DETERGENT TO USE The detergent dispenser has one main wash and one pre-wash cup. The covered cups open automatically to release detergent. The amount of detergent to use depends on the water hardness. Water hardness is measured in grains per gallon. Using too little detergent can result in poor cleaning and hard water filming or spotting. Using too much detergent in sof water can cause a permanent film called etching.
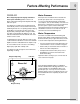
Factors Affecting Performance RINSE AID Water Pressure Rinse aid greatly improves drying and reduces water spots and filming. Water “sheets” off dishes rather than forming water droplets that cling and leave spots. Water pressure should be between 20 and 120 pounds per square inch. Low water pressure occurs most often during periods of high water consumption, such as when laundry or showers are being done.
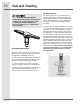
Care and Cleaning Cleaning the Filter Property Damage Hazard Freezing temperatures may cause water lines to rupture. Be sure all supply lines to and circulating lines within dishwasher are protected. Failure to do so could result in property damage. Cleaning the Spray Arm The spray arm may need to be cleaned to insure that there are no clogs to the spray arm jets and bearings due to hard water chemicals.
Care & Cleaning 11 WINTERIZING Burn Hazard Allow heating element to cool before cleaning the interior. Failure to do so can result in burns. Outside—Occasionally wash with a mild nonabrasive detergent and water. Rinse and dry. Inside—The inside of the dishwasher is selfcleaning with normal use. To clean stainless steel wipe with the grains. Use a Dishwasher Safe Detergent to help with the stains or discolorations.
The portable dishwasher must be connected to a faucet and electrical outlet each time it is used. Follow directions on this page to properly connect dishwasher. IMPORTANT: Make sure door is latched before moving Faucet Adapter Assembly dishwasher. (Figure A) The power cord and faucet coupler with hoses are located in a compartment in back of dishwasher. A special adapter must be installed on faucet before you can connect dishwasher (Figure A). 1. Remove faucet adapter assembly from literature package.
Solutions to Common Problems Dishes not clean—Check pages 4 to 8 for information on correct wash cycle, proper loading, water temperature, water pressure, hard water, amount of detergent, old and ineffective detergent, and dish placement. To maximize wash performance clean the filter of all large food particles after each wash. To ensure that you clean the filter correctly refer to page 12. Dishes not drying can be greatly improved by using a rinse aid and hot water.
Do not place silver next to or touching Troubleshooting stainless steel utensils in dishwasher silverware basket. This can cause pitting of stainless steel blades. (Most silver knives have stainless steel blades. Do not let blades touch other stainless steel utensils during wash cycle.) Before calling for service, review this list. It may save you both time and expense. This list includes common experiences that are not the result of defective workmanship or material.
Warranty Information Your appliance is covered by a one year limited warranty. For one year from your original date of purchase, Electrolux will repair or replace any parts of this appliance that prove to be defective in materials or workmanship when such appliance is installed, used, and maintained in accordance with the provided instructions. The stainless tub and door liner of your appliance are covered by a lifetime limited warranty.