S75348KG5 User manual Fridge-Freezer
Contents Thank you for choosing one of our high-quality products. To ensure optimal and regular performance of your appliance please read this instruction manual carefully. It will enable you to navigate all processes perfectly and most efficiently. To refer to this manual any time you need to, we recommend you to keep it in a safe place. And please pass it to any future owner of the appliance. We wish you much joy with your new appliance.
Safety information 3 the appliance are thoroughly familiar with its operation and safety features. Save these instructions and make sure that they remain with the appliance if it is moved or sold, so that everyone using it through its life will be properly informed on appliance use and safety. For the safety of life and property keep the precautions of these user's instructions as the manufacturer is not responsible for damages caused by omission.
Safety information • • • • 2. Make sure that the power plug is not squashed or damaged by the back of the appliance. A squashed or damaged power plug may overheat and cause a fire. 3. Make sure that you can come to the mains plug of the appliance. 4. Do not pull the mains cable. 5. If the power plug socket is loose, do not insert the power plug. There is a risk of electric shock or fire. 6. You must not operate the appliance without the lamp cover1) of interior lighting. This appliance is heavy.
Control panel 5 • Adequate air circulation should be around the appliance, lacking this leads to overheating. To achieve sufficient ventilation follow the instructions relevant to installation. • Wherever possible the back of the product should be against a wall to avoid touching or catching warm parts (compressor, condenser) to prevent possible burn. • The appliance must not be located close to radiators or cookers. • Make sure that the mains plug is accessible after the installation of the appliance.
Control panel 12 13 14 15 Freezer temperature indicator Freezer temperature regulator, - button Alarm reset button Alarm indicator Switching on 1. Insert the plug into the mains socket. 2. Set ON/OFF switch to ON. 3. The alarm indicator light flashes since the temperature is reached. The acoustic alarm sounds. 4. Press the alarm reset button to reset the alarm. Switching off To switch the entire appliance off: 1. Set ON/OFF switch to OFF. 2. Disconnect the mains plug from the mains socket.
First use 7 1. press continuously the temperature regulator (+ button) until the letter "H" (Holiday) appears on the temperature indicator. The Holiday function sets the temperature approx +15°C. The refrigerator is in the energy-saving mode. To deactivate the function: 1. set the required temperature by pressing the fridge temperature regulator.
Daily use In the event of accidental defrosting, for example due to a power failure, if the power has been off for longer than the value shown in the technical characteristics chart under "rising time", the defrosted food must be consumed quickly or cooked immediately and then re-frozen (after cooling). Thawing Deep-frozen or frozen food, prior to being used, can be thawed in the refrigerator compartment or at room temperature, depending on the time available for this operation.
Daily use Vegetable Drawer The drawer is suitable for storing fruit and vegetables. There is a separator inside the drawer that can be placed in different positions to allow for the subdivision best suited to personal needs. There is a grille (if foreseen) on the bottom of the drawer to separate the fruit and vegetables from any humidity that may form on the bottom surface.
Helpful hints and tips Removal of freezing baskets from the freezer 2 2 1 1 The freezing baskets have a limit stop to prevent their accidental removal or falling out. At the time of its removal from the freezer, pull the basket towards yourself and, upon reaching the end point, remove the basket by tilting its front upwards. At the time of putting it back, slightly lift the front of the basket to insert it into the freezer. Once you are over the end points, push the baskets back in their position.
Care and cleaning 11 Hints for refrigeration Useful hints: Meat (all types) : wrap in polythene bags and place on the glass shelf above the vegetable drawer. For safety, store in this way only one or two days at the most. Cooked foods, cold dishes, etc..: these should be covered and may be placed on any shelf. Fruit and vegetables: these should be thoroughly cleaned and placed in the special drawer(s) provided.
Care and cleaning This appliance contains hydrocarbons in its cooling unit; maintenance and recharging must therefore only be carried out by authorized technicians. Periodic cleaning The equipment has to be cleaned regularly: • clean the inside and accessories with lukewarm water and some neutral soap. • regularly check the door seals and wipe clean to ensure they are clean and free from debris. • rinse and dry thoroughly. Do not pull, move or damage any pipes and/or cables inside the cabinet.
What to do if… 13 Defrosting of the freezer The freezer compartment of this model, on the other hand, is a "no frost" type. This means that there is no buildup of frost when it is in operation, neither on the internal walls nor on the foods. The absence of frost is due to the continuous circulation of cold air inside the compartment, driven by an automatically controlled fan. WHAT TO DO IF… CAUTION! Before troubleshooting, disconnect the power supply.
What to do if… Problem Possible cause Solution Water flows on the ground. The melting water outlet does Attach the melting water outlet not flow in the evaporative tray to the evaporative tray. above the compressor. There is too much frost and ice. Products are not wrapped prop- Wrap the products better. erly. The door is not closed correctly. Refer to "Closing the door". The Temperature regulator may be set incorrectly. The temperature in the appliance is too high. Set a higher temperature.
Technical data 15 Closing the door 1. Clean the door gaskets. 2. If necessary, adjust the door. Refer to "Installation". 3. If necessary, replace the defective door gaskets. Contact the Service Center. TECHNICAL DATA Dimension Height 1850 mm Width 595 mm Depth 648 mm Rising Time 18 h The technical information are situated in the rating plate on the internal left side of the appliance and in the energy label.
Installation B A 20 mm The appliance should be installed well away from sources of heat such as radiators, boilers, direct sunlight etc. Ensure that air can circulate freely around the back of the cabinet. To ensure best performance, if the appliance is positioned below an overhanging wall unit, the minimum distance between the top of the cabinet and the wall unit must be at least 100 mm . Ideally, however, the appliance should not be positioned below overhanging wall units.
Installation 3 Brown: Live 5 Blue: Neutral 17 As the colours of the wires in the mains lead of this appliance may not correspond with the coloured markings identifying the terminals in your plug, proceed as follows: 1. Connect the wire coloured green and yellow to the terminal marked either with the letter “E“ or by the earth symbol or coloured green and yellow. 2. Connect the wire coloured blue to the terminal either marked with the letter “N“ or coloured black. 3.
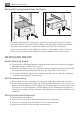
Installation Levelling When placing the appliance ensure that it stands level. This can be achieved by two adjustable feet at the bottom in front. Removing the shelf holders Your appliance is equipped with shelf retainers that make it possible to secure the shelves during transportation. To remove them proceed as follows: 1. Move the shelf holders in the direction of the arrow (A). 2. Raise the shelf from the rear and push it forward until it is freed (B). 3. Remove the retainers (C).
Installation 1. 2. 3. 4. 5. Open the doors. Unscrew the middle hinge (m2). Remove the plastic spacer (m1). Remove the spacer (m6) and move to the other side of the hinge pivot (m5). Remove the doors. Remove the left-hand cover pin of the middle hinge (m3,m4) and move to the other side. Fit the pin of the middle hinge (m5) into the left-hand hole of the lower door. m1 m5 m3 6. 7. 19 m2 m6 m4 Remove using a tool the cover (b1).
Environmental concerns 10. Remove the handle. Unscrew the top handle bracket from the handle rod (h1). Unscrew the bottom handle bracket from the door (h2) Unscrew the top handle bracket from the door (h3). h1 h2 h3 11. Install the handle in the opposite side. h4 h5 h6 Re-screw the handle bracket on the door (h4). Turn the handle bracket with the handle and screw them to the door (h5) and the fitted handle bracket (h6). 12. Re-insert the lower door on the lower hinge pivot (b2). 13.
210621236-11052010 925033134 www.aeg-electrolux.