Installation Instructions 30” Free-Standing Gas Range Instructions d’installation Cuisinière à gaz autonome de 76,2 cm (30 po) 316469105 Rev B
Anchor
INSTALLATION INSTRUCTIONS FOR FREESTANDING GAS RANGE INSTALLATION AND SERVICE MUST BE PERFORMED BY A QUALIFIED INSTALLER. IMPORTANT: SAVE FOR LOCAL ELECTRICAL INSPECTOR'S USE. READ AND SAVE THESE INSTRUCTIONS FOR FUTURE REFERENCE. If the information in this manual is not followed exactly, a fire or explosion may result causing property damage, personal injury or death. FOR YOUR SAFETY: — Do not store or use gasoline or other flammable vapors and liquids in the vicinity of this or any other appliance.
INSTALLATION INSTRUCTIONS FOR FREESTANDING GAS RANGE Important Notes to the Installer 1. Read all instructions contained in these installation instructions before installing range. 2. Remove all packing material from the oven compartments before connecting the gas and electrical supply to the range. 3. Observe all governing codes and ordinances. 4. Be sure to leave these instructions with the consumer. Important Note to the Consumer 1.
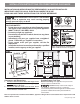
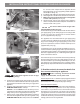
INSTALLATION INSTRUCTIONS FOR FREESTANDING GAS RANGE A. Locate the Bracket Using the Template - (Bracket may be located on either the left or right side of the appliance. Use the information below to locate the bracket if template is not available). Mark the floor or wall where left or right side of the range will be located. If rear of appliance is against the wall or no further than 1-1/4" from wall when installed, you may use the wall or floor mount method.
INSTALLATION INSTRUCTIONS FOR FREESTANDING GAS RANGE C. Level & Position Appliance - Level appliance by adjusting the (4) leveling legs with a wrench. NOTE: A minimum clearance of 1/8" is required between the bottom of the appliance and the leveling leg to allow room for the bracket. Use a spirit level to check your adjustments. Slide appliance back into position. Visually check that rear leveling leg is inserted into and fully secured by the Anti-Tip Bracket by removing lower panel or storage drawer.
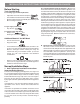
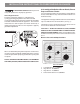
INSTALLATION INSTRUCTIONS FOR FREESTANDING GAS RANGE the 1/2" flare union adapter with an adjustable wrench before tightening the gas supply fitting and/or appliance conduit (Refer to Fig. 4e). d) Install flare union adapter to external manual shut-off valve. e) Attach appliance conduit to flare union on shut-off valve. f) Make sure service shut-off valve on pressure regulator is in the "ON" position (See Fig. 4f). g) Check for leaks.
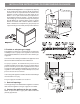
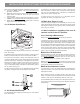
INSTALLATION INSTRUCTIONS FOR FREESTANDING GAS RANGE 6. Assembly of the Surface Burner Heads, Burner Caps and Burner Grates: PLEASE READ CAREFULLY! For personal safety, this product must be properly grounded. It is very important to make sure that all of the Surface Burner Heads, Surface Burner Caps and Surface Burner Grates are installed correctly.
INSTALLATION INSTRUCTIONS FOR FREESTANDING GAS RANGE Test to verify if “LO or LOW” setting should be adjusted (right front position ONLY): REMEMBER — DO NOT ALLOW SPILLS, FOOD, CLEANING AGENTS OR ANY OTHER MATERIAL TO ENTER THE GAS ORIFICE HOLDER OPENING. Always keep the Burner Caps and Burner Heads in place whenever the surface burners are in use. 7.
INSTALLATION INSTRUCTIONS FOR FREESTANDING GAS RANGE After removing all packing materials and literature from the oven: a) Set oven to BAKE at 300ºF. See Use & Care Manual for operating instructions. b) Within 60 seconds the oven burner should ignite. Check for proper flame and allow the burner to cycle once. Reset controls to OFF. c) If your model is equipped with a waist-high broiler, set oven to BROIL. See Use & Care Manual for operating instructions. d) Within 60 seconds the broil burner should ignite.
Anchor