.................................................................. ..................................................................
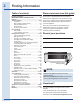
Finding Information Table of contents Finding information .................................................. 2 IMPORTANT SAFETY INSTRUCTIONS ................. 3-6 Features ..................................................................... 7 Surface Cooking ................................................... 8-10 • Cookware ............................................................. 8 • Before setting surface burners .......................... 8-9 • Setting surface burners ...........................
IMPORTANT SAFETY INSTRUCTIONS Recognize safety symbols, words and labels Safety items throughout this manual are labeled with a WARNING or CAUTION based on the risk type as described below: WARNING This symbol alerts you to situations that may cause serious body harm, death or property damage. CAUTION This symbol alerts you to situations that may cause bodily injury or property damage.
IMPORTANT SAFETY INSTRUCTIONS • Remove all tape and packaging before using the range. Destroy the carton and plastic bags after unpacking the range. Never allow children to play with packaging material. • Proper Installation—Be sure your appliance is properly installed and grounded by a qualified technician in accordance with the National Fuel Gas Code ANSI Z223- latest edition, or in Canada CAN/CGA B149.1 and CAN/GGA B149.2, and the National Electrical Code ANSI/NFPA No.
IMPORTANT SAFETY INSTRUCTIONS Important instructions for using your cooktop WARNING Use Proper Flame Size—Adjust flame size so it does not extend beyond the edge of the utensil. The use of undersized utensils will expose a portion of the burner flame to direct contact and may result in ignition of clothing. Proper relationship of utensil to flame will also improve efficiency. • Know which knob controls each surface burner.
IMPORTANT SAFETY INSTRUCTIONS Important cleaning instructions • Clean the range regularly to keep all parts free of grease that could catch fire. Pay particular attention to the area underneath each surface element. Do not allow grease to accumulate. • Kitchen cleaners and aerosols—Always follow the manufacturer’s recommended directions for use. Be aware that excess residue from cleaners and aerosols may ignite causing damage and injury.
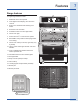
Features Range features 2 Your gas range features include: 1. Membrane touch control panel 1 2. Oven digital control display, timer and oven controls 3. Sure-2-fit™ cobalt blue self-cleaning oven interior 14 4. Self-clean oven door latch 5. Automatic interior oven door light switch 4 5 3 6. Interior oven light 6 7. Perfect-Convect3™ convection fan system 7 8. Extendable Luxury-Glide™ telescoping interior oven rack(s) 9. Interior oven racks (not shown, types may vary by model) 11 12 11.
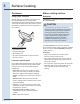
Surface Cooking Cookware Using proper cookware The size and type of cookware used will influence the setting needed for best cooking results. Cookware should have flat bottoms that make good contact with the entire burner grate surface. Check for flatness by rotating a ruler across the bottom of the cookware.
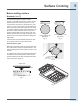
Surface Cooking Before setting surface burners (con’t) On round style burners, the burner cap lip (Figure 1,) should fit snug into the center of burner head and rest level. Refer to Figures 2 and 3 for correct and incorrect burner cap placement. Once in place, you may check the fit by gently sliding the burner cap from side to side (Figure 4) to be sure it is centered and firmly seated. When the burner cap lip makes contact inside the center of the burner head you will be able to hear the burner cap click.
Surface Cooking Setting surface burners Surface burner positions 1. Push the desired gas surface control knob in and turn counterclockwise out of the OFF position (Figure 1). 2. Turn knob to (lite) position. Visually check 2 that the needed burner has lit. 5 3. To adjust, turn counterclockwise to a flame size setting that best fits your need. 3 1 1 4 2 3 4 5 1. Standard burner -9.5K BTU- best for most surface cooking requirements. Fig.
Oven Cooking Oven racks CAUTION Always use potholders or oven mitts when removing food or adjusting the oven racks. Wait until the oven has completely cooled if possible. Oven racks may be HOT and may cause burns. Air circulation in the oven For best air circulation when baking, allow a space of 2-4 inches (5-10 cm) around the cookware for proper air circulation. Be sure pans and cookware do not touch each other, the oven door, sides or back of the oven cavity.
Oven Cooking Luxury Glide™ oven racks IMPORTANT Remove ALL oven racks before starting a selfclean cycle. If oven racks are left inside the oven during a cleaning cycle, the slide ability of the Luxury-Glide™ oven racks may be damaged and all of the oven racks will lose their shiny finish. Clean oven racks according to the instructions provided in the Care & Cleaning section. The fully extendable Luxury-Glide™ rack makes food preparation easier.
Setting Oven Controls Oven control display and keys 10 2 1 3 5 4 6 11 8 7 9 18 13 12 15 14 17 16 1. 2. 3. 4. 5. 6. 7. 8. 9. 10. Bake Broil Fast Preheat Convection Bake Convection Roast Convection Convert Keep Warm Slow Cook My Favorite Oven display 11. 12. 13. 14. 15. 16. 17. 18. 19. 20. 19 Cook Time End Time Set Clock Oven Timer Control Lock Oven Light Self-clean Numeric Key Pad Start Cancel Minimum & maximum control settings Max.
Setting Oven Controls Setting the clock Changing clock display mode When the appliance is powered up for the first time or when the electric supply to the appliance has been interrupted, the display will flash "12:00" (Figure 1). The oven control is factory preset to display the time of day with a 12-hour clock setting. The display can be changed to provide the time of day using a 24-hour clock display or the clock display may be turned OFF.
Setting Oven Controls Changing oven temperature display mode (°F or °C) The oven control is factory preset to display oven temperatures with Fahrenheit (°F) values. The control may be changed to display either Fahrenheit or Celsius (°C) temperatures. To change the temperature display mode: Changing between 12-Hour Energy Saving or continuous bake mode settings The oven control is factory preset for a 12-Hour Energy Saving mode.
Setting Oven Controls Adjusting tone volume Oven control lock A tone will sound when a key is pressed and at the end of a cycle (timer, cook time or end time). The factory audio setting is preset to the highest level (5). The control may be adjusted for lower levels 1 through 5, or OFF. The control lock will lock the oven controls and the oven door. This feature does not lock the cooktop controls. Examples Step To adjust audio tone level: Example Step Press 1.
Setting Oven Controls Timer The timer may be used to help time cooking or food preparation times without interfering with any active cooking process. When the timer countdown reaches less than 1 minute, the display will show time remaining in seconds. When the time runs out the timer will beep, "End" will flash in the display. Timer settings: • Minimum set time: 1 minute • Maximum set time: 11 hours 59 minutes How to set the timer for 5 minutes: Example Step Press 1.Press timer on-off. 2.
Setting Oven Controls Fast preheat Use the fast preheat option for single rack baking to quickly bring the oven to baking temperature. The fast preheat option must be set using the bake or conv bake feature. Fast preheat may be set with cook time or cook time with an end time.
Setting Oven Controls Bake Use bake to cook most food items that require normal cooking temperatures. Bake may be set with the following options: • Fast preheat • Cook time and Cook time with end time setting To set bake with the oven temperature set for 425°F/ 218°C ): Example Step Press The following oven temperature settings apply to the bake feature: 1. Press bake • Factory default bake setting: 350°F/176°C 2. Enter 4 2 5 using numeric keypad • Minimum bake setting: 170°F / 77°C • Max.
Setting Oven Controls Bake (cont’d) For best results • Fully preheat the oven before baking items like cookies, biscuits and breads. • When using any single rack, position the rack so that the food is in the center of the oven. • For best results when baking cakes using 2 oven racks, place the Luxury Glide™ rack in position 4 and a flat rack in position 2 (Figure 1). • If using two flat racks, place racks in positions 2 and 5 (Figure 1).
Setting Oven Controls Cook time The cook time feature is used when a recipe calls for a specific temperature and cook time. Following the recipe’s suggested cook time can help ensure the best possible results. The maximum cook time setting is 11 hours, 59 minutes. Cook time instructions may be set with the following features: When the cook time runs out: "End" will appear in the display window and the oven will shut-off automatically (Figure 2).
Setting Oven Controls Setting cook time with end time Adding a cook time with a specific end time gives the same benefits as the cook time option in addition to controlling exactly when the cooking process will begin and end. Cook time and end time instructions may be set with the following features: Fig. 1 • Slow cook Once START is pressed, the oven will calculate the delayed start time. Once the delayed start time has passed, the oven will automatically turn on and heat to the set temperature.
Setting Oven Controls Broil Use the broil feature to cook meats that require direct exposure to radiant heat for optimum browning results. To set broil with the factory default temperature setting of 550°F / 288°C: Example The following oven temperature settings apply to the broil feature: Step • Factory default temperature: 550°F / 288°C 1. Place the broiler insert on the broiler pan, then place the meat on the insert. Remember to follow all warnings and cautions. • Min.
Setting Oven Controls Broil (con’t) The broil pan insert has slots that allow grease and fat from the meat to drain into the broil pan. Place prepared meat on broil pan insert and then place onto broiler pan as shown in Figure 1. 6 Recommended broiling times 5 Use the broiling table (Figure 3) for approximate recommended broiling times for the types of meats listed. Increase or decrease broiling times, or move the broiling pan to a different rack position to suit for doneness.
Setting Oven Controls Conv bake To set conv bake with the factory default temperature setting of 350°F (176°C): Example 6 5 4 3 2 1 Fig. 1 Convection (conv) bake uses a fan to circulate the oven heat evenly and continuously (Figure 1). The improved heat distribution allows for even cooking with excellent results. Multiple rack cooking may slightly increase cook times for some food types, but the overall result will be time saved.
Setting Oven Controls Conv bake (cont’d) For best results • Fully preheat the oven before baking items like cookies, biscuits and breads. 6 • When using any single rack, position the rack so that the food is in the center of the oven. 5 • For best results when baking cakes using 2 oven racks, place racks in positions 2 and 4 (Figure 1). Use the Luxury Glide™ rack in position 4. • If using two flat racks, place racks in positions 2 and 5 (Figure 1).
Setting Oven Controls Conv convert The convection (conv) convert feature allows you to convert any normal baking recipe into a convection bake recipe. The control uses the normal recipe settings and adjusts to a lower temperature for convection baking. Conv convert must be used with conv bake. Conv convert may be set with cook or end time instructions. Benefits of conv convert: To set conv convert for 30 minutes with a temperature setting of 375°F (191°C): Example Step Press 1. Press cook time.
Setting Oven Controls Conv roast To set conv roast with the factory default oven temperature setting of 350°F (176°C): 6 5 4 Example Step Press 1. Press conv roast. 3 2 1 Fig. 1 2. Press START When activated, the control display will show "CONV ROAST" and the oven will begin heating.
Setting Oven Controls Conv roast (cont’d) When preparing meats for conv roast, you should use the broiler pan and insert. The broiler pan will catch grease spills and the insert will help prevent grease splatters. Insert 1. Place oven rack on bottom or next to the bottom oven rack position. 2. Place the insert on the broiler pan. 3. Be sure the insert is securely seated on top of the broiler pan. Do not use the broiler pan without the insert. Do not cover the insert with aluminum foil. Broil pan 4.
Setting Oven Controls Keep warm Use the keep warm feature to keep hot foods warm. Keep warm may be set with the following options: To set keep warm with a setting of 150ºF: Example • Cook time Step • Cook time with end time The following temperature settings apply to the keep warm feature: Press 1.
Setting Oven Controls Slow cook The slow cook feature is used to cook foods slowly using lower temperatures. The cooking results will be much like that of a slow cooker. This feature is ideal when roasting beef, pork or poultry.
Setting Oven Controls My favorite The my favorite feature may be used to store and recall a favorite recipe setting. This feature will only store or recall one favorite recipe at a time. To use a saved favorite recipe setting: Example My favorite feature may be used with bake, cook time, conv bake, conv roast and keep warm cooking features. This feature will not work with any other feature including end time, broil or self clean.
Setting Oven Controls Adjusting the oven temperature Your appliance has been factory calibrated and tested to ensure accurate baking temperatures. For the first few uses, follow your recipe times and temperature recommendations carefully. If you think the oven is cooking too hot or too cool for your recipe times, the control may be adjusted so the oven cooks hotter or cooler than the temperature displayed.
Setting Oven Controls Sabbath mode (for use on the Jewish Sabbath & Holidays) For further assistance, guidelines for proper usage and a complete list of models with the Sabbath feature, please vist the web at http:\\www.star-k.org. This appliance provides special settings for use when observing the Jewish Sabbath/Holidays. Sabbath mode disables all audible tones or visual display changes on the oven control. BAKE and cooktop heating are the only cooking features available while in the Sabbath mode.
Setting Oven Controls Canceling Sabbath mode To cancel Sabbath mode: Example Step Press Press and hold both the cook time and end time keys for 3 seconds. A beep will sound. Release the keys. + All previously-set features in the oven will automatically cancel once Sabbath mode has ended. NOTES • The only keys available once the range is set to Sabbath mode are: • You may change the oven temperature once baking has started. 1. Press bake. 2. Enter the desired temperature. 3. Press START.
Setting Oven Controls Restoring control to factory default settings Your appliance is set with a number of predetermined oven control settings. Over time, you may make changes to the original factory settings. Interior oven light The interior oven light will automatically turn ON when the oven door is opened.
Self-Clean Before starting self-clean Adhere to the following precautions before starting a self-clean cycle: • Remove all items from the oven and cooktop, including food, cookware, utensils, plastic and any aluminum foil. Aluminum foil will not withstand high temperatures generated during the self-clean cycle. • Remove all oven racks and accessories from the oven interior to avoid possible damage. If the oven racks are not removed they may discolor.
Self-clean Setting self-clean A self-cleaning oven automatically cleans itself using much higher temperatures than those used for cooking. The self-clean feature eliminates soils completely or reduces them to a fine powdered ash that you can later easily wipe away with a damp cloth. The self-clean function provides 3 different clean time settings for self-cleaning. Set clean for 2 hours for light, 3 hours for normal or 4 hours for heavier soils.
Self-clean Setting self-clean (cont’d) Setting delayed self-clean To cancel self-clean: You may wish to set your appliance to perform a self-clean cycle later (up to 12 hours later). The end time key will determine when the cleaning will stop. 1. Press thecancel key. 2. If the self-clean cycle has heated the oven to a high temperature, "Hot" (Figure 1) will show in the display. Allow enough time for the oven to cool and for the "door OPn" message to display (Figure 2).
Care and Cleaning Cleaning Recommendations Surface Type Cleaning Recommendation • Control knobs (some models) • Painted body parts • Painted decorative trim • Aluminum, plastic or vinyl trim For general cleaning, use hot, soapy water and a cloth. For more difficult soils and built-up grease, apply a liquid detergent directly onto soil. Leave on soil for 30-60 minutes. Rinse with a damp cloth and dry. Do not use abrasive cleaners these surfaces; they can scratch.
Care and Cleaning Cleaning cooktop and parts CAUTION • Do not remove any parts from the cooktop until they have completely cooled and are safe to handle. DO NOT attempt to clean the cooktop whenever the cooktop or burner heads are still hot. • To avoid possible burns DO NOT attempt to operate the surface burners without the burner caps. • Any additions, changes or conversions required in order for this appliance to satisfactorily meet the application needs must be made by an authorized qualified Agency.
Care and Cleaning Aluminum foil and oven liners Do not use oven bottom liners or use aluminum foil to cover the oven racks. CAUTION Protective liners—Do not use aluminum foil to line the oven bottom, except as suggested in the manual. Improper installation of these liners may result in a risk of electrical shock, or fire. Using a liner in the oven restricts the heat and air flow needed to obtain the best possible cooking results for any oven.
Care and Cleaning Removing the oven door CAUTION To prevent possible burns, do not attempt to remove the oven door until the oven has completely cooled. K LOC IMPORTANT The oven door is heavy. Be careful when removing and lifting the door. Do not lift the oven door by the handle. Fig. 2 1. Open oven door completely (Figure 1). 2. Pull the hinge locks on both left and right hinges down from the oven frame completely towards the oven door (Figure 2).
Care and Cleaning Replacing the oven door To replace oven door: 1. Firmly grasp both sides of oven door along the door sides (Do not use the oven door handle). about 10° 2. Holding the oven door at the same angle as the removal position (See “Removing the oven door” section), carefully line up and insert both door hinge arms between the pins located on each side of the oven door frame (Figure 1). oven door hinge 3. With both door hinge arms in place, open the oven door (Figure 2). 4.
Care and Cleaning Special door care instructions IMPORTANT Most oven doors contain glass that can break. Read the following recommendations: • Do not close the oven door until all the interior oven racks are fully inserted and retracted to the back of the oven. • Do not hit the glass with pots, pans, or any other object. The oven door glass may break or even break at a later time unexpectedly.
Solutions to Common Problems Before you call for service, review the following list. It may save you time & expense. The list includes common occurrences that are not the result of defective workmanship or materials in this appliance. Before you call Problem Solution Appliance is not level • Be sure floor is level, strong & stable enough to adequately support range. • If floor is sagging or sloping, contact a carpenter to correct the situation. • Poor installation. Place oven rack in center of oven.
Solutions to Common Problems Before you call Problem Solution Oven smokes excessively during broiling • Control not set properly. Follow broiling instructions under Setting Oven Controls. • Make sure oven door is opened to broil stop position. • Meat too close to the broil element. Reposition the broil rack to provide proper clearance between the meat & the element. Preheat the broil element for searing. • Meat not properly prepared. Remove excess fat from meat.
Solutions to Common Problems Before you Call Problem Solution Surface burners do not light • Surface control knob has not been completely turned to (lite). Push in and turn the surface control knob to lite until burner ignites and then turn control knob to desired flame size. • Burner ports are clogged. With the burners OFF, use a small-gauge wire or needle to clean ports. See “Cleaning cooktop and parts” in the Care and Cleaning section for complete instructions.
Notes 49
Notes
Major Appliance Warranty Information Your appliance is covered by a one year limited warranty. For one year from your original date of purchase, Electrolux will repair or replace any parts of this appliance that prove to be defective in materials or workmanship when such appliance is installed, used, and maintained in accordance with the provided instructions.
www.electrolux-store.