Electric Cookers - Rear Control User Guide and Installation Instructions
Rear control electric cookers Conditions of Use This appliance is intended to be used in household and similar applications such as: • Staff kitchen areas in shops, offices and other working environments • Farm houses • By clients in hotels, motels and other residential type environments • Bed and breakfast type environments. This appliance complies with the requirements of Australian Standard AS/NZ 60335.2.6 Read the following carefully to avoid an electric shock or fire.
Contents Installation 4 Controls 7 Understanding the cooker 13 Using the hotplates 14 Understanding the functions 15 Cooking guide for ovens 18 Get to know your oven 19 Handling baking & grilling problems 20 Clocks 21 Cleaning and caring for the cooker 23 Cleaning and caring for the oven 24 Solving problems 25 Warranty 27 The symbols you will see in this booklet have these meanings: warning WARNING Indicates information concerning your personal safety WARNING caution Indicates i
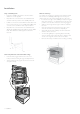
Installation This appliance must be installed by an authorised person in compliance with local municipal building codes and any other relevant statutory regulation. Wiring connections must be made in accordance with: New Zealand & Australian Requirements, including AS/NZS 3000 WIRING RULES Refer to data plate for rating information. The data plate is positioned on the bottom left corner of the oven front, viewable with the oven door open. The circuit diagram is positioned on the control panel back cover.
Installation 5mm Clearance min. 596mm 5mm Clearance min. Floor mounted Alternative Method 3 Anchors Minimum Installation dimensions IMPORTANT NOTICE warning Installers responsibility In ALL cases the anti-tilt bracket MUST be securely anchored to the floor with suitable fasteners, and the stability bolt fixed. Step 2: Fixing anti-tilt bracket Position the anti-tilt bracket so that it will fully engage into the slot at the rear of the cooker. The bracket is mounted centrally at the rear of the cooker.
Installation Step 3: Stability bolt • Fasten the stability bolt bracket to the front frame with the 2 screws supplied. • Reposition the cooker back into the anti-tilt bracket and then mark the position of the stability bolt hole. • Pull the cooker back out and drill the bolt location hole. Use a 6.5mm masonry or wood drill. When drilling into concrete ensure a minimum hole depth of 40mm. • Reposition the cooker back into the anti-tilt bracket, aligning the stability bolt bracket with the 6.
Controls warning General warnings and advice • The clock where fitted must be set before your oven will operate. • This appliance is not suitable for use by young children or infirm persons, without supervision. • Young children should be supervised to ensure they do not play with this appliance. • Accessible parts will become hot when in use. To avoid burns & scalds children should be kept away.
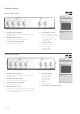
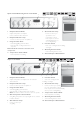
Controls (cont.) Mercury model 4U600 2 4 3 1 5 4 Oven Indicator Lamp • Comes on when you operate the oven temperature control knob. Cycles on and off automatically when you are cooking/baking. 5 Function Switch • Sets oven functions. Bake - with light Grill - with light Light - light only 1 Hotplate Control Knobs • Adjusts temperature of hotplate. Can be rotated in either direction. 2 Hotplate Indicator Lamp • Comes on when you turn a hotplate on.
Apollo model 4U606 and Gemini model 4U604 2 3 8 4 1 6 5 1 Hotplate Control Knobs • Adjusts temperature of hotplate. Can be rotated in either direction. 2 Hotplate Indicator Lamp • Comes on when you turn a hotplate on. 3 Programmable Clock • Sets baking/grilling reminder times. • Sets automatic cooking duration and stop time. Note: Clock time must be set before oven can operate. 4 Temperature Control Knob • Sets temperature for baking.
Controls (cont.) Jupiter model 4U609 2 3 5 7 7 1 4 6 5 Oven Indicator Lamp • Comes on when you operate the oven temperature control knob. Cycles on and off automatically when you are cooking/baking. 6 Function Switch • Sets oven functions. Bake - with light Grill - with light Light - light only 7 General Purpose Outlet Switch 1 Hotplate Control Knobs • Adjusts temperature of hotplate. Can be rotated in either direction. 2 Hotplate Indicator Lamp • Comes on when you turn a hotplate on.
Saturn model 4U613 2 3 5 8 8 1 4 6 7 5 Oven Indicator Lamp • Comes on when you operate the oven temperature control knob. Cycles on and off automatically when you are cooking/baking. 6 Function Switch • Sets oven cooking function including oven light. 7 Warming Drawer Switch • Turns warming drawer on/off. 8 General Purpose Outlet Switch 1 Hotplate Control Knobs • Adjusts temperature of hotplate. Can be rotated in either direction. 2 Hotplate Indicator Lamp • Comes on when you turn a hotplate on.
Controls (cont.) PAK model 806 2 4 1 3 6 5 7 5 Grill Temperature Control Knob • Sets grilling temperature for separate grill. Can be rotated in either direction. 6 Grill Indicator Lamp • Comes on when you are grilling. 7 60 Minute Ringer Time • Sets reminder time. 1 Hotplate Control Knobs • Adjusts temperature of hotplate. Can be rotated in either direction. 2 Hotplate Indicator Lamp • Comes on when you turn a hotplate on. 3 Temperature Control Knob • Sets temperature for baking.
Understanding the cooker Some models have a separate grill compartment. On other models the grill element is included in the oven cavity.
AD x base) Using the hotplates Hotplate indicator lamp GOOD GOOD BAD Hot Surface Warning BAD Light (recessed base) (convex base) BAD (undersize) Radiant Hotplates The high-speed radiant coil hotplates heat rapidly from a cold start to give you economic use of power. Radiant hotplate models have a bowl under each element for collecting spillage. The radiant elements are removable to aid in cleaning the hob and spillage bowls.
Understanding the functions CAUTION: Do not line the bottom of the warning oven with foil or place anything on bottom surface of oven liner as trapped heat will crack or craze oven liner. Always remove unnecessary trays or dishes from oven when baking or roasting. Preheating Oven 1. For best results when baking preheat your apppliance for 30 minutes 2. when the oven indicator light goes out, put your food in the oven and close the door.
Understanding the functions (cont) Fan Grilling “Fan grill” offers you the benefits of both “Bake” and traditional “Grill” functions. The grill element turns on and off to maintain the set temperature while the fan circulates the heated air. The oven door remains closed for fan grill. In this mode it is recommended that the thermostat is set to 180°C. You can use “Fan grill” for large cuts of meat, which gives you a result that is similar to “Rotisserie” cooked meat.
Understanding the functions (cont) Self-Clean Panels (Fitted in Selected Ovens & available as an optional extra) Catalytic self-clean panels are treated with a specially formulated enamel coating. This enamel coating is baked on at over 800 degrees and has a slightly rough surface, which is also porous. During normal cooking, fats are partially absorbed into the surface and are then oxidised.
Cooking guide for ovens Food Bake Thermowave Base Heat R R A Grill Fan Grill Maxi Grill Rapid Heat Baked Products Single trays 3 trays A R 2 trays A R Scones/small cakes R R R Muffins R R Slices R R A Cakes R A A Fruit Cakes R R A Baked Custards R R Pavlova A A Meringues A R A R R R Egg Recipes Pies & Pastry R A Fish R R A A Meats Beef Roast R Beef Steaks A R R Beef Patties A R R Lamb Roast A A R Lamb Chops Pork Roast A A A R A Pork C
Get to know your oven Get to know your new oven with this ‘Simple Test Cake’ Although we strive for a perfect performing oven, it’s possible that there will be some variation in colour when baking. Therefore, we suggest this simple, easy and delicious to make Simple Test Cake, it can help you understand your new oven. All ovens do sometimes have hot or cold spots, therefore it is important to judge with your eye as you may require to rotate during baking.
Handling baking & grilling problems PROBLEM Uneven cooking: Baked products too brown on top: Baked products too brown on bottom: Cakes have a cracked, thick crust: Baked products are pale, flat and undercooked Cakes fallen in the centre: Roast meat & potatoes not browning in fan oven: Juices running out of meat: CAUSES REMEDIES • Incorrect shelf position. - Select shelf that puts food in the centre of the oven. • Oven tray too large. - Experiment with other trays or dishes.
Clocks Operating the programmable clock Before operating your appliance for the first time 3 button programmable clock 3 button programmable clock PROGRAM TIMER cook time timer end time clock PROGRAM TIMER cook time timer — MODE + clock end time MODE — + After the appliance has been switched on “12.00“ will be displayed and the “clock indicator“ will flash. 1. To set the time of day in hours and minutes, press the – or + buttons.
Clocks (cont) Operating your 60 minute ringer timer Setting the cooking duration 1. Check the clock displays the correct time of day. 2. Select the desired oven function and temperature. The oven indicator light will glow and the heating source will come on. 3. Press the “mode“ button until the “cook time” indicator begins flashing. 4. Set the cooking duration you want by using the – or + buttons.
Cleaning and caring for the cooker IMPORTANT: Always make sure that the appliance warning is turned off before you clean it. All surfaces should be kept clean to reduce the risk of damage or fire. Cleaning Enamel and Glass Doors Panels Keep it clean by wiping it regularly with a soft cloth dipped in warm soapy water. Rub persistent stains vigorously with a creamed powder cleanser. Note: You can also use household oven enamel cleaners follow the manufacturer’s instructions carefully.
Cleaning and caring for your oven Removing the Oven Shelves Slide the oven shelves towards you until they reach the front stop. Tilt them up at the front to clear the side supports. Lift them clear. Wash the shelves in hot soapy water. For heavy baked-on-stains soaking of the shelves may be required. To install the oven shelves, fit the guide between the two side rack rails. This will ensure the shelves remain stable.
Solving problems Faults If you have a problem with your oven and/or grill, please: •C heck the points listed below before calling for service. You may be able to avoid a service call by fixing the problem yourself - and so continue cooking. Note: We may charge you for service even in the guarantee period if your problem is due to the causes listed below. Data Plate When you need information, service or replacement parts please: • Quote the; 1 Model; 2 Model Number & 3 Serial Number.
Notes 26 notes
Warranty FOR SALES IN AUSTRALIA AND NEW ZEALAND APPLIANCE: BUILT-IN OVEN, COOKTOP AND UPRIGHT RANGE COOKER This document sets out the terms and conditions of the product warranties for Electrolux Appliances. It is an important document. Please keep it with your proof of purchase documents in a safe place for future reference should you require service for your Appliance. 1.
For more information on all Westinghouse and Simpson appliances, or for dimension and installation information, call into your retailer, phone or email our customer care team or visit our website. AUSTRALIA phone: 1300 363 640 email: customercare@electrolux.com.au web: www.westinghouse.com.au www.simpson.com.au NEW ZEALAND phone: 09 573 2230 email: customercare@electrolux.co.nz web: www.westinghouse.co.nz www.simpson.co.