EOA5551AOX ................................................ .............................................
www.electrolux.com CONTENTS 1. 2. 3. 4. 5. 6. 7. 8. 9. 10. 11. 12. 13. SAFETY INFORMATION . . . . . . . . . . . . . . . . . . . . . . . . . . . . . . . . . . . . . . . . . . . . . . . . . . . 3 SAFETY INSTRUCTIONS . . . . . . . . . . . . . . . . . . . . . . . . . . . . . . . . . . . . . . . . . . . . . . . . . . 4 PRODUCT DESCRIPTION . . . . . . . . . . . . . . . . . . . . . . . . . . . . . . . . . . . . . . . . . . . . . . . . . 6 BEFORE FIRST USE . . . . . . . . . . . . . . . . . . . . . . . . . . .
ENGLISH 3 1. SAFETY INFORMATION Before the installation and use of the appliance, carefully read the supplied instructions. The manufacturer is not responsible if an incorrect installation and use causes injuries and damages. Always keep the instructions with the appliance for future reference. 1.1 Children and vulnerable people safety WARNING! Risk of suffocation, injury or permanent disability.
www.electrolux.com • Before maintenance cut the power supply. • Do not use harsh abrasive cleaners or sharp metal scrapers to clean the glass door since they can scratch the surface, which may result in shattering of the glass. • Only use the core temperature sensor recommended for this appliance. • To remove the shelf supports first pull the front of the shelf support and then the rear end away from the side walls. Install the shelf supports in the opposite sequence.
ENGLISH • Connect the mains plug to the mains socket only at the end of the installation. Make sure that there is access to the mains plug after the installation. • If the mains socket is loose, do not connect the mains plug. • Do not pull the mains cable to disconnect the appliance. Always pull the mains plug. • Use only correct isolation devices: line protecting cut-outs, fuses (screw type fuses removed from the holder), earth leakage trips and contactors.
www.electrolux.com • If you use an oven spray, obey the safety instructions on the packaging. • Do not clean the catalytic enamel (if applicable) with any kind of detergent. • Only use lamps with the same specifications. 2.5 Disposal WARNING! Risk of injury or suffocation. 2.4 Internal light • The type of light bulb or halogen lamp used for this appliance, is only for household appliances. Do not use it for house lighting. WARNING! Risk of electrical shock.
ENGLISH 4.1 Initial cleaning To change the time, press again and again until the indicator for the Time of Day function flashes. You must not set the Duration or End function at the same time. • Remove all accessories and removable shelf supports (if applicable). • Clean the appliance before first use. Refer to the chapter "Care and cleaning". 4.2 Setting the time You must set the time before you operate the oven.
www.electrolux.com 5.2 Oven functions Oven function Application Off position The appliance is off. Light To activate the oven lamp without a cooking function. Conventional Cooking To bake and roast on one oven level. The top and bottom heating elements operate at the same time. Top Heat To finish cooked dishes. Only the top heating element operates. Bottom Heat To bake cakes with crispy or crusty bottom. Only the bottom heating element operates.
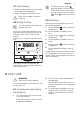
ENGLISH 9 6. CLOCK FUNCTIONS 6.1 Electronic programmer 1 2 3 4 1 Function indicators 2 Time and temperature display 3 Function indicator 4 Indicator for the core temperature sensor hr min 5 Button 6 Selection button 7 Button 7 6 5 Clock function Time of day Minute Minder Duration End Application To set, change or check the time of day. To set a countdown time. This function has no effect on the operation of the oven. To set how long the appliance must operate.
www.electrolux.com 6.3 Cancelling the clock functions 1. 2. Press the Selection button again and again until the necessary function indicator flashes. Press and hold the button -. The clock function goes out after some seconds. 7. USING THE ACCESSORIES WARNING! Refer to the Safety chapters. 7.1 Core temperature sensor The core temperature sensor measures the core temperature of the meat. There are two temperatures to be set: • The oven temperature. Refer to the table for roasting.
ENGLISH 11 7.2 Telescopic runners 1. Pull out the right and left hand telescopic runners. 2. Put the wire shelf on the telescopic runners and carefully push them into the appliance. Make sure you push back the telescopic runners fully in the appliance before you close the oven door. °C °C Keep the installation instructions for the telescopic runners for future use. With telescopic runners you can put in and remove the shelves more easily.
www.electrolux.com 9. HELPFUL HINTS AND TIPS 9.1 Inner side of the door In some models, on the inner side of the door you can find: • The numbers of the shelf positions. • Information about the heating functions, recommended shelf positions and temperatures for typical dishes. The temperature and baking times in the tables are guidelines only. They depend on the recipes and the quality and quantity of the ingredients used. • The appliance has five shelf levels.
ENGLISH TYPE OF DISH Conventional Cooking True Fan Cooking Cooking time Temp [min] [°C] 13 Notes Shelf position Temp [°C] Shelf position Buttermilk cheesecake 1 170 2 165 60 - 80 In a 26 cm cake mould Apple cake (Apple pie) 2 170 2 (left and right) 160 80 - 100 In two 20 cm cake moulds on a wire shelf1) Strudel 3 175 2 150 60 - 80 In a baking tray Jam-tart 2 170 2 (left and right) 165 30 - 40 In a 26 cm cake mould Sponge cake 2 170 2 160 50 - 60 In a 26 cm cake mo
www.electrolux.
ENGLISH TYPE OF DISH Conventional Cooking True Fan Cooking Cooking time Temp [min] [°C] 15 Notes Shelf position Temp [°C] Shelf position Vegetable flan 2 200 2 175 45 - 60 In a mould Quiches 1 180 1 180 50 - 60 In a mould1) Lasagne 2 180 190 2 180 190 25 - 40 In a mould1) Cannelloni 2 180 190 2 180 190 25 - 40 In a mould1) 1) Preheat for 10 minutes.
www.electrolux.
ENGLISH 17 9.7 Turbo Grilling Beef TYPE OF DISH Quantity Shelf position Temperature [°C] Time [min] Roast beef or fillet, rare per cm of thickness 1 or 2 190 - 200 1) 5-6 Roast beef or fillet, medium per cm of thickness 1 or 2 180 - 190 1) 6-8 Roast beef or fillet, well done per cm of thickness 1 or 2 170 - 180 1) 8 - 10 Quantity Shelf position Temperature [°C] Time [min] 1 - 1.5 kg 1 or 2 160 - 180 90 - 120 1) Preheat the oven.
www.electrolux.com TYPE OF DISH Quantity Shelf position Temperature [°C] Time [min] Chicken , half 400 - 500 g each 1 or 2 190 - 210 35 - 50 Chicken, poulard 1 - 1.5 kg 1 or 2 190 - 210 50 - 70 Duck 1.5 - 2 kg 1 or 2 180 - 200 80 - 100 Goose 3.5 - 5 kg 1 or 2 160 - 180 120 - 180 Turkey 2.5 - 3.5 kg 1 or 2 160 - 180 120 - 150 Turkey 4 - 6 kg 1 or 2 140 - 160 150 - 240 Quantity Shelf position Temperature [°C] Time [min] 1 - 1.
ENGLISH 19 VEGETABLES Shelf position TYPE OF DISH 1 level 2 levels Temperature [°C] Time [hr] Beans 3 1/4 60 - 70 6-8 Peppers 3 1/4 60 - 70 5-6 Vegetables for soup 3 1/4 60 - 70 5-6 Mushrooms 3 1/4 50 - 60 6-8 Herbs 3 1/4 40 - 50 2-3 FRUIT Shelf position TYPE OF DISH 1 level 2 levels Temperature [°C] Time [hr] Plums 3 1/4 60 - 70 8 - 10 Apricots 3 1/4 60 - 70 8 - 10 Apple slices 3 1/4 60 - 70 6-8 Pears 3 1/4 60 - 70 6-9 9.
www.electrolux.com • To clean metal surfaces use a usual cleaning agent. • Clean the oven interior after each use. Then you can remove dirt more easily and it does not burn on. • Clean stubborn dirt with a special oven cleaner. • Clean all oven accessories after each use and let them dry. Use a soft cloth with warm water and a cleaning agent. • If you have nonstick accessories, do not clean them using aggressive agents, sharp-edged objects or a dishwasher. It can destroy nonstick coating.
ENGLISH Installing the shelf supports 10.4 Oven lamp Install the shelf supports in the opposite sequence. WARNING! Be careful when you change the oven lamp. There is a risk of electrical shock. The rounded ends of the shelf supports must point to the front. 10.3 Catalytic walls The walls with catalytic enamel are selfcleaning. They absorb fat which collects on walls when the oven operates. To support the self-cleaning process: 1. Activate the oven lamp. 2. Remove the accessories from the appliance. 3.
www.electrolux.com Removing the oven door and the glass panel 1. 2. Fully open the door and identify the hinge to the right side of the door. Push the tightening component until it pulls back. 3. Hold the pushed component with one hand. Use a screwdriver with the other hand to lift and turn the right side hinge lever. 4. Identify the hinge to the left side of the door.
ENGLISH 23 5. Lift and turn the lever on the left hinge. 6. Close the oven door to the first opening position (halfway). Then pull forward and remove the door from its seat. 7. Put the door on a soft cloth on a stable surface. 8. Release the locking system to remove the glass panels.
www.electrolux.com 9. Turn the two fasteners by 90° and remove them from their seats. 90° 10. Carefully lift (step 1) and remove (step 2) the glass panels one by one. Start from the top panel. 11. Clean the glass panels with water and soap. Dry the glass panels carefully. 1 2 Installing the door and the glass panel When the cleaning is completed, install the glass panels and the oven door. Do the above steps in the opposite sequence.
ENGLISH Problem Possible cause 25 Remedy The oven does not heat up. The clock is not set. Set the clock. The oven does not heat up. The necessary settings are not set. Make sure that the settings are correct. The oven does not heat up. The fuse in the fuse box is released. Do a check of the fuse. If the fuse is released more than one time, contact a qualified electrician. The oven lamp does not operate. The oven lamp is defective. Replace the oven lamp. The display shows F11.
www.electrolux.com 13.1 Building In 13.2 Electrical installation 548 558 20 573 589 WARNING! Only a qualified person must do the electrical installation. The manufacturer is not responsible if you do not follow the safety precautions from the chapter "Safety Information". This appliance is supplied with a main plug and a main cable. 13.3 Cable 594 Cable types applicable for installation or replacement: H07 RN-F, H05 RN-F, H05 RRF, H05 VV-F, H05 V2V2-F (T90), H05 BB-F.
ENGLISH 27 14. ENVIRONMENT CONCERNS Recycle the materials with the symbol . Put the packaging in applicable and electronic appliances. Do not dispose appliances marked with the symbol containers to recycle it. Help protect the environment and human health and to recycle waste of electrical with the household waste. Return the product to your local recycling facility or contact your municipal office.