Use & Care Guide IQ-Touch™ Front-Load Gas & Electric Dryer Guide d’utilisation et d’entretien Sécheuse à gaz et à l’électricité à chargement frontal IQ-TouchMC Guía de Uso y Cuidado Secadora eléctrica y a gas de carga frontal IQ-TouchMC 137464900 A (1106)
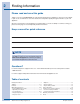
Finding Information Please read and save this guide Thank you for choosing Electrolux, the new premium brand in home appliances. This Use & Care Guide is part of our commitment to customer satisfaction and product quality throughout the life of your new appliance. We view your purchase as the beginning of a relationship. To ensure our ability to continue serving you, please use this page to record important product information.
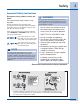
Safety Important Safety Instructions Recognize safety symbols, words and labels Your safety and the safety of others is very important. We have provided many important safety messages in the Use and Care Guide, Installation Instructions and on your appliance. Always read and obey all safety messages.
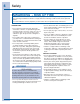
Safety WARNING - RISK OF FIRE To reduce the risk of fire, electrical shock, or injury to persons when using this dryer, comply with the basic warnings listed below. Failure to comply with these warnings could result in serious personal injuries. You can be killed or seriously injured if you don’t follow these Important Safety Instructions: PREVENT FIRE • Do not dry items that have been previously cleaned in, soaked in, or spotted with gasoline, cleaning solvents, kerosene, waxes, etc.
Safety Important Safety Instructions, continued PREVENT INJURY • To prevent shock hazard and assure stability during operation, the dryer must be installed and electrically grounded by a qualified service person in accordance with local codes. Installation instructions are packed in the dryer for the installer’s reference. Refer to INSTALLATION INSTRUCTIONS for detailed grounding procedures. If the dryer is moved to a new location, have it checked and reinstalled by a qualified service person.
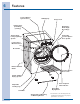
Features Touch-2-Open™ Cycle Selector LCD Display Control Lock 3 Drum Vanes (2 tumbling) (1 mixing) Dual Stage, Wide-Angle Door Hinge Reversible, Touch-2-Open™ Door System Theater-Style, Luxury-Lighting™ System Large Surface Moisture Sensor Door Strike Exhaust Channel Outlet Touch-2-Open™ Door Latch Gentle Tumble™ Drying System Touch-2-Open™ Latch Indicator Adjustable Leveling Legs Heavy Duty Drying Rack* Lint Filter Stacking Kit for Mounting on Matching Washer* *Not all models come with dr
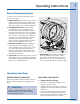
Operating Instructions Normal Operating Sounds You may or may not hear the following sounds from your new dryer: A A. WATER VALVE (Steam models only.) The flow of water is controlled by electric solenoids. During operation there may be a clicking sound as the valve opens and closes to control the water flow. B. SUSPENSION ROLLERS The dryer drum is supported by a set of suspension rollers. At times there may be a thumping or rolling sound when the dryer starts.
Operating Instructions OPERATING YOUR DRYER, continued • Place delicate or small items in a mesh bag. • Be sure buckles, buttons and trim are heatproof and won’t damage the drum finish. Close zippers; fasten hooks and Velcro®-like fas(Mesh bag not included.) teners. Tie strings and sashes to prevent snagging and tangling. 2. Check that the lint filter is clean and in place. the cycle selected. See the “Dryer Settings Chart” for more details.
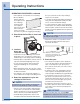
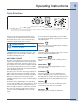
Operating Instructions Cycle Selection This manual covers many models and not all cycles, options, or features listed are available on every model. Console shown above for reference only. Your model may differ. Turn the cycle selector in either direction to the cycle desired. The indicator for that cycle will be illuminated. Press on the cycle selector knob to extend it or return it flush to the console. For best results Follow the fabric care label instructions on items to be dried.
Operating Instructions Cycle Selection, continued MY FAVORITE CYCLE To program a cycle with your preferred settings, select the desired cycle, drying temperature, dryness level and options. Then press and hold the my favorite button for 3 seconds. To use that customized cycle to dry future loads, simply press the my favorite button and the selected cycle, drying temperature, dryness level and options will be indicated. Your personalized cycle can be changed by repeating the my favorite procedure.
Operating Instructions Specialty Cycle Selection SPECIALTY CYCLES To access you dryer’s specialty cycles: • Press the button under the LCD corresponding to specialty cycles. • Rotate the cycle selector knob to scroll through the list of available Specialty Cycles to choose from. • Press the start button to begin the cycle. • To exit the specialty cycle navigation without performing a cycle, press the specialty cycle button again and cycle selector knob will return to normal function.
Operating Instructions Cycle Settings DRYING TEMPERATURE The appropriate drying temperature will automatically be indicated for the cycle selected. For best results Follow the fabric care label instructions on items to be dried. To change the preset temperature, press the temperature button to scroll to the desired setting. To protect your fabrics, not all temperatures are available with every cycle.
Operating Instructions Cycle Options Suitable options will automatically be indicated when the cycle is selected. To add options, press the corresponding options buttons to illuminate the selections desired. To delete options, press the options buttons again and the indicator lights will turn off. To protect your fabrics, not all options are available with every cycle. If an option is not appropriate for the cycle, it will not be displayed.
Operating Instructions Other Features STATUS DISPLAY The estimated total cycle time will be displayed when the cycle is selected. The estimated remaining cycle time is displayed during the cycle. The following will also be displayed at the appropriate times during the cycle: DRYING SANITIZING COOLING ADDING STEAM WRINKLE REL. EXT. TUMBLE CYCLE COMPLETE CLEAN FILTER REVERSIBLE DOOR Your dryer is equipped with a reversible door. The door can be hinged on the right or left side.
Operating Instructions Dryer Setting Chart These temperature, dryness levels and options are available with the following cycles: air clean active wear comforter pet beds stuffed animals warm up jeans time dry allergen heavy duty fast dry casual normal mixed load delicate perfect steam™ towels specialty cycles Temperature sanitize high 9 9 9 9 9 9 9 9 9 9 9 9 9 9 9 9 9 9 9 9 9 9 9 9 9 9 9 9 9 9 9 9 9 9 9 9 9 9 9 normal low air dry Dryness max normal less damp dry 9 9 9 9 9 Option
Care & Cleaning WARNING To reduce risk of fire or serious injury to persons or property, comply with the basic warnings listed in the Important Safety Instructions and those listed below. • Before cleaning the dryer interior, unplug the electrical power cord to avoid electrical shock hazards. • Do not use any type spray cleanser when cleaning the dryer interior. Hazardous fumes or electrical shock could occur. WARNING FIRE HAZARD A clothes dryer produces combustible lint.
Solutions to Common Problems Common Drying Problems Many drying problems involve poor cleaning results, poor soil and stain removal, residues of lint and scum, and fabric damage. For satisfactory drying results, follow these suggestions provided by The Soap and Detergent Association. PROBLEM POSSIBLE CAUSES SOLUTIONS PREVENTIVE MEASURES Greasy, oily stains • Fabric softener sheet. • Rub fabric softener stains with bar soap. Rinse and rewash. • Add a few bath towels to small loads for proper tumbling.
Solutions to Common Problems Service Prevention Checklist Before calling for service, review this list. It may save both time and expense. The list includes common occurrences that are not the result of defective workmanship or materials in this dryer. OCCURRENCE POSSIBLE CAUSE SOLUTION Dryer does not start. Electrical power cord is not securely plugged in or plug may be loose. Make sure the plug fits tightly in wall outlet. House fuse blown or circuit breaker tripped.
Warranty Information Your appliance is covered by a one year limited warranty. For one year from your original date of purchase, Electrolux will repair or replace any parts of this appliance that prove to be defective in materials or workmanship when such appliance is installed, used, and maintained in accordance with the provided instructions. In addition, your appliance is covered by an additional one year, parts only, limited warranty.
Notes