
User Manual
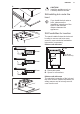


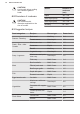
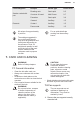
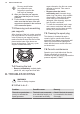
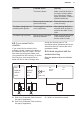
Table Of Contents
- CONTENTS
- 1. SAFETY INFORMATION
- 2. SAFETY INSTRUCTIONS
- 3. INSTALLATION
- 4. PRODUCT DESCRIPTION
- 5. DAILY USE
- 6. HINTS AND TIPS
- 7. CARE AND CLEANING
- 8. TROUBLESHOOTING
- 9. TECHNICAL DATA
- 10. ENERGY EFFICIENCY
- INDICE
- 1. INFORMAZIONI DI SICUREZZA
- 2. ISTRUZIONI DI SICUREZZA
- 3. INSTALLAZIONE
- 4. DESCRIZIONE DEL PRODOTTO
- 5. UTILIZZO QUOTIDIANO
- 6. CONSIGLI E SUGGERIMENTI UTILI
- 7. PULIZIA E CURA
- 8. RISOLUZIONE DEI PROBLEMI
- 9. DATI TECNICI
- 10. EFFICIENZA ENERGETICA

4. PRODUCT DESCRIPTION
4.1 Cooking surface layout
1
2
3
4
1
Rapid burner
2
Auxiliary burner
3
Semi-rapid burner
4
Control knobs
4.2 Control knob
Symbol Description
no gas supply / off posi‐
tion
ignition position / maxi‐
mum gas supply
Symbol Description
minimum gas supply
1 - 9 power levels
5. DAILY USE
WARNING!
Refer to Safety chapters.
5.1 Burner overview
$
%
'
&
A. Burner cap
B. Burner crown
C. Ignition candle
D. Thermocouple
5.2 Ignition of the burner
Always light the burner
before you put on the
cookware.
WARNING!
Be very careful when you
use open fire in the kitchen
environment. The
manufacturer declines any
responsibility in case of the
flame misuse.
1. Push the control knob down and turn
it counterclockwise to the maximum
gas supply position ( ).
2. Keep the control knob pushed for
equal or less than 10 seconds. This
www.electrolux.com12