Use & Care Guide Freezer Guia de Uso y Cuidado Congelador Guide d’utilisation et d’entretien Congélateur 297299200 August 2010
Finding Information Please Read And Save This Guide Thank you for choosing Electrolux, our new premium brand in home appliances. This Use & Care Guide is part of our commitment to customer satisfaction and product quality throughout the service life of your new appliance. Keep A Record For Quick Reference Purchase date Electrolux model number Table Of Contents Electrolux serial number Finding Information ................................................ 2 Safety ......................................
Safety Important Safety Instructions Safety Precautions Do not attempt to install or operate your unit until you have read the safety precautions in this manual. Safety items throughout this manual are labeled with a Danger, Warning, or Caution based on the risk type. Definitions This is the safety alert symbol. It is used to alert you to potential personal injury hazards. Obey all safety messages that follow this symbol to avoid possible injury or death.
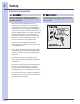
Safety Electrical Information You must follow these guidelines to ensure that your refrigerator’s safety mechanisms are operating correctly. • The freezer must be plugged into its own dedicated 115 Volt, 60 Hz, AC-only non-GFCI electric outlet. The power cord of the appliance is equipped with a three-prong grounding plug for your protection against electrical shock hazards. It must be plugged directly into a properly grounded three-prong receptacle.
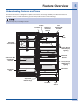
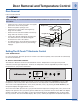
Feature Overview Understanding Features and Terms Your Electrolux freezer is designed for optimal convenience and storage flexibility. The illustration below is provided to assist you with familiarizing yourself with product features and terminology. Features may vary according to model.
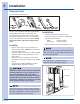
Installation Required Tools You will need the following tools: This Use & Care Guide provides general installation and operating instructions for your model. We recommend using a service or kitchen contracting professional to install your freezer. Use the freezer only as instructed in this Use & Care Guide. Before starting the freezer, follow these important first steps. Installation Location • • • • • Choose a place that is near a grounded, nonGFCI, electrical outlet.
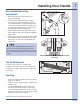
Installing Door Handle Door Handle Mounting Instructions 1. Remove handle from carton and any other protective packaging. 2. Position freezer handle end caps over upper and lower pre-installed shoulder bolts (A) that are fastened into door, ensuring the holes for the set screws are facing towards the outside of door if a single unit installation or the refrigerator door (if installing the matching refrigerator) 3.
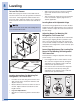
Leveling • To Level The Freezer: While unit is lying on its back for wood skid removal, note the location of the four (4) leg levelers installed at each corner. These leg levelers will be used to level the freezer and to adjust the height. Use a carpenter’s level to level the freezer from front to back and side to side. Make sure to allow for the Trim and Leveling Kit if it is to be installed with the unit.
Door Removal and Temperature Control Door Removal If door must be removed: Doors are heavy. It is recommended to have two people to remove or replace the door assembly from the cabinet. • • • • • • Unplug the unit or switch the breaker that supplies power to the unit to the off position. Remove the plastic top hinge cover. Hold the door in place while removing the top hinge from the cabinet. Remove the two 3/8” hex head bolts from the top hinge with a 3/8” wrench or socket.
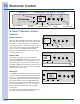
Electronic Control Adjust UP Key Air Filter Reset Key Temp Mode Key Alarm Off Key hold to reset press & hold °F air filter door ajar Adjust DOWN Key Door Ajar Indicator power fail temp mode alarm off control lock replace air filter Replace Air Filter Indicator Power Fail Indicator Control Lock Key IQ Touch™ Electronic Control Features Replace Air Filter When the “REPLACE AIR FILTER” LED is illuminated yellow, the air filter needs to be replaced.
Alarms 11 Alarms There are four possible conditions that will cause the alarm tone to sound. High Temp Alarm If the temperature inside the cabinet has exceeded 23ºF (-5ºC) for 1 hour or more of normal operation, the HI TEMP LED will illuminate, the HIGH TEMP Alarm will sound and the cabinet temperature is shown in the display. The LED and temperature alarm will remain active until the cabinet temperature is below 23ºF (-5ºC). The audible alarm can be turned off by pressing ALARM OFF key.
Sabbath Mode and Air Filter Sabbath Mode The Sabbath Mode is a feature that disables portions of the freezer and its controls in accordance with the observance of the weekly Sabbath and religious holidays within the Orthodox Jewish community. To initiate or cancel Sabbath Mode, press the CONTROL LOCK and TEMP MODE keys at the same time and hold for three (3) seconds. The display will now show “Sb” and the confirmation tone will sound.
Luxury Design™ Lighting and Water Supply 13 Luxury Design™ Lighting Water Supply The interior cabinet lighting features LED lights that gradually ramp up in intensity after the door is opened. To avoid electric shock, which can cause death or severe personal injury, disconnect the freezer from electrical power before connecting a water supply line to the freezer. To replace an LED: Unplug the unit or switch the breaker that supplies power to the unit to the off position before changing an LED light. 1.
Connecting Water Supply To Freezer Check with your local building authority for recommendations on water lines and associated materials prior to installing your new freezer. Depending on your local/state building codes, Electrolux recommends for homes with existing valves its Smart Choice® water line kit 5305513409 (with a 6 ft. Stainless Steel Water Line) and for homes without an existing valve, Electrolux recommends its Smart Choice® water line kit 5305510264 (with a 20 ft.
Ice Service 15 Ice Service If your freezer has an automatic icemaker, it will provide a sufficient supply of ice for normal use. During the initial startup of your freezer, however, no ice will be produced during the first 24 hours of operation. Automatic ice makers are also optional accessories that may be installed in some models at any time. Call your local dealer for information. Turning Your Ice Maker On After the plumbing connections have been completed, the water supply valve must be opened.
Storage Components Storage Luxury Design Glass Shelving Multi-position adjustable slide out glass shelves can be moved to any position for larger or smaller packages. The shipping spacers that stabilize the shelves for shipping may be removed and discarded. To Adjust The Shelves • • • Lift front edge up. Pull shelf out. Replace the shelf by inserting the hooks at rear of the shelf into the wall bracket. Lower the shelf into the desired slots and lock into position.
Storage Components 17 Adjustable Door Bins This model is equipped with adjustable door bins that can be moved to suit individual needs. To Move Door Bins: • • • • Lift the bin straight up. Remove the bin. Place the bin in desired position. Lower the bin onto supports until locked in place. Soft Freeze Tilt Out Bin The soft freeze tilt out bin is designed to be warmer than the freezer compartment. It is ideal for keeping ice cream and frozen yogurt ready to serve.
Storing Food & Saving Energy Energy Saving Ideas Vacation And Moving Tips • Short Vacations: • • • • • Locate the freezer in the coolest part of the room, out of direct sunlight, and away from heating ducts or registers. Do not place the freezer next to heat-producing appliances such as a range, oven, or dishwasher. If this is not possible, a section of cabinetry or an added layer of insulation between the two appliances will help the freezer operate more efficiently.
Care & Cleaning 19 • Turning the freezer temperature control to “OFF” (See Page 9) turns off the compressor, but does not disconnect electrical power to the LED lights or other electrical components. Unplug the unit or switch the breaker that supplies power to the unit to the off position. Do not use razor blades or other sharp instruments which can scratch the appliance surface when removing adhesive labels.
Warranty Information Major Appliance Warranty Information Your appliance is covered by a one year limited warranty. For one year from your original date of purchase, Electrolux will repair or replace any parts of this appliance that prove to be defective in materials or workmanship when such appliance is installed, used, and maintained in accordance with the provided instructions.
Solutions To Common Problems 21 Troubleshooting Guide Before calling for service, review this list. It may save you time and expense. This list includes common occurrences that are not the result of defective workmanship or materials in this Freezer. Problem Cause Correction Freezer Operation Freezer does not run. Freezer runs too much or too long. * Freezer is plugged into a circuit that has a ground fault interrupt. * Temperature control set to “OFF”.
Solutions To Common Problems Problem Cause Correction Sound And Noise (Continued) Popping or cracking sound when compressor comes on. * Metal parts undergo expansion and contraction, as in hot water pipes. * This is normal. Sound will level off or disappear as Freezer continues to run. Bubbling or gurgling sound. * Freezer (used to cool refrigerator is circulating throughout the system. * This is normal. Vibrating or rattling noise. * Freezer is not level.