
Installation guide


g.
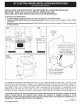
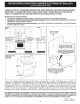
Drill Pilot Holes and Fasten Bracket - Drill a 1/8" pilot
hole where screws are to be located. If bracket is to be
mounted to the wall, drill pilot hole at an approximate 20 °
downward angle. If bracket isto be mounted to masonry
or ceramic floors, drill a 3/16" pilot hole 1-3/4" deep. The
screws provided may be used in wood or concrete
material. Use a 5/16" nut-driver or flat head screwdriver
to secure the bracket in place.
FASTEN BgACKET (WALL OR FLOOR MOUNTING)
--_1 I._.--I-1/4"Max.
LeveJim _.
= Wall Mount
,1
[ _ ,,? WaJJ PJate
Floor Mount _i L-Anti-Tip Bracket
2. Electrical Connection Requirements
Plug the range power cable (4 conductors) intoa 4conductor
range outlet. Outlet must be properly grounded and in
accordance with the Canadian Electrical Code (CSA Standard
(C22.1 Part 1 -- latest edition) -- and any local electrical code
requirements.
Locate outlet 6" above the floor in the wall behind the range.
This appliance may be connected by means of permanent
"Hard Wiring."
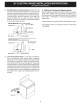
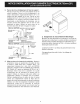
FASTEN BRACKET (FLOOR MOUNTING ONLY)
Levelim
Wall
C,
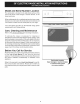
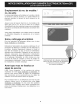
Level and Position Range - Level range by adjusting
the (4) leveling legs with a wrench. Note: A minimum
clearance of 1/8" is required between the bottom of the
range and the leveling leg to allow room for the bracket.
Use a spirit level to check your adjustments. Slide range
back into position. Visually check that rear leveling leg is
inserted intoand fully secured by the Anti-Tip Bracket by
removing lower panel or storage drawer. For models with
a warmer drawer or broiler compartment, grasp the top
rear edge of the range and carefully attempt to tilt it
forward.