INSTRUCTION BOOK FOR ELECTROLUX COOKER HOOD CH 950 UK cod.
Thank you for buying a Electrolux product. To enable you to use your appliance effectively and safely, please read this instruction book carefully before using the appliance and retain for future reference. If you require guidance in the use of the appliance or require further information on Electrolux Products, please contact our Customer Care Department. For general enquiries concerning your Electrolux appliance or for further information, visit our website at http://www.electrolux.co.
IMPORTANT SAFETY INFORMATION These warnings are provided in the interests of your safety. Ensure that you understand them all before installing or using this appliance. Your safety is of paramount importance. If you are unsure about any of the meanings of these warnings contact the Customer Care Department. Installation Child Safety • Any installation work must be undertaken by a qualified electrician or a competent person. • This appliance is designed to be operated by adults.
650 min.
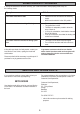
OPERATING INSTRUCTIONS The cooker hood is designed to extract unpleasant odours from the kitchen, it will not extract steam. The appliance can be installed to recirculate or extract contaminated air. Control Panel The hood can be switched on pushing directly onto the requested speed without firstly having to select 0/1 button. S1 L KEY LED T1 T2 T3 T4 FUNCTIONS L 0/1 Light T1 0/1 Motor on First speed. When pressed for about 1 seconds the motor is switched off. T2 Speed on Second speed.
MAINTENANCE AND CLEANING Before carrying out any maintenance or cleaning isolate the cooker hood from the mains supply. The cooker hood must be kept clean, as a build up of grease or fat can be a fire hazard. External Cleaning Wipe the cooker hood frequently with warm soapy water using a mild detergent. Never use scouring pads or abrasive cleaners. Never use excessive amounts of water when cleaning particularly around the control panel.
MAINTENANCE AND CLEANING Before carrying out any maintenance or cleaning isolate the cooker hood from the mains supply. Charcoal Filters In the recirculation mode the charcoal filters absorb smells and unwanted odours. Enabling the alarm signal • • • • • • In Recirculation version Hoods, the Filter saturation alarm can be enabled on installation or at a later date. Turn the Lights and the suction Motor off. Disconnect the Hood using the Main switch or the double-pole switch on the mains power supply.
SOMETHING NOT WORKING If, having followed these instructions carefully, your cooker hood fails to work properly please carry out the following checks. Symptom Solution The cooker hood will not start • Check the hood is connected to the electricity supply. • Make sure the switch is in the ‘ON’ position. The cooker hood is not working effectively • The fan speed is set high enough for the task • The grease filter is clean. • The kitchen is adequately vented to allow the entry of fresh air.
GUARANTEE CONDITIONS We Electrolux, undertake that if within twenty four months of the date of the purchase this Electrolux built-in appliance or any part thereof is proved to be defective by reason only of faulty workmanship or materials, the company will, at our option repair or replace the same FREE OF ANY CHARGE for labour, materials or carriage on condition that: • • • • • The appliance has been correctly installed and used only on the electrical supply stated on the rating plate.
INSTALLATION INSTRUCTIONS It is dangerous to alter the specifications or attempt to modify this product in any way. Technical Information DIMENSIONS HEIGHT OF CANOPY: HEIGHT OF CHIMNEY: WIDTH OF CANOPY : DEPTH OF CANOPY: ELECTRICAL SUPPLY: 70 mm (UPPER SECTION) 470 mm (LOWER SECTION) 745 mm 898 mm 490 mm VOLTAGE: POWER CONSUMPTION: FAN MOTOR: LAMPS : (2 x 20 W) 220-240 V 50Hz 245 W 205 W 40 W Note: CE Marking certifies that this appliance complies with the requirements laid down in EEC directive 89:336.
INSTALLING THE COOKER HOOD Please ensure that when the appliance is installed it is easily accessible to an engineer in the event of a breakdown. All installations must comply with the local authorities requirements for the discharge of exhaust air. Incorrect installation may affect the safety of this cooker hood. Installation Requirements Before installation check the wall to which the cooker hood is to be fitted for electric cables, water pipes or gas.
INSTALLING THE COOKER HOOD Clearance Height The cooker hood is designed to be fitted over a cooking appliance at the clearance heights stated, providing the maximum output of the appliance beneath does not exceed the maximums quoted in the Technical Specifications. If the output of the appliance below the cooker hood exceeds the maximum outputs quoted, please refer to the cooker manufacturer’s installation instructions.
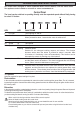
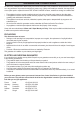
INSTALLING THE COOKER HOOD 1÷2 Fitting the Wall Brackets 11 X 7.2.1 116 116 650 min. 310 12a Wall marking: • Draw a vertical line on the supporting wall up to the ceiling, or as high as practical, at the centre of the area in which the hood will be installed. • Draw a horizontal line at 650 mm above the hob. • Place bracket 7.2.1 on the wall as shown about 1-2 mm from the ceiling or upper limit aligning the centre (notch) with the vertical reference line.
INSTALLING THE COOKER HOOD Fitting the Hood Body Before starting to fix the hood body, tighten the two screws Vr located on the top of the hood body. Vr Hook the hood body onto the two screws item 12a (not supplied). Fully tighten the screws item 12a. Using a screw driver and spirit level, adjust the screws item Vr until the hood body is level. 12a Extraction The cooker hood is more effective when used in the extraction mode (ducted to the outside).
INSTALLING THE COOKER HOOD Extraction The charcoal filter is not required in this mode and should be removed. Ducting The ducting used must be Ø150mm (6ins), or Ø125mm (5ins) in diameter. If possible duct through the wall immediately above the hood body. For the best performance use the shortest possible duct run and the minimum number of bends. Where flexible ducting is fitted it should not be turned through very tight bends as this may impair the performance of the hood.
INSTALLING THE COOKER HOOD Fitting the Chimney Stack The chimney consists of two sections. The lower chimney measures 740mm and the upper chimney (with the recirculation grilles on either side) measures 465mm. The overall installed measurement is min. 870 - max 1200mm. 12c 2.1 12c 2 UPPER CHIMNEY To fit the upper chimney section item 2.1 expand the chimney slightly to allow it to be fitted over the brackets item 7.2.1 as illustrated. 2.
55 - 77 High Street - Slough BERKSHIRE SL1 1DZ © Electrolux plc 2002