
Cooker Hood Instruction Manual


14
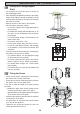
INSTALLING THE COOKER HOOD
Drilling the Ceiling/Support
Shelf
• Use a plumb line to mark the centre of the hob on
the ceiling/support shelf.
• Place the drilling template 21 provided on the ceiling/
support shelf, making sure that the template is in the
correct position by lining up the axes of the template
with those of the hob.
• Mark the centres of the holes in the template.
• Drill the holes at the points marked:
• For concrete ceilings, drill for plugs appropriate to
the screw size.
• For hollow brick ceilings with wall thickness of 20
mm: drill ø 10 mm (immediately insert the Dowels
not provided).
• For wooden beam ceilings, drill according to the
wood screws used.
• For wooden shelf, drill ø 7 mm.
• For the power supply cable feed, drill ø 10 mm.
• For the air outlet (Ducted Version), drill according
to the diameter of the external air exhaust duct
connection.
• Insert two screws of the following type, crossing them
and leaving 4-5 mm from the ceiling:
• For concrete ceilings, use the appropriate plugs
for the screw size (not provided).
• For Cavity ceiling with inner space, with wall thi-
ckness of approx. 20 mm, Screws not provided.
• For wooden beam ceilings, use 4 wood screws
(not provided).
• For wooden shelf, use 4 screws with washers and
nuts (not provided)
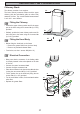
Fixing the Frame
• Loosen the two screws fastening the lower chimney
and remove this from the lower fra me.
• Loosen the two screws fastening the upper chimney
and remove this from the upper fra me.
If you wish to adjust the height of the frame, proceed
as follows:
• Unfasten the eight metric screws joining the two
columns, located at the sides of the frame.
• Adjust the frame to the height required, then replace
all the screws removed as above.
• Insert the upper chimney stack from above, and leave
it running free on the frame.
• Lift up the frame, fi t the frame slots onto the screws
up to the slot end positions.
• Tighten the two screws and fasten the other two
screws provided with the hood.
2
2
1
1