CKW700CX EN Microwave Oven User Manual
www.electrolux.com CONTENTS 1. SAFETY INFORMATION....................................................................................3 2. SAFETY INSTRUCTIONS..................................................................................5 3. PRODUCT DESCRIPTION................................................................................ 8 4. CONTROL PANEL............................................................................................. 8 5. BEFORE FIRST USE...............................
ENGLISH 1. 3 SAFETY INFORMATION Before the installation and use of the appliance, carefully read the supplied instructions. The manufacturer is not responsible for any injuries or damages that are the result of incorrect installation or usage. Always keep the instructions in a safe and accessible location for future reference. 1.
www.electrolux.com • • • • • • • • • • • • • Always use oven gloves to remove or put in accessories or ovenware. Before carrying out any maintenance, disconnect the appliance from the power supply. Ensure that the appliance is switched off before replacing the lamp to avoid the possibility of electric shock. Do not use a steam cleaner to clean the appliance.
ENGLISH • • • • • • • 5 The appliance is intended for heating food and beverages. Drying of food or clothing and heating of warming pads, slippers, sponges, damp cloth and similar may lead to risk of injury, ignition or fire. If smoke is emitted, switch off or unplug the appliance and keep the door closed in order to stifle any flames. Microwave heating of beverages can result in delayed eruptive boiling. Care must be taken when handling the container.
www.electrolux.com • • • • • • • • • • Do not use multi-plug adapters and extension cables. Make sure not to cause damage to the mains plug and to the mains cable. Should the mains cable need to be replaced, this must be carried out by our Authorised Service Centre. Do not let mains cables touch or come near the appliance door, especially when the door is hot. The shock protection of live and insulated parts must be fastened in such a way that it cannot be removed without tools.
ENGLISH close the furniture panel until the appliance has cooled down completely after use. 2.4 Care and cleaning WARNING! Risk of injury, fire, or damage to the appliance. • • • • • • • • Before maintenance, deactivate the appliance and disconnect the mains plug from the mains socket. Make sure the appliance is cold. There is the risk that the glass panels can break. Replace immediately the door glass panels when they are damaged. Contact the Authorised Service Centre.
www.electrolux.com 3. PRODUCT DESCRIPTION 3.1 General overview 1 2 3 4 5 6 7 8 9 4 11 3 1 2 3 4 5 6 7 8 9 10 11 2 1 10 3.2 Accessories Control panel Power lamp / symbol Knob for the heating functions Display Temperature and microwave power indicator / symbol Control knob Heating element Microwave generator Lamp Shelf support, removable Shelf positions For cookware, cake tins, roasts. Wire shelf 4. CONTROL PANEL 4.
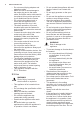
ENGLISH 4.2 Display A H G F B E C D A. Timer / Temperature / Microwave power B. Heat-up and residual heat indicator C. Microwave mode D. Core temperature sensor (selected models only) E. Door lock (selected models only) F. Hours / minutes G. Demo mode (selected models only) H. Clock functions 5. BEFORE FIRST USE Refer to "Care and cleaning" chapter. WARNING! Refer to Safety chapters. To set the Time of day refer to "Clock functions" chapter.
www.electrolux.com Oven function Microwave grill‐ ing Application The Microwave grilling starts as a normal grilling function. When you add the microwave function, it combines the microwave and the grilling function at different time periods and power levels (refer to the power setting table). Use the Microwave grilling to keep the crispness of certain foods. The lamp may automatically deactivate at a temperature below 60 °C during some oven functions. 6.4 Setting a heating function 1.
ENGLISH While using Microwave Combi function the oven can make various noises. They are normal for this function. 11 6.7 Heat-up indicator When the oven function operates, the appear one by one bars in the display when the temperature in the oven increases, and disappear when it decreases. 7. CLOCK FUNCTIONS 7.1 Clock functions table Clock func‐ tion TIME OF DAY DURATION END 3. Turn the knob for the temperature to set the current minutes. Application To show or change the time of day.
www.electrolux.com At the set End time the signal sounds for At the set END time the signal sounds for 2 minutes. and time setting flash in the display. The oven turns off automatically. 4. Press any button or open the oven door to stop the signal. 5. Turn the knob for the heating functions to the off position. 2 minutes. and time setting flash in the display. The oven turns off. 5. Press any button or open the oven door to stop the signal. 6.
ENGLISH 13 Small indentation at the top increase safety. The indentations are also anti-tip devices. The high rim around the shelf prevents cookware from slipping of the shelf. 9. ADDITIONAL FUNCTIONS 9.1 Using the Child Lock 9.3 Residual heat indicator When the Child Lock is on the oven cannot be turned on accidentally. When you turn off the oven, the display 1. Ensure the knob for the oven functions is in the off position. and at the 2. Press and hold same time for 2 seconds. The signal sounds.
www.electrolux.com 10. HINTS AND TIPS can be put into the oven only when the packaging is microwave safe (check information on the packaging). WARNING! Refer to Safety chapters. Microwave cooking Cook food covered. If you want to keep a crust cook food without a cover. The temperature and baking times in the tables are guidelines only. They depend on the recipes and the quality and quantity of the ingredients used. Do not overcook the dishes by setting the power and time too high.
ENGLISH Cookware / Material Microwave function Defrost‐ ing Non-ovenproof glass and porcelain without any silver, gold, platinum or other metal decorations Heating, Cooking X Microwave Combi function X Glass and glass ceramic made of ovenproof / frost-proof material Ceramic and earthenware without any quartz or metal components and glazes which contain metal Ceramic, porcelain and earthen‐ ware with unglazed bottom or with small holes, e.g.
www.electrolux.com Grilling Food Temperature (°C) Grilling time (min) Shelf position 1st side 2nd side Roast beef, medium 210 - 230 30 - 40 30 - 40 1 Filet of beef, medium 230 20 - 30 20 - 30 1 Back of pork 210 - 230 30 - 40 30 - 40 1 Back of veal 210 - 230 30 - 40 30 - 40 1 Back of lamb 210 - 230 25 - 35 20 - 35 1 Whole Fish, 0.5 210 - 230 - 1 kg 15 - 30 15 - 30 1 10.
ENGLISH Defrosting fish Food Power (Watts) Time (min) Standing time (min) Whole Fish (0.5 kg) 100 10 - 15 5 - 10 Fish fillets (0.5 kg) 100 12 - 15 5 - 10 Food Power (Watts) Time (min) Standing time (min) Butter (0.25 kg) 100 3-4 5 - 10 Grated cheese (0.2 kg) 100 2-3 10 - 15 Food Power (Watts) Time (min) Standing time (min) Yeast cake (1 piece) 200 2-3 15 - 20 Cheesecake (1 piece) 100 2-4 15 - 20 Dry cake (e.g.
www.electrolux.com Food Power (Watts) Time (min) Standing time (min) Sauce (200 ml) 600 1-3 - Soup (300 ml) 600 3-5 - Food Power (Watts) Time (min) Standing time (min) Chocolate / Chocolate coating (0.15 kg) 300 2-4 - Butter (0.1 kg) 400 0:30-1:30 - Food Power (Watts) Time (min) Standing time (min) Whole fish (0.5 kg) 500 8 - 10 2-5 Fish fillets (0.5 kg) 400 Melting Cooking 4-7 2-5 Vegetables, fresh (0.5 kg + 600 50 ml of water) 5 - 15 - Vegetables, frozen (0.
ENGLISH 19 10.6 Examples of cooking applications for power settings The data in the table is for guidance only.
www.electrolux.com 1 3 2 2. Pull the front end of the shelf support away from the side wall. 3. Pull the supports out of the rear catch. Install the shelf supports in the opposite sequence. 11.3 Replacing the lamp WARNING! Risk of electric shock. The lamp can be hot. 1. Turn off the oven. Wait until the oven is cooled down. 2. Disconnect the oven from the mains. 3. Put a cloth on the bottom of the cavity.
ENGLISH 21 Problem Possible cause Remedy The oven does not heat up. The fuse is blown. Make sure that the fuse is the cause of the malfunc‐ tion. If the fuse is blown again and again, contact a qualified electrician. The lamp does not oper‐ ate. The lamp is defective. Replace the lamp. It takes too long to cook The temperature is too low Adjust the temperature if the dishes or they cook too or too high. necessary. Follow the ad‐ quickly. vice in the user manual.
www.electrolux.com Use metal dishes to improve energy saving, but only when you use a nonmicrowave function. When possible, do not preheat the oven before you put the food inside. When the cooking duration is longer than 30 minutes, reduce the oven temperature to minimum 3 - 10 minutes before the end of the cooking time, depending on the duration of the cooking. The residual heat inside the oven will continue to cook. Use the residual heat to warm up other dishes.
ENGLISH 23
867352436-A-472018 www.electrolux.