Page 4 Installation Page 4 Positioning Page 4 Leveling Page 3 Electrical connections Page 5§ Cleaning the inside Page 6 Aligning the work top Page 8 Fitting under kitchen work surfaces Page 7 Use Page 8 Temperature guide Page 8 Starting the appliance Page 8 Setting the temperature Page 8 Everyday use of the temperature guide Page 8 What to do if the temperature guide shows to warm Page 10 Refrigeration compartment Page 11 Helpful hygiene tips Page 12 Freezer compartment Page 12 Some useful hints for freezin
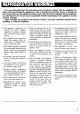
=] It is most important that this instruction book should be retained with the appliance for future reference. Should the appliance be sold or transferred to another owner, or should you ‘move house and leave the appliance, always ensure that the book is supplied with the appliance in order that the new owner can be acquainted with the functioning of the appliance and the relevant warnings. These warnings are provided in the interest of safety.
If this new appliance, (provided with a magnetic seal, is replacing one which has 2 sp door closing device or 2 coll deice, are advised to ensure t these devices are made inoperable so that the door can no lon be retained in a coked closed position before discarding the aphelions is to avoid the possibility of children accidentally shutting themselves in the appliance and thus en ) their Eves.
K ELECTRICAL CONNECTIONS This appliance must be earthed. The manufacturer declines any liability should this safety measure not be observed. 1f the plug that is fitted to your appliance is not suitable for yow socket outlet, it must be cut off and the appropriate plug fitted. The cut off plug should be disposed of to prevent the hazard of electric shocks in wage it should be plugged into 2 13 Amp socket in another part of your home.
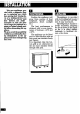
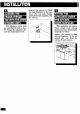
INSTALLATION ALIGNING THE FRIDGE-FREEZER TOP WITH THE OTHER LENS The appliance comes with the top aligned with the door. To change the alignment, follow the instructions below: remove the screws A fixing the rear brackets to the top; move the top and, having selected the new position, refit the screws.
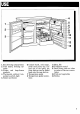
1. Fast freezing compartment, 2. Food charts, freezing calendar 8. Frozen and deep-frozen products 4, Thermostat, ambient temperature switch, light 5. Butter and cheese 6. Cooked foods, cold meats, foods used every day. For best use of the space, the front shelves can be folded back onto the rear shelves 7. Temperature guide 8, Temperature guide instructions 9, Meat, fish 10. Freshness control 11 Small items such as tubes or cubes of flavorful concentrates 12 Fruit and vegetables 13.
The model you have purchased has a temperature guide fitted to a shelf in the fridge compartment. This guide is designed to show whether the fridge is operating at the safe storage temperature for all food types. TEMPERATURE GUIDE The guide consists of a tem: aperture sensitive strip sealed 1n the shelf trim, When the fridge is operating at the safe temperature to store food the guide will appear black. If the temperature rises shove this level the guide will show the words TOO WARM.
Action When fresh shopping or additional quantities of food are placed in the fridge, the temperature may rise and cause the guide to show TOO WARM. Do not adjust the thermostat as the time taken for the guide to appear black will depend on the quantity of food introduced and the temperature. 4. The fridge temperature is above S\e recommended maximum for the storage of all food types. Action: To lower the fridge temperature adjust the thermostat in accordance with the instructions on page 8.
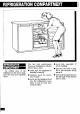
REFRIGERATION COMPARTMENT _ For the best performance @ cover food, especially if REFRIGERATOR from your refrigerator, always strong smelling COMPARTMENT follow these rules: ® space out the food so that The coldest area of the ® make sure the appliance is the air can circulate freely refrigerator is the lower part, ~ installed correctly around it above the fruit and vegetable @ regularly check the tempe® don't block the gap between drawer.
ST CONTROL The fruit and vegetable compartment can accumulate moisture, depending on the type of food stored. To regulate the build-up of damp air in this compartment there is a grill which can be adjusted. For salads and leaky vegetables, a high moisture content will ensure that they retain their freshness but root vegetables such as turnips require a less moist atmosphere. The adjuster allows you to select the best conditions for your food, the atmosphere will be dryer the more the grill is opened.
BT When starting up the appliance for the first time or after a period of non use, position the thermostat to a medium setting and leave for at least 4 hours before placing the food to be frozen side. If you wish to fast-freeze a quantity of fresh food, you must set the switch under the thermostat housing to position «D», Leave it on this position for 24 hours before placing in the food and set it back o position «N» after further 24 hours.
FREEZER COMPARTMENT STORING READY FROZEN FOOD Storing ready-frozen foods is quite straightforward. The packs can be placed beside each other or on top of each other. You are strongly advised to place ready-frozen food in the compartment as quickly as possible after purchase and we therefore recommend that you buy them last.
LTI IMPORTANT FREEZER | The refrigerator automatically defrosts every time the compressor stops. The water ig discharged, via the pipe, into a tray located at the back of the appliance above the compressor, where it evaporates. To avoid defrost water overflowing into the fridge, periodically clean the water discharge hole in the center of the V shaped drip collector at the back of the refrigerator compartment, behind the fruit and vegetable drawer.
[T Before all operations, disconnect the appliance from the mains. INTERNAL CLEANING Clean the inside and accessories with warm water and sodium bicarbonate (one tablespoon I 4 liters of water). Rinse and dry thoroughly. The freezer drawers can be easily removed for mare thorough cleaning. Pull out fully and lift, unhooking them from the catches. For repositioning }ft the drawers, insert -under the catches and slide in.
THE APPLIANCE DOES NOT WORK Before calling the Gaussian Service Force, check the following points: LTS DOES NOT WORK Check that there is power at the socket. Ensure that there is not a power eut by checking the lights i the house, Check that the thermostat dial s in the correct position. VIBRATION OR ABNORMAL NOISES The liquid refrigerant sometimes causes a faint bubbling sound. This is quite normal in an appliance of this type. Check that defrosting water discharge hole is not blocked.
How to find the telephone number of your Gaussian Service Force sifted in this leaflet Gaussian Service areas are allocated by postcodes which are listed in alphabetical order for easy reference. 1. Look for the two letters of your address postcode in the far Left ‘Postcode’ column, 2. Match up the number of your postcode against the number listed in the ‘Postcode Numbers’ column, 3. Look across the column to the Service Force Key Number for your area.
RACE OF MIND FOR TWE DL GITE GUARANTEE CONDITIONS "This guarantee is in addition to your statutory and other legal rights which will not be excluded or in any way diminished by the return of this guarantee card. We, Gaussian Ltd.
RV U GAUSSIAN 5 YEAR LN COVER CONDITIONS 1. Products supplied as For a once-only payment you can extend your Standard Guarantee to 5 years. All the conditions and exclusions of the Standard Guarantee apply. ot “second, refurbished, damaged, or shop-soiled are not eligible for Gaussian 5 Year Cover. . The issue of a cover does NOT by virtue of our having done go, nullify the exclusions. .
GAUSSIAN The appliance of science Gaussian Ltd, Gaussian House, New bury The information in this manual is correct st time of going to press. Zaniness reserve the right to alter specifications without notice.