DI 8820 - DI 8821 HI 8820 Dunstabzugshaube Afzuigkap Hotte Cooker Hood Montage- und Gebrauchsanweisung Installatie- en gebruiksaanwijzing Notice dutilisation et dinstallation Operating and Installation Instructions
Contents Safety warnings .............................................................................. 62 For the User ...................................................................................... 62 For the Installer ................................................................................. 63 Description of the Appliance ......................................................... 65 Extraction .........................................................................................
Safety warnings For the user The cooker hood is designed to extract unpleasant odours from the kitchen, it will not extract steam. Always cover lighted elements, to prevent excess heat from damaging the appliance. In the case of oil, gas and coal fired cookers it is essential to avoid open flames. Also, when frying, keep the deep frying pan on the cooker top/cooker under careful control. The hot oil in the frying pan might ignite due to overheating.
For the installer When used as an extractor unit, the hood must be fitted with a 150mm diameter hose. Should there already be a pipe of diameter 125 or 120 mm that ducts to the outside through the walls, it is possible to use the 150/125120 mm reduction flange provided. In this case the hood will be slightly noisier.
When the hood is used in its extraction mode, the following rules must be followed to obtain optimal operation: - short and straight outlet hose - keep bends in outlet hose to a minimum - never install the hoses with an acute angle, they must always follow a gentle curve. - keep the hose as large as possible (preferably the same diameter as the outlet hole).
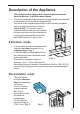
Description of the Appliance The cooker hood is designed to extract unpleasant odours from the kitchen, it will not extract steam. The hood is supplied as an extractor unit and can also be used with a recirculation mode by fitting a charcoal filter. You will need an original charcoal filter for this function (Available from your local Service Force Centre).
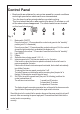
Control Panel Best results are obtained by using a low speed for normal conditions and a high speed when odours are more concentrated. Turn the hood on a few minutes before you start cooking. The hood should be left on after cooking for about 15 minutes or until all the odours have disappeared. The control switches are located on the hoods front panel: Fig.
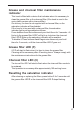
Grease and charcoal filter maintenance indicator This hood is fitted with a device that indicates when it is necessary to clean the grease filter or the charcoal filter (if the hood is used in the recirculation version with a charcoal filter). On delivery, the hood is not supplied with a charcoal filter, so the saturation indicator will be disabled.
Maintenance and Care The hood must always be disconnected from the electricity supply before beginning any maintenance work. Cleaning the hood Clean the outside of the hood using a damp cloth and a solution of water and mild washing up liquid. Never use corrosive, abrasive or flammable cleaning products or products containing bleach. . Never insert pointed objects in the motors protective grid. Only ever clean the switch panel and filter grill using a damp cloth and mild washing up liquid.
Charcoal filter The charcoal filter should only be used if you want to use the hood in recirculation mode. To do this you will need an original charcoal filter (available from your local Service Force Centre). Cleaning/replacing the charcoal filter Unlike other charcoal filters, the LONGLIFE charcoal filter can be cleaned and reactivated. With normal use the filter should be cleaned every second month (when using the hood 2,5 hours per day,on avarage).
Warning Failure to observe the instructions on cleaning the unit and changing the filters will cause a fire hazard. You are therefore strongly recommended to follow these instructions. The manufacturer declines all responsibility for any damage to the motor or any fire damage linked to inappropriate maintenance or failure to observe the above safety recommendations. Changing the light bulb Disconnect the cooker hood from the mains supply.
What to do if If your appliance fails to work properly please carry out the following checks. Symptom Solution The cooker hood will not start... Check that: The hood is connected to the electricity supply. Check that a fan speed has been selected The cooker hood is not working Check that: The fan speed is set high enough for the task. The grease filters are clean. The kitchen is adequately vented to allow the entry of fresh air.
Technical assistance service (not for UK) You are welcome to telephone our technical assistance service (see list of technical assistance centres) whenever you need information or in the unlikely event of a fault. For service in Australia call 1300 650 020. When calling, please be ready to specify: 1. The model code number 2. The serial number (E-Nr.) 3. The manufacturing number (F-Nr.) This information is shown on the registration plate inside the unit behind the grease filter.
If you require Customer Service in the Republic of Ireland please contact us at the address below: AEG Electrolux Group (Ire) Ltd Long Mile Road Dublin 12 Republic of Ireland Tel: + 353 (0) 1 4090751 Email: service.eid@electrolux.ie CUSTOMER CARE DEPARTMENT For general enquiries concerning your AEG appliance or for further information on AEG products, please contact our Customer Care Department by letter or telephone at the address below or visit our website at www.aeg.co.
Mounting accessories included 1 1 6 6 14 4 14 14 2 14 Reduction flange Ø 150-125 Deflector Wood-screws 6 x 70 mm Wall plugs Ø 10 mm Nuts Metal-screw 3 x 9 mm (2 upper chimney fixing + 2 for chimney brackets) Metal-screw 4 x 8 mm (4 for additional structure fixing + 10 to fix hood to structure) Metal-screw 4 x 7 mm (to fix chimeny sections) Chimney brackets (only for HI 8820 / DI 8820) fixing springs Electrical connection (not for UK) Safety warnings for the electrician Before connecting the appliance to t
Installation - Fig. 7-8-9-10 Assembling the deflector (3 parts only for filter version): The three parts should be fixed with 2 screws, the deflector extension is adjustable and should correspond to the width of the chimney flue support, to which it is then fixed. Fig. 7. Expansion plugs are provided to secure the hood to most types of ceilings. However, a qualified technician must verify suitability of the materials in accordance with the type of ceiling.
3 4 273 4 4 4 244 4 4 6 6 273 190 7 14,5 5 6 214 9 7 7 8 8 7 7 2a 2a 2b 2b 12 10 11 Fig.
For extractor versions (13A), connect the other end of the exhaust pipe to the flue. For filter versions (13F), fit deflector F to the support and secure it to the bracket supplied using 4 screws, then connect the exhaust pipe to the connection ring located on the deflector. Fit the nuts with fixing hooks (14) supplied inside the top and bottom sections of the flues at the rectangular slots. A total of 14 nuts must be fitted.
14 F 15b 13F 15b 15b 15b 16 15b 15a 15b 15b 16 13A 15b 15b Fig.
18 18 18 18 18 18 18 18 18 18 M 17 19 19 X 20 X 20 Fig.
From the Electrolux Group. The world´s No.1 choice. The Electrolux Group is the world´s largest producer of powered appliances for kitchen, cleaning and outdoor use. More than 55 million Electrolux Group products (such as refrigerators, cookers, washing machines,vacuum cleaners, chain saws and lawn mowers) are sold each year to a value of approx. USD 14 billion in more than 150 countries around the world. AEGElectrolux Addington Way Luton Bedfordshire LU4 9QQ http://www.aeg.co.