Use & Care Guide Trash Compactor Gu[a de uso y cuidado Compactador de basura Guide d'utilisation et d'entretien Compacteur _ dechets % iiili ii!i!iii iii li!i!ii_il ii_ iiiiiiil iiiiil !iiii i!iii !ii!ii!i _i!i! i_i !i!i_!ii !i_iii!i !i!i! if!ii!iiiii _i!i! ii;if! iil ii_i! i!i !!i!i!!i ill !!_!i !i!!i!i! !iili i_ !i!i!!i! i!!iiiii !_!i!i!! i!i!! iiiii!_!i!i !!iiii!i iii i!_!i !i!!i!i! !iiiii!_ !i!i!!i! i!!iiiii !_!i!i !!iiii! ili ii!ji!i !!i!i !!iill !!_!i!i!!i!i! !iiiii!_ !i!i!!ii ii!iliii !_!i! i!!
Finding Information Please read and save this guide Thank you for choosing Electrolux, the new premium brand in home appliances. This Use & Care Guide is part of our commitment to customer satisfaction and product quality throughout the service life of your new appliance. We view your purchase as the beginning of a relationship. To ensure our ability to continue serving you, please use this page to record important product information.
Safety Important Safety Read all instructions Instructions before using this appliance. Save these instructions Do not attempt manual. Safety for future reference. to install or operate your appliance until you have read the safety precautions in this items throughout this manual are labeled with a WARNING or CAUTION based on the risk type. READ ALL INSTRUCTIONS OPERATING COMPACTOR.
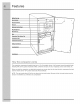
Features BatteryBack-up Doorinterlock i tt I_ _n_er_ock_ctuatorI Itl _ ¢_ _ _ ,,* /0 LevelingLegs How the compactor works The compactor compresses household trash up to 1/6 of its original volume. It will compact normal household trash including milk cartons, glass and plastic bottles, containers and jars, tin cans, wrappings, boxes, food wastes, etc.
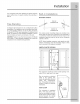
Installation Your compactor has been designed to require minimum space without loss of capacity whether free-standing or built-in. Built-in MOUNTING Installations STRAPS TOP OF COMPACTOR Free Standing As shipped, the Compactor is only configured for built in installations. This appliance can be converted from builtin to free-standing with the use of Toe Kick Accessory Kit Model ETC15TKH (sold separately).
Installation Leveling the Compactor Your compactor has four adjustable levelers; (2) rollers in the rear and (2) legs in the front. They allow you to adjust for uneven floors and also trim the unit up to fit an undercounter installation. BACK OF COMPACTOR _ / _/ 1 SLOTS To level the back of the compactor: Tip the back of compactor up and onto a wood block. Loosen the adjustinq screws only far enough to move the rollers to a higher or lower slot. Retighten the adjusting screws and remove the wood block.
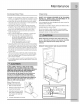
Preparation Use of Key Lock Switch The key lock switch on your compactor your protection as a safety measure. is provided for When the key lock switch is in the "OFF" and "LOCK" positions, the compactor will not operate. Remove the key to keep children from operating the unit or to prevent anyone from tampering with it. When the key lock switch is in the "ON" position, the compactor is ready for operation. The key cannot be removed when in the "ON" position.
Operation Delay Start / Clock The compactor is now ready to use. FOR BEST RESULTS, ALWAYS FiLL EACH NEW BAG COMPLETELY BEFORE OPERATING THE COMPACTOR. DOING SO WiLL MiNiMiZE BAG PULLUP AND TEARING. _) run @ start mode ifoo.oo (_ I i @ delay I.I |l ! - ,toJ start clock delay 1. Slide trash bucket closed completely. 2. Turn Key Lock Switch to "ON" position.
Maintenance Although it is not necessaryto compactuntil the draweris full or nearlyso, it is suggestedthat for maximumcompaction,you start the compactoreachtime a significantamount of trash is added. At full stroke, the ram doesnot travel all the wayto the bottom of the trash bucket.Trashin the bottom 1/3 of the bucket will be crushedduringsubsequentcompacting. ,, Glassbottles can make a loud noisewhen they breakduring compaction.This is normal.Bottles do not alwaysbreak during the first cycle.
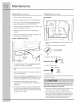
Maintenance Cleaning Cleaning (continued) (continued) CLEAN RAM 1. Pull out trash bucket until it stops. / 2. Remove (1) screw from each of the bucket slides. 3. Press down on left and right bucket slide release tabs while pulling the bucket out of the unit. TRASH BUCKET 4. Vacuum and clean cabinet base, track channels, and bucket, particularly in corners. 5. Wash the cabinet interior with a mild detergent solution. 6.
Maintenance Before youcallforservice, check thesehandy hintswhich maysaveyouthecostofaservice call: 1. Iselectric cordplugged insecurely? 2. Hasahouse fuseblownoracircuitbreaker tripped? 3. Isthedoorpushed firmlyshut? 4. Isthekeyswitchinthe"ON"position? 5. Iftrashbucket isdifficulttoclose, check toseeifany trashhasfallenbehind thebucket - preventing itfrom closing completely. 6. 7. The motor has an automatic thermal cutout. If you have compacted repeatedly, this protector may have opened the circuit.
Warranty Major Appliance Warranty Information Your appliance is covered by a one year limited warranty. For one year from your original date of purchase, Electrolux will repair or replace any parts of this appliance that prove to be defective in materials or workmanship when such appliance is installed, used, and maintained in accordance with the provided instructions Exclusions This warranty does not cover the following: 1. 2. 3.