E3000-5 User manual Built-In Electric Oven
Contents Thank you for choosing one of our high-quality products. To ensure optimal and regular performance of your appliance please read this instruction manual carefully. It will enable you to navigate all processes perfectly and most efficiently. To refer to this manual any time you need to, we recommend you to keep it in a safe place. And please pass it to any future owner of the appliance. We wish you much joy with your new appliance.
Operating Instructions 3 Operating Instructions 1 Safety instructions Electrical safety • This appliance must be only connected by a registered electrician. • In the event of a fault or damage to the appliance: Take the fuses out or switch off. • Repairs to the appliance must only be carried out by qualified service engineers. Considerable danger may result from improper repairs. If repairs become necessary, please contact our Customer Services or your dealer.
Description of the Appliance • Do not store any moist foods inside the oven. This could damage the oven enamel. • After switching off the cooling fan, do not keep uncovered dishes in the oven. Moisture may condense in the oven interior or on the glass doors and may get into the units. 3 Note on enamel coating Changes in the colour of the oven’s enamel coating as a result of use do not affect the appliance’s suitability for normal and correct use.
Description of the Appliance Control Panel Oven Power Indicator Oven Functions Temperature Pilot Light Temperature selector Hob Cooking Zone Control Hob Cooking Zone Control Oven Features Top heat and heating elements Oven lighting Shelf positions Fan Bottom Heat Oven shelf runners, removable 5
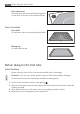
Before Using for the first time Oven steam vent The steam from the oven is fed directly upwards via the duct in the rear of the cooking surface. Oven accessories Oven shelf For cookware, cake tins, roasts and grilled foods. Baking tray For cakes and biscuits. Before Using for the first time Initial Cleaning 1 3 Before using the oven for the first time you should clean it thoroughly. Caution: Do not use any caustic, abrasive cleaners! The surface could be damaged.
Using the Rings 7 Using the Rings 3 2 Also refer to the operating instructions for your built-in hob. It contains important information on ovenware, operation, cleaning and care. Heat settings • You may select the heat settings within the range of settings 1-9. • Intermediate positions may be selected between settings 2 and 7. 1 = lowest heat setting 9 = highest heat setting Switch the cooking zone off approx. 5-10 minutes before cooking is finished to make use of the residual heat.
3 Using the Oven 2. To end the cooking process, turn back to the Off position. The power indicator light is lit as long as a ring is on. Using the Oven Switching the Oven On and Off Oven Power Indicator Oven Functions Temperature Pilot Light Temperature selector 1. Turn the oven functions dial to the desired function. 2. Turn the temperature selector to the desired temperature. The power indicator is lit as long as the oven is in operation.
Using the Oven 9 Oven Functions The oven has the following functions: Oven function Application Light Using this function you can light up the oven interior, e.g. for cleaning. Fan-assisted circulation For baking on up to two oven levels. Set the oven temperatures 20-40 °C lower than when using Conventional. Conventional For baking and roasting on one oven level. Base heat For baking cakes with crispy or crusty bases. Defrost For defrosting e. g.
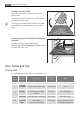
3 Uses, Tables and Tips Inserting the oven shelf: Insert the oven shelf so that the feet point downwards. Push the oven shelf between the guide bars of the selected oven level. The high rim around the oven shelf is an additional device to prevent cookware from slipping. Inserting the oven shelf and the baking tray together: Lay the oven shelf on the baking tray. Push the baking tray between the guide bars of the selected oven level.
Uses, Tables and Tips Heat setting Cookingprocess suitable for Cooking time Hints 3-4 Steaming Braising To steam vegetables, fish to braise meat 20-45 mins. With vegetables add only some liquid (some tablespoons) To steam potatoes 20-60 mins. Use only some liquid, e.g.: max. ¼ l water for 750 g potatoes To cook larger quantities of food, stews and soups 60-150 mins.
Uses, Tables and Tips 1 cake tin: e.g. oven level 1 2 baking trays: e. g. oven levels 1 and 3 3 2 General Instructions • Insert the tray with the bevel at the front. • With Conventional or Fan-assisted circulation you can also bake with two tins next to one another on the oven shelf at the same time. This does not significantly increase baking time. When frozen foods are used the trays inserted may distort during cooking.
Uses, Tables and Tips 13 Baking table Type of baking Ovenfunction Shelf position Temperature °C Time Hours mins.
Uses, Tables and Tips Type of baking Ovenfunction Shelf position Temperature °C Time Hours mins. Fruit flans made with short pastry Conventional 3 170-190 0:40-1:20 Yeast cakes with delicate toppings (e. g.
Uses, Tables and Tips Type of baking Ovenfunction Shelf position Temperature °C Time Hours mins.
Uses, Tables and Tips Dish Shelf position Oven function Fish bakes Stuffed vegetables Temperature Time °C Hours mins.
Uses, Tables and Tips 17 Roasting table Type of meat Quantity Ovenfunction Shelf position TemperaTime ture Hours mins. °C Beef Pot roast 1-1.5 kg Conventional 1 200-250 2:00-2:30 per cm. of thickness Roast beef or fillet - rare per cm. of thickness Rothitherm 1 190-2001) 0:05-0:06 - medium per cm. of thickness Rothitherm 1 180-190 0:06-0:08 - well done per cm. of thickness Rothitherm 1 170-180 0:08-0:10 1-1.
Uses, Tables and Tips Type of meat Quantity Ovenfunction TemperaTime ture Hours mins. °C Shelf position Goose 3.5-5 kg Rothitherm 1 160-180 2:30-3:30 Turkey 2.5-3.5 kg Rothitherm 1 160-180 1:45-2:30 Turkey 4-6 kg Rothitherm 1 140-160 2:30-4:00 1-1.
Uses, Tables and Tips 19 Defrosting Oven function: Defrost (no temperature setting) • Unwrap the food and place it on a plate on the oven shelf. • Do not cover with a plate or bowl, as these can substantially lengthen the defrosting time. • For defrosting, place the shelf in the 1st oven level from the bottom. Defrosting table Defrosting time mins. Further defrosting time (mins.
Uses, Tables and Tips Oven level Temperature in °C 1 level 2 levels Time in hours (Guideline) Plums 60-70 3 1/4 8-10 Apricots 60-70 3 1/4 8-10 Apple slices 60-70 3 1/4 6-8 Pears 60-70 3 1/4 6-9 Food to be dried Fruit Making preserves Oven function: Base heat • For preserving, use only commercially available preserve jars of the same size. • Jars with twist-off or bayonet type lids and metal tins are not suitable.
Cleaning and Care 21 Cleaning and Care 1 Warning: First switch off the appliance and let it cool down before carrying out any cleaning. Warning: For safety reasons, do not clean the appliance with steam blasters or highpressure cleaners. Attention: Do not use any corrosive cleaning fluids, sharp objects or stain removers. Do not clean the glass oven door with abrasive fluids or metal scrapers, which could scratch the surface. The glass could crack and shatter.
3 Cleaning and Care Fitting the shelf support rails Important! The rounded ends of the guide rails must be pointing forwards! To re-insert, first hook the rail into place at the back (1) and then insert the front and press into place (2). Oven Lighting 1 3 Warning: Risk of electric shock! Prior to changing the oven light bulb: – Switch off the oven! – Disconnect from the electricity supply. Place a cloth on the oven floor to protect the oven light and glass cover.
Cleaning and Care 23 Oven Ceiling The upper heating element can be folded down to make it easier to clean the oven ceiling. 1 1 Folding down the heating element Warning: Only fold down the heating element when the oven is switched off and there is no risk of being burnt! 1. Remove the side shelf support rails. 2. Grip the heating element at the front and pull it forwards and out over the support lug on the inner wall of the oven. 3. The heating element will now fold down.
Cleaning and Care Oven door For easier cleaning of the oven interior the oven door of your appliance can be taken off its hinges. Removing the oven door from its hinges 1. Open the oven door as far as it will go. 2. Undo the clamping levers (A) on both door hinges fully. 3. Close the oven door as far as the first position (approx. 45°). 3 4. Take hold of the oven door with a hand on each side and pull it away from the oven at an upwards angle (Take care: It is heavy).
Cleaning and Care Hanging the oven door back on its hinges 1. From the handle side take hold of the oven door with a hand on each side and hold at an angle of approx. 45°. Position the recesses on the bottom of the oven door on the hinges on the oven. Let the door slide down as far as it will go. 2. Open the oven door as far as it will go. 3. Fold up the clamping levers (A) on both door hinges back into their original positions. 4. Close the oven door.
Cleaning and Care Oven door glass 1 The oven door is fitted with two panels of glass mounted one behind the other. The inner panel can be removed for cleaning. Important Rough handling, especially around the edges of the front panel, can cause the glass to break. Removing the door glass 1. Open the oven door as far as it will go. 2. Undo the clamping levers (A) on both door hinges fully. 3. Close the oven door as far as the first position (approx. 45°). 4.
Cleaning and Care 27 5. Take hold of the door glass on its upper edge and take it out of the guide by pulling it upwards. Cleaning the door glass Clean the door glass thoroughly with a solution of water and washing up liquid. Then dry it carefully. Putting the door glass back 1. From above insert the door glass at an angle into the door profile at the bottom edge of the door and lower it. 2.
3 Cleaning and Care On the open side of the door trim (B) there is a guide bar (C). This must be pushed between the outer door panel and the guide corner(D). The clip seal (E) must be snapped in. 3. Open the oven door as far as it will go. 4. Fold up the clamping levers (A) on both door hinges back into their original positions. 5. Close the oven door.
What to do if … 29 What to do if … Problem Possible cause Remedy The cooking zones are not functioning Consult the operating instructions for the built-in cooking surface The oven does not heat up The oven is not switched on Switch the oven on The required settings have not Check the settings been set The oven lighting is not operating 1 3 3 The house wiring fuse (in the fuse box) has tripped Check the fuse. If the fuses trip repeatedly, please call an authorised electrician.
Disposal Disposal 2 2 1 Packaging material The packaging materials are environmentally friendly and can be recycled. The plastic components are identified by markings, e.g. >PE<, >PS<, etc. Please dispose of the packaging materials in the appropriate container at the community waste disposal facilities. Old appliance W The symbol on the product or on its packaging indicates that this product may not be treated as household waste.
Installation Instructions 31 Installation Instructions 1 1 Attention: The new appliance may only be installed and connected by a registered expert. Please comply with this. If you do not, any damage resulting is not covered by the warranty. Safety information for the installer • The electrical installation is to be set up so that the appliance can be isolated from the mains with a minimum 3mm all-pole contact separation. Suitable separation devices include e.g.
Installation Instructions
Installation Instructions 33
Installation Instructions
Guarantee/Customer Service 35 Guarantee/Customer Service European Guarantee This appliance is guaranteed by Electrolux in each of the countries listed at the back of this user manual, for the period specified in the appliance guarantee or otherwise by law.
Guarantee/Customer Service www.electrolux.com p t b Albania +35 5 4 261 450 Rr. Pjeter Bogdani Nr. 7 Tirane Belgique/België/ Belgien +32 2 363 04 44 Bergensesteenweg 719, 1502 Lembeek Èeská republika +420 2 61 12 61 12 Budìjovická 3, Praha 4, 140 21 Danmark +45 70 11 74 00 Sjællandsgade 2, 7000 Fredericia Deutschland +49 180 32 26 622 Fürther Straße 246, 90429 Nürnberg Eesti +37 2 66 50 030 Mustamäe tee 24, 10621 Tallinn España +34 902 11 63 88 Carretera M-300, Km.
Guarantee/Customer Service 37 p t b Türkiye +90 21 22 93 10 25 Tarlabaþý caddesi no : 35 Taksim Istanbul Ðîññèÿ +7 495 937 7837 129090 Ìîñêâà, Îëèìïèéñêèé ïðîñïåêò, 16, ÁÖ „Îëèìïèê“ Óêðà¿íà +380 44 586 20 60 04074 Êè¿â, âóë.
Service Service In the event of technical faults, please first check whether you can remedy the problem yourself with the help of the operating instructions (section “What to do if…”). If you were not able to remedy the problem yourself, please contact the Customer Care Department or one of our service partners. In order to be able to assist you quickly, we require the following information: – Model description – Product number (PNC) – Serial number (S No.
822 722 071-A-240309-01 Subject to change without notice www.electrolux.