
Manual
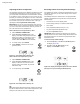
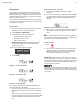

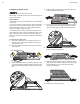
Table Of Contents
- Keep a Record for Quick Reference
- Before Setting Oven Controls
- Setting Oven Controls
- Wave-Touch™ Display Modes
- User Preferences
- Setting the Clock
- Setting the Clock Display
- Setting 12 or 24 Hour Display
- Changing Oven Temperature Display (°F or °C)
- Changing Between 12 Hour Energy Saving or Continuous Bake Mode Settings
- Adjusting Tone Volume
- Control Lock
- Timers
- Changing Settings
- Temperature Visual Display
- Interior Oven Lights
- Cook Options
- Rapid Preheat
- Bake
- Convection Bake
- Convection Convert
- Cook Duration
- Setting Cook Duration with End Time
- Broil
- Recommended Broiling Times
- Convection Broil
- Convection Roast
- Meat Probe
- Setting the Probe
- Setting the Probe
- Recommended Internal Temperatures
- Setting Defrost
- Setting Dehydrate
- Setting Bread Proof
- Slow Cook
- Warm Oven
- Warm Oven Temperature Selection
- Setting Multi Stage
- Setting Multi Stage for 3 Stages
- My Favorite
- Setting the Sabbath Mode
- Canceling Sabbath Mode
- What to do after a power failure or power interruption when Sabbath mode is active
- Adjusting the Oven Temperature
- Restoring Control to Factory Default Settings
- Before Starting Clean
- Setting Clean
- Setting Delayed Clean
- Care and Cleaning
- Solutions to Common Problems
- Warranty
- Blank Page

38 Care and Cleaning
Caring for your glide racks
Handle oven racks only when they are cool.
After cooking or after the self clean cycle, racks will be very hot
and can cause burns.
Important Notes:
• Remove all oven racks, including ladder racks, before starting
a clean cycle.
• Do not use cooking oil, cooking spray, or other oil-based lubri-
cation products on the glide rack extension tracks. Use only the
graphite lubrication in this area. To order graphite lubrication,
contact your installer, servicer or dealer.
• It is important that the parts of the rack that contact the oven
sides always have a light coating of vegetable oil. Apply a thin
layer of vegetable oil to the sides of the rack after every self-
clean cycle and when the rack becomes difficult to reposition in
the oven.
To lubricate the glide rack:
1. Remove the rack from the oven and place the rack on a
large flat surface covered with newspaper or scrap cloth.
Fully extend the rack.
2. Wipe away debris and crumbs from the glide track using a
cloth or sponge.
3. Shake graphite lubrication very well before applying. Place
four drops of graphite lubrication along the tracks (see area
circled on figure below). Repeat on both sides of the glide
rack.
4. Extend and return the glide rack several times along the
tracks to distribute the lubrication.
5. Turn glide rack over. Shake graphite lubrication very well
before applying. Place four drops of graphite lubrication
along the tracks. Repeat on both sides of the glide rack.
6. Extend and return the glide rack several times along the
tracks to distribute the lubrication.
7. Apply a thin layer of cooking oil to the outer frame of the
glide rack as shown below. Keeping the frame sides lightly
lubricated allows the entire rack to slide easily when
changing rack positions.
8. Replace rack in oven right side up.