
Installation Guide


12
30" & 36" GAS RANGE INSTALLATION INSTRUCTIONS
6.4
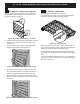
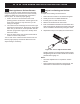
36" Models - Glide Racks
On 36" models, the glide tracks for the gliding oven racks
come pre-installed on the ladder rack supports (see
Figure 19).
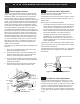
The glide racks appear slightly different than the at
racks (see Figre 20). Only the glide racks can be
installed onto the glide tracks.
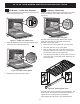
1. Extend the two bottom glides fully out of the oven.
2. Place the glide rack on top of the glides.
3. Near the back of the rack, t the rack slot onto the
track tabs. Near the front of the rack, t the track pin
into the hole on the rack (see Figure 20).
4. Once the rack is installed, it can be pulled in and out
of the oven cavity on the glide tracks. Repeat for the
top set of glides.
The glide racks can only be used in these positions. The
racks may be removed from the tracks and used like a
regular at rack on all the other rack positions.
Insert regular at oven racks in any desired position.
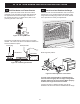
6.3
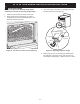
36" Models - Ladder Rack Supports
1. Remove the thumb screws located on each side of the
oven cavity (see Figure 17).
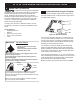
2. Place the ladder racks into the support brackets loca-
ted on the oven sides (see Figure 18).
3. Replace the screws removed in Step 1.
Figure 17: Ladder rack thumb screw
Figure 18: Ladder rack supports
Figure 19: Ladder rack glides
Figure 20: Installing glide racks