Finding Information MAKE A RECORD FOR FUTURE USE Brand_______________________________________________________________ Purchase Date______________________________________________________ Model Number______________________________________________________ Serial Number______________________________________________________ NOTE The serial plate is located under the burner box. QUESTIONS? For toll-free telephone support in the U.S.
Finding Information TABLE OF CONTENTS Finding Information ........................................... 2 Make a Record for Future use .......................... 2 Questions? ........................................................ 2 Safety ................................................................... 4 Important Safety Instructions .............................. 4 Getting Start ........................................................ 7 Grounding Instructions .......................................
Safety IMPORTANT SAFETY INSTRUCTIONS Please read all safety instructions before using your new Electrolux cooktop. ! WARNING To reduce the risk of fire, electrical shock, or injury when using your gas cooktop, follow basic precautions including the following: ! WARNING If the information in this manual is not followed exactly, a fire or explosion may result causing property damage, personal injury or death.
Safety ! WARNING Stepping, leaning or sitting on this cooktop can result in serious injuries and also cause damage to the cooktop. Do not allow children to climb or play around the cooktop. Never use your appliance for warming or heating the room. Storage on ApplianceFlammable materials should not be stored on the cooktop or near surface units. This includes paper, plastic and cloth items, such as cookbooks, plasticware and towels, as well as flammable liquids.
Safety Utensil Handles Should Be Turned Inward and Not Extend Over Adjacent Surface Burners/Unit To reduce the risk of burns, ignition of flammable materials, and spillage due to unintentional contact with the utensil, the handle of the utensil should be positioned so that it is turned inward, and does not extend over adjacent surface burners.
Getting Start 7 GROUNDING INSTRUCTIONS For personal safety, the cooktop must be properly grounded. For maximum safety, the power cord must be plugged into an electrical outlet that is correctly polarized and properly grounded. DO NOT operate the cooktop using a 2-prong adapter or an extension cord.
Surface Cooking FLAME SIZE For most cooking, start on the highest control setting and then turn to a lower one to complete the process. Use the chart below as a guide for determining proper flame size for various types of cooking. The size and type of utensil used and the amount of food being cooked will influence the setting needed for cooking. For deep fat frying, use a thermometer and adjust the surface control knob accordingly. If the fat is too cool, the food will absorb the fat and be greasy.
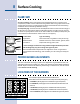
Surface Cooking 9 PLACEMENT OF BURNER HEADS AND CAPS Place burner head over each gas orifice, matching the head with the orifice size. Be careful not to damage the electrode while placing the head over the orifice. Make sure electrode fits correctly into slot in burner head. Place a burner cap on each burner head, matching the cap size to the head size. The cap for each burner has an inner locating ring which centers the cap correctly on the burner head.
Surface Cooking SURFACE COOKING UTENSILS *GOOD POOR Flat bottom and straight sides. Pan overhangs unit by more than 2.5 cm (1). Tight fitting lids. Pans should have flat bottoms. Check for flatness by rotating a ruler across the bottom. There should be no gaps between the pan and ruler. * Specialty pans such as lobster pots, griddles and pressure cookers may be used but must conform to the above recommended cookware requirements. Weight of handle does not tilt pan. Pan is well balanced.
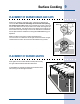
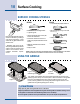
Surface Cooking 11 USING THE WOK STAND The Wok Stand provided with your cooktop is designed to allow round-bottomed woks to be used. It is recommended that you use a 14 inch diameter (35.5 cm) or less Wok. It is recommended that you use the right front POWER burner with the wok stand for best performance. If properly positioned, the Wok Stand will not slide off the grate. ! CAUTION Always use potholders to remove the wok stand from the grate. Allow the wok stand to cool before removing.
Surface Cooking USING THE SIMMER PLATE The simmer plate (Figure 1) is intended to diffuse lower temperature of the burner to help cooking delicate aliment such as chocolate, milk, bechamel, etc... It can also be use for cooking sauce during long period. With the grate in position over the burner, set the simmer plate on top of the grate positioning the notches in the simmer plate over the grate fingers (See Figure 2) and then place the utensil on the simmer plate.
Surface Cooking SETTING SURFACE CONTROLS Your cooktop may be equipped with any combination of the following burners: Simmer Burner: best used for simmering delicate sauces, etc. Standard Burner: used for most all surface cooking needs. Large Burner: best used when bringing large quantities of liquid to temperature and when preparing larger quantities of food. Regardless of size, always select a utensil that is suitable for the amount and type of food being prepared.
General Care & Cleaning CARE & CLEANING TABLE Surfaces How to Clean Painted and Plastic Control Knobs For general cleaning, use hot, soapy water and a cloth. For more difficult soils and built-up grease, apply a liquid detergent directly onto the soil. Leave on soil for 30 to 60 minutes. Rinse with a damp cloth and dry. DO NOT use abrasive cleaners on any of these materials; they can scratch. Glass Surface Before cleaning, turn all controls to OFF.
General Care & Cleaning 15 CLEANING THE BURNER GRATES, BURNER CAPS, BURNER HEADS, SIMMER PLATE AND GRIDDLE The Burner Grates, Burner Caps, Burner Heads, simmer plate and griddle should be routinely cleaned. Keeping the burner ports clean will prevent improper ignition and an uneven flame.
General Care & Cleaning COOKTOP CLEANING AND MAINTENANCE Consistent and proper cleaning is essential to maintaining your ceramic glass cooktop Prior to using your cooktop for the first time, apply the recommended Cleaning Creme to the ceramic surface. A sample of that cleaning creme is supplied with your appliance and you will find it in store. Clean and buff with a paper towel. This will make cleaning easier when soiled from cooking.
General Care & Cleaning CLEANING RECOMMENDATIONS FOR THE CERAMIC GLASS COOKTOP (CONTINUED) ! CAUTION Damage to the ceramic glass cooktop may occur if you use scrub pad. Plastic or foods with a high sugar content: These types of soils need be removed immediately if spilled or melted onto the ceramic cooktop surface. Permanent damage (such as pitting of the cooktop surface) may occur if not removed immediately.
Solutions to Common Problems IMPORTANT Before calling for service, review this list. It may save you both time and expense. This list includes common experiences that are not the result of defective workmanship or material in your cooktop. SURFACE BURNERS DO NOT LIGHT Surface Control knob has not been completely turned to LITE. Push in and turn the Surface Control knob to LITE until burner ignites and then turn control knob to desired flame size. Be sure gas supply valve is open.
Solutions to Common Problems SCRATCHES OR ABRASIONS ON CERAMIC GLASS COOKTOP SURFACE Coarse particles (such as salt or sand) are between cooktop and utensil. Be sure cooktop surface and bottom of utensils are clean before use. Small scratches do not affect cooking and will become less visible with use. Cleaning materials not recommended for glass ceramic cooktop have been used. See Ceramic-Glass Cooktop section in this Owner's Guide.
Warranty Information COOKTOP WARRANTY Your cooktop is protected by this warranty In the U.S.A., your appliance is warranted by Electrolux Home Products North America, a division of White Consolidated Industries, Inc. We authorize no person to change or add to any of our obligations under this warranty. Our obligations for service and parts under this warranty must be performed by us or an authorized Electrolux Home Products North America servicer.