Installation, Use & Care Guide 30”(76.2 cm) and 36”(91.4 cm) Range Hood Guide d’installation, utilisation et d’entretien 30”(76.2 cm) et 36”(91.4 cm) Hotte de la Cuisiniere Guia de Instalación, Uso y Cuidado Campana de cocina de 30”(76.2 cm) y 36”(91.
Finding Information Please read and save this guide Thank you for choosing Electrolux, the new premium brand in home appliances. This Use & Care Guide is part of our commitment to customer satisfaction and product quality throughout the service life of your new appliance. We view your purchase as the beginning of a relationship. To ensure our ability to continue serving you, please use this page to record important product information.
Important Safety Instructions Important Safety Instructions Read all instructions before using this appliance. Save these instructions for future references Approved for residential appliances For residential use only Do not attempt to install or operate your appliance until you have read the safety precautions in this manual. Safety items throughout this manual are labeled with a WARNING or CAUTION based on the risk type.
Important safety Instructions READ AND SAVE THESE INSTRUCTIONS Important safety Instructions FOR GENERAL VENTILATING USE ONLY. DO NOT USE TO EXHAUST HAZARDOUS OR EXPLOSIVE MATERIALS OR VAPORS. TO REDUCE THE RISK OF A RANGE TOP GREASE FIRE: a) b) TO REDUCE THE RISK OF FIRE, ELECTRIC SHOCK, OR INJURY TO PERSONS, OBSERVE THE FOLLOWING: A. Use this unit only in the manner intended by the manufacturer. If you have questions, contact the manufacturer B.
List of materials- Electrical & Installation requirements List of Materials CAUTION! Remove carton carefully. Wear gloves to protect against sharp edges. Parts supplied with unit for the installation •• •• •• •• •• Hood canopy assembly with blower. Lamp already installed. Transition (31⁄4” x 10” rectangular) Grease filter.
Location requirements Location Requirements IMPORTANT: Observe all governing codes and ordinances. Have a qualified technician install the hood insert. It is the installer’s responsibility to comply with installation clearances specified on the model/serial rating plate. The model/serial rating plate is located behind the left filter on the rear wall of the hood insert. The range hood location should be away from strong draft areas, such as windows, doors and strong heating vents.
Venting Requirements Venting Requirements •• Vent system must terminate to the outdoors. •• Do not terminate the vent system in an attic or other enclosed area. •• Do not use 4” (10.2 cm) laundry-type wall caps. •• Use metal vent only. Rigid metal vent is recommended. Plastic or metal foil vent is not recommended. •• The length of vent system and number of elbows should be kept to a minimum to provide efficient performance. For the most efficient and quiet operation: •• Use no more than three 90° elbows.
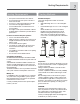
Range Hood Installation Installation Exhaust transition/damper Installation - Ducting version After having chosen the vent option, proceed as follows: •• Prepare duct and conduit cut outs as needed. •• If possible, disconnect and move freestanding or slide-in range from cabinet opening to provide easier access to rear wall. Otherwise put a thick, protective covering over countertop, cooktop or range to protect from damage and debris. Select a flat surface for assembling the unit.
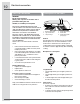
Blower Motor Systems Installation For recessed bottom cabinet only If the cabinets have front, side or back trim, make 2 wood shims the width of the trim and attach them to the cabinet bottom recess on both sides. 8-1/2” min. opening for ductwork View From Rear Cleats 1” x6” Min. Mounting Support Installation to wall (Horizontal duct– 31⁄4”x 10” Rectangular) •• Use the diagram or the hood as a template and mark the locations on the wall for ductwork, electrical wiring and keyhole screw slots.
Electrical connection Electrical connection WARNING Electrical Shock Hazard Warning: Turn off power circuit at the service panel before wiring this unit. 120 VAC, 15 or 20 Amp circuit required. ELECTRICAL GROUNDING INSTRUCTIONS THIS APPLIANCE IS FITTED WITH AN ELECTRICAL JUNCTION BOX WITH 3 WIRES, ONE OF WHICH (GREEN/YELLOW) SERVES TO GROUND THE APPLIANCE.
Maintenance Maintenance ATTENTION! Before performing any maintenance operation, isolate the hood from the electrical supply by switching off at the connector and removing the connector fuse. Or if the appliance has been connected through a plug and socket, then the plug must be removed from the socket. Cleaning Do not spray cleaners directly to the control while cleaning the Hood.
Warranty Information Your appliance is covered by a one year limited warranty. For one year from your original date of purchase, Electrolux will pay all costs for repairing or replacing any parts of this appliance that prove to be defective in materials or workmanship when such appliance is installed, used and maintained in accordance with the provided instructions. Exclusions This warranty does not cover the following: 1.