
User Guide


6 www.electrolux.com
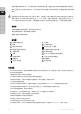
CNT
CNS
KR
ID
TH
VN
EN
• This appliance is intended for domestic use only. The manufacturer cannot accept any liability for
possible damage caused by improper or incorrect use.
• This appliance is suitable to operate on both 50 and 60Hz.
• CAUTION: In order to avoid a hazard due to inadvertent resetting of the thermal cut-out, this appliance
must not be supplied through an external switching device, such as a timer, or connected to a circuit
that is regularly switched on and off by the utility.
GETTING STARTED AND OPERATING INSTRUCTIONS
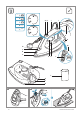
1 Before first use. Remove all adhesive remains and gently rub with a dampened cloth. Rinse water
tank to remove foreign particles. Position the steam iron horizontally on the ironing-board or on a
heat resistant, secure surface at the same height as an ironing-board. Unwind and straighten the
power cord.
2 Fill the steam iron with water. Make sure, the plug is outside the power outlet. Raise the heel of
the iron, open the filling aperture cover (P). Use the water filling container provided (F), pour water
to maximum level (M). Close the cover (P). This product is appropriate for use with tap water. It is
recommended to use Electrolux AquaSense filtered water resp. a mix of 50% distilled, 50% tap water
if the tap water is particularly hard.
Always refill the water tank to MAX level using cold water.
Caution! Never operate the appliance without any water in the tank.
This product is equipped with a detachable Soft Water Activator (L),
We recommend to replace the
Soft Water Activator every 3 months.
.
Before starting ironing, please test your iron on an old towel to ensure that no residues inside the
iron are transferred to your garments. If necessary, wipe the soleplate with a slightly damp cloth.
3 Connect the steam iron to the mains supply. Select the ironing programme from the temperature
selector (E) on the steam iron. The light indicator (C) on the iron will pulsate when preheating. When
turned on for the first time, temporary vapours/odours may occur. The iron is equipped with an au-
to-steam function, which automatically adjusts the steam output to the selected ironing programme
supporting best ironing results.
4 As soon as the selected temperature has been reached, the lights indicator (C) is on permanently
and the headlight (D) turns on. Now the iron is ready to be used.
5 To activate the steam function, press and hold the steam on/off button (I). To stop the steam func-
tion, release the steam on/off button.
6 To use the continuous steam function, slide the steam button lock (R). To stop the continuous steam
function, slide the steam button lock.
7 For extra steam, press the steam jet button for one second.
Iron with extra steam: Press the steam buttons the same time for improved crease removal. When
releasing the buttons, use up the steam before putting the iron back on its heel.
Caution! Never release steam while the iron is standing on its heel.
Dry ironing: When not pressing steam buttons, the iron will be in dry mode.
8 Using
the spray mist. Pre-damp fabrics by pressing the spray button several times to release a fine
mist; ensure the tank is at least half full.
9 Steam hanging items.
The vertical steam function is ideal for curtains and suits. Hold the iron at a
distance of 10-20 cm and press the steam jet button.
10 The iron is equipped with 3-way auto-off function. If the iron is left unattended on soleplate or the
side, it automatically turns off after 30 seconds. If left unattended on the heel it automatically turns
off after 8 minutes. To turn it on again, move the iron. A short beep can be heard before the iron is
switched off by itself. To reactivate the iron, move it shortly and it is back to working mode.
11 To switch-off the steam iron, turn the temperature selector to position 0, a short beep can be heard
and all lights will turn off. Disconnect the mains plug. Never pull the supply cord. Instead, grasp the
plug and pull.
Empty the water tank and let the iron cool completely before storage.
12 Always store the iron on its heel
with the cord twisted loosley around the cable wrap facility. To
clean exterior surfaces, use damp soft cloth and wipe dry. Do not use any chemical solvents, as they
may damage the surface.