user manual Oven EB SL7
electrolux Electrolux. Thinking of you. Share more of our thinking at www.electrolux.com Contents Operating Instructions............................ Safety instructions.................................. Description of the Appliance .................. Before Using for the first time ................. Using the Oven ...................................... 3 3 4 8 9 Cleaning and Care................................. What to do if …..................................... Installation Instructions ...........
electrolux 3 Operating Instructions 1 Safety instructions Electrical safety • This appliance must be only connected by a registered electrician. • In the event of a fault or damage to the appliance: Take the fuses out or switch off. • Repairs to the appliance must only be carried out by qualified service engineers. Considerable danger may result from improper repairs. If repairs become necessary, please contact our Customer Services or your dealer.
electrolux Description of the Appliance General Overview Oven displays and Touch Control sensor fields Water drawer Door handle Heated drawer Oven door 3 The oven switches off after 2 minutes, if no function is selected and is changed at the oven nothing.
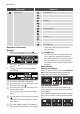
electrolux 5 The electronic oven controls Indicators Menu option symbol (with oven shelf level) Clock Heat indicator Time functions Temperature Weight Meat core temperature Symbols Certain symbols are displayed in the displayed according to the function set. Symbol Display (Examples) Function Countdown timer 4:30 The countdown timer is active. Time 10:00 Indicates the current time set. Duration 1:00 Indicates the period of time required for the cooking process.
electrolux Set values Select options On/Off Oven lighting Confirm Scroll Drawer heater Main menu Sensor field Function Comment , To move down and up in the menu. When a function is active: • Press once: Change to the higher menu (function remains active), after 5 seconds move again into the active menu option • Press twice: Up and down in the higher menu (function switches off) To display main menu. Functions set switch off (except for countdown timer). To confirm.
electrolux 7 Oven Features Top heat and heating elements Oven lighting Oven levels Meat probe socket Fan Oven lighting Rear wall heating element/Fat filter Oven shelf runners, removable Oven shelf runners, removable Bottom heat (not visible) Steam generator/ Steam rosette Oven accessories Roasting pan (high-sided baking tray) Oven shelf For cookware, cake tins, roasts and grilled foods. For baking and roasting or use as a pan to collect fat. Meat probe Baking tray For cakes and biscuits.
electrolux Glass cookware with 2 grill inserts QuickSponge 180 Extremely absorbent sponge for absorbing any residual water from the steam generator. Before Using for the first time 3 If you would like to change one of these 4. base settings at a later date, please refer to the Basic Settings section. Using time. or set the hour of the current Setting the language 1. – – – When the appliance has been connected to the electrical supply, the following is shown in the display.
electrolux 9 Using the Oven The menus in overview Main menu Assisted Cooking Submenu Pork/Veal Beef/Game/Lamb Poultry Fish Cake Desserts Pizza/Pie/Bread Casseroles/Gratins Side Dishes Combi Steaming Convenience Specials Heating Functions Fan Cooking Moist Fan Cooking Conventional Cooking Pizza Setting Turbo Grill Economy Grill Dual Grill Bottom Heat Slow Cook Regenerating Quarter Steam + Heat Half Steam + Heat Full Steam My Programmes 1- My Program 2- My Program ...
electrolux Main menu Basic Settings Submenu Set Time of Day Time Indication Set+Go Heat+Hold Time Extension Display Contrast Display Brightness Set language Buzzer Volume Key Tones Alarm/Error Tones Service Factory Settings Operation of the menus Example 1. Switch the appliance on with . You will find yourself in the main menu. 2. 3. With or select the desired main menu. Use to move to the appropriated sub-menus. The sub-menu selected is displayed.
electrolux 11 Residual heat indicator After switching off the oven, the residual heat is displayed to the degree. Inserting the oven shelf: Displaying temperature to the degree The temperature is displayed to the degree instead of the bar of the heating up indicator for 5 seconds during the heating up time. Press and at the same time. 3 When the temperature set is reached, an audible signal sounds.
electrolux Inserting/Removing the Fat Filter Only use the fat filter when roasting to protect the rear heating elements from fat splashes. Inserting the fat filter Hold the fat filter by the grip and insert the two mounts downwards into the opening on the rear wall of the oven (fan opening). Taking out the fat filter Hold the fat filter by the grip and unhook it.
electrolux 13 Category Poultry Fish Cake Desserts Dish Chicken, whole Chicken Legs Turkey, whole Coq au Vin Duck, whole Roast Duck with Orange Goose, whole Stuffed Chicken Boned Poultry Stuffed Chicken Breast Whole Fish Stuffed Calamari Fillet of Fish Steamed Fish Cod fish Jansons Temtation Fish in Salt Stuffed Fish (Trout) Lemon Sponge Cake Ring Cake Swedish Cake Savarin Cake Biscuit Brownies Cheese Cake Muffins Fruit Cake Sweet Tart Streusel Cake Carrot Cake Rich Yeast P
electrolux Category Side Dishes Combi Steaming Dish Vegetables, mediterranean Boiled Potatoes Vegetables, traditional Salty Dumplings Peeling Tomatoes Rice Potatoes/Jacket Egg Custard Steam Menu 1 Steam Menu 3 Steam Menu 2 Convenience Pizza, frozen Bred/Rolls Pizza American, frozen Bred/Rolls, frozen, not browned Pizza, chilled Apple Studel, frozen Pizza Snacks, frozen Fillet of Fish, frozen French Fries Chicken Wings Wedges/Croquettes Lasagne/Cannelloni, frozen Hash Browns Sp
electrolux 15 3 With all poultry programmes turn the food after 30 minutes. A reminder is displayed. Assisted Cooking with Meatprobe Automatic The oven switches itself off automatically when the pre-set core temperature set is reached. 1 Important: Only the Meatprobe supplied may be used. If replacing, please use only original replacement parts. Example 1. Switch the appliance on using . 2. Using or select the menu option Assisted Cooking, the desired category and the dish. 3. Confirm each one using . 4.
electrolux The Oven Functions menu The oven functions in overview Using the oven functions you can set baking and roasting sessions to suit your requirements. Oven function Application Fan Cooking For baking on up to three oven levels at the same time. Set the oven temperatures 20-40 °C lower than when using Conventional. Moist Fan Cooking For energy-saving baking and cooking of mainly dry bakery items as well as for baking in tins on one level.
electrolux 17 The menu My Programmes My Programmes in overview Sub menu Description 1- My Program 2- My Program ... To save optimum settings for your own recipes. Edit Programme Name To rename stored programmes. 3 You can store 20 programmes. 8. Confirm with when you have written your programme name. Operation of My Programmes Storing a programme 1. 2. Select oven function or Assisted Cooking with the desired settings.
electrolux The steam cleaning menu 3 How to operate the Steam Cleaning is explained in the “Cleaning and care” section. The menu Basic Settings The Basic Settings in overview 3 You can change certain basic settings regardless of the task the oven is performing. The settings can only be changed if no oven function is selected. Setting Display Description Set Time of Day 12:15 Setting current time on the clock. Time Indication – On Current time is displayed when the appliance is switched off.
electrolux 19 3 Between 22:00 and 6:00 the display re- duces its brightness when the appliance is switched off to save energy. Operation of the Basic Settings Example 1. Using or select the menu option Basic Settings. 2. Confirm with . 3. Using or go to the setting that you want to adjust. 4. Confirm with . The value currently set appears in the display. 5. 6. Using or select the desired value. Confirm with . The setting is changed.
electrolux Time Extension Let the last oven function run again after the time has elapsed. Condition: • All oven functions with Duration or Weight Automatic. • No oven functions with Meatprobe and steam functions. The Time Extension can be switched on and off in the menu Basic Settings. To switch on Time Extension Oven function is completed. Signal sounds and message appears. 1. Press any key. 2. Message for Time Extension appears for approx. 5 minutes. 3. Activate with Time Extension. 4.
electrolux 21 3 Irrespective of the oven function set the 3 fixed cook time remains. You can move between the oven functions. Condition: The oven function to which you move has no fixed cook time. If the Meatprobe is inserted, Duration or End Time is not possible. 2 Using residual heat with the Duration and End Time clock functions When the Duration and End Time clock functions are used, the oven switches the heating elements off, when 90% of the time set or calculated has elapsed.
electrolux The oven switches itself off when the oven temperature is: 30 - 120°C 120 - 200°C 200 - 230°C after after after 12.5 hours 8.5 hours 5.5 hours Using the appliance after an automatic cut-out Press the key. Heated drawer 1 Important! Do not store goods that are 1. inflammable or heat sensitive in the drawer. You can pre-heat cookware in the drawer. Switch the drawer heater on using the button, lights up. 3 Place the cookware equally in the draw- er.
electrolux 23 Removing the Meatprobe 1 Warning: The Meatprobe is very hot. There is a risk of being burned when removing the plug and the tip of the meat probe. 1. 2. Remove the Meatprobe´s plug from the socket and take the meat out of the oven. Switch off the appliance. Steam cooking functions 1 Important: The steam cooking func- 1 1 3 tions must always be set in conjunction with the clock functions Duration or End Time (see section Clock functions Duration /End Time ).
electrolux Half Steam + Heat and Quarter Steam + Heat The continual change from hot air to steam takes place automatically, with Half Steam + Heat however with a greater percentage of steam. The Half Steam + Heat and Quarter Steam + Heat oven functions are operated depending on the oven function Full Steam.
electrolux 25 5. 6. 7. 8. 9. The duration of the process (15 mins.) is shown on the display. An acoustic signal sounds when the programme has finished. Press any button to switch off the signal. Wipe out the oven with a soft cloth. Remove any residual water from the steam generator.Lay a dampened sponge in the cooled steam generator. Press the sponge firmly.Remove the sponge and squeeze out the water. To completely dry the oven, leave the oven door open for around 1 hour.
electrolux 2. Insert the screw and tighten (2). 5. Leave the oven door open to let the oven dry out completely. Oven Light 1 Danger of electrocution! Before re• • placing the oven light bulb: Switch off the oven. Take the fuses out of the fuse box, or switch off. 3 To protect the oven light bulb and the Steam generation system 1 Important: Wipe the steam generator dry after each use. Soak up water with a sponge. 3 Remove any lime residue with water and vinegar.
electrolux 27 Replacing the oven side light bulb/ cleaning the glass cap 1. Take out the side rails. 2. Unscrew the metal frame using a crosstip screwdriver. 3. 4. 5. 6. Oven door For easier cleaning of the oven interior the oven door of your appliance can be taken off its hinges. Removing the oven door from its hinges 1. Open the oven door as far as it will go. 2. Undo the clamping levers (A) on both door hinges fully. 3. Close the oven door as far as the first position (approx. 45°).
electrolux 4. Take hold of the oven door with a hand on each side and pull it away from the oven at an upwards angle (Take care: It is heavy). 2. Open the oven door as far as it will go. 3. Fold up the clamping levers (A) on both door hinges back into their original positions. 4. Close the oven door. 3 Lay the oven door with the outer side facing downwards on something soft and level, for example, a blanket in order to prevent scratches. Hanging the oven door back on its hinges 1.
electrolux 29 What to do if … Problem The oven is not heating up Possible cause Remedy The oven has not been switched on Switch oven on The required settings have not been set Check the settings The house wiring fuse (in the fuse box) has tripped Check fuse. If the fuses trip several times, please call a qualified electrician The oven lighting is not operat- The oven light bulb is faulty ing Replace oven light bulb “F11” appears in the clock dis- The meat probe has short circuited play.
electrolux Installation Instructions Installing the oven 1 Installation into flammable material must 1. comply with NIN 2005, Chapter 4.2.2 of the VKF (Association of Cantonal Fire Insurers) fire protection guidelines and regulations. Pull the appliance drawer out as far as it will go, take hold of it and remove it. Installing the oven under a work surface 1 Installation into flammable material must 1. comply with NIN 2005, Chapter 4.2.
electrolux 31 1 When installing next to a wood-fuelled boiler, a heatproof and heat-insulating plate must be mounted at the height of the appliance and at least 30 cm deep. 3 To secure it, you can bore 2 x 2.8 mm holes at the top where the indents are provided (detail C). Electrical connection/power supply The oven must be connected to the electricity supply by a qualified electrician or a competent person. Use a H05VV-F type power cable or higher.
electrolux Disposal 2 Packaging material The packaging materials are environmentally friendly and can be recycled. The plastic components are identified by markings, e.g. >PE<, >PS<, etc. Please dispose of the packaging materials in the appropriate container at the community waste disposal facilities. 2 Old appliance W on the product or on its The symbol packaging indicates that this product may not be treated as household waste.
electrolux 33 Garantie/Kundendienst, Garantie/service-clientèle, Garanzia/Servizio clienti, Guarantee/Customer Service Centres Servicestellen 5506 Mägenwil/Zürich Industriestrasse 10 9000 St.
electrolux Service In the event of technical faults, please first check whether you can remedy the problem yourself with the help of the operating instructions (section “What to do if…”). If you were not able to remedy the problem yourself, please contact the Customer Care Department or one of our service partners. In order to be able to assist you quickly, we require the following information: – – – Model description Product number (PNC) Serial number (S No.
www.electrolux.com www.electrolux.