EB4GL90KCN EB4GL90KSP EN Microwave combi-oven User Manual
www.electrolux.com CONTENTS 1. SAFETY INFORMATION....................................................................................3 2. SAFETY INSTRUCTIONS..................................................................................5 3. PRODUCT DESCRIPTION................................................................................ 8 4. CONTROL PANEL............................................................................................. 9 5. BEFORE FIRST USE...............................
ENGLISH 1. 3 SAFETY INFORMATION Before the installation and use of the appliance, carefully read the supplied instructions. The manufacturer is not responsible for any injuries or damages that are the result of incorrect installation or usage. Always keep the instructions in a safe and accessible location for future reference. 1.
www.electrolux.com • • • • • • • • • • • • • Always use oven gloves to remove or put in accessories or ovenware. Before carrying out any maintenance, disconnect the appliance from the power supply. Ensure that the appliance is switched off before replacing the lamp to avoid the possibility of electric shock. Do not use a steam cleaner to clean the appliance.
ENGLISH • • • • • • • 5 The appliance is intended for heating food and beverages. Drying of food or clothing and heating of warming pads, slippers, sponges, damp cloth and similar may lead to risk of injury, ignition or fire. If smoke is emitted, switch off or unplug the appliance and keep the door closed in order to stifle any flames. Microwave heating of beverages can result in delayed eruptive boiling. Care must be taken when handling the container.
www.electrolux.com • • • • • • • • • • • Always use a correctly installed shockproof socket. Do not use multi-plug adapters and extension cables. Make sure not to cause damage to the mains plug and to the mains cable. Should the mains cable need to be replaced, this must be carried out by our Authorised Service Centre. Do not let mains cables touch or come near the appliance door, especially when the door is hot.
ENGLISH closed furniture panel and cause subsequent damage to the appliance, the housing unit or the floor. Do not close the furniture panel until the appliance has cooled down completely after use. • • 2.5 Internal lighting 2.4 Care and cleaning WARNING! Risk of injury, fire, or damage to the appliance. • • • • • • • Before maintenance, deactivate the appliance and disconnect the mains plug from the mains socket. Make sure the appliance is cold. There is the risk that the glass panels can break.
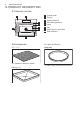
www.electrolux.com 3. PRODUCT DESCRIPTION 3.1 General overview 1 2 3 4 4 8 5 6 3 2 1 1 2 3 4 5 6 7 8 Control panel Display Heating element Microwave generator Lamp Fan Shelf support, removable Shelf positions 7 3.2 Accessories For cakes and biscuits. Wire shelf Crisp pan For cookware, cake tins, roasts. Baking tray To make crispy food with MW function.
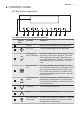
ENGLISH 9 4. CONTROL PANEL 4.1 Electronic programmer 1 2 3 4 5 6 7 8 9 10 11 Use the sensor fields to operate the appliance. Sensor field Function Comment Display Shows the current settings of the appliance. ON / OFF To activate and deactivate the appliance. Heating Func‐ tions or Recipes Touch the sensor field once to choose a heat‐ ing function or the menu: Recipes. Touch the sensor field again to switch between the me‐ nus: Heating Functions, Recipes.
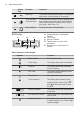
www.electrolux.com Sensor field 9 10 11 Function Comment Back key To go back one level in the menu. To show the main menu, touch the field for 3 seconds. Time and addi‐ tional functions To set different functions. When a heating func‐ tion operates, touch the sensor field to set the timer or the functions: Function Lock, Favour‐ ites, Heat + Hold, Set + Go. Minute Minder To set the function: Minute Minder. 4.2 Display A B C E D A. Heating function or Microwave function B. Time of day C.
ENGLISH Symbol 11 Function Heat + Hold The function is on. 5. BEFORE FIRST USE WARNING! Refer to Safety chapters. 5.1 Initial Cleaning Remove all accessories and removable shelf supports from the oven. Refer to "Care and cleaning" chapter. 5.2 First Connection When you connect the oven to the mains or after the power cut, you have to set the language, the display contrast, the display brightness and the time of the day. or 1. Press 2. Press to set the value. to confirm.
www.electrolux.com Symbol / Menu Description item When ON, the dis‐ Time Indication play shows the cur‐ rent time when you deactivate the appli‐ ance. Fast Heat Up When ON, the func‐ tion decreases the heat-up time. Set + Go To set a function and activate it later with a press of any symbol on the control panel. Heat + Hold Keeps the prepared food warm for 30 mi‐ nutes after a cooking cycle finished. Activates and deacti‐ Time Extension vates the time exten‐ sion function.
ENGLISH Heating func‐ tion Turbo Grilling Bottom Heat Application To roast larger meat joints or poultry with bones on one shelf position. Also to make gratins and to brown. To bake cakes with crispy bottom and to preserve food. The lamp may automatically deactivate at a temperature below 60 °C during some oven functions. Heating func‐ tion Dough Proving To bake bread. Bread Baking Defrost To keep food warm. Au Gratin To preheat plates for serving.
www.electrolux.com Functions Description Quick Start Use it to turn on the Microwave function with one touch of the symbol with the high microwave power and short operating time: 30 seconds. 6.7 Setting the Microwave function to turn on the Microwave 3. Press function. For some functions the microwave will start as soon as the set temperature is reached. Functions not available for the Combi function: Favourites, End Time, Set + Go, Heat + Hold. 4. Press .
ENGLISH 15 6.12 Residual heat To turn on the function, hold for 3 seconds. The heat-up indicator alternates. When you turn off the oven, the display shows the residual heat. You can use the heat to keep the food warm. 7. CLOCK FUNCTIONS 7.2 Setting the clock functions 7.1 Clock functions table Clock func‐ tion Minute Minder Before you use the functions: Duration, End Time, you must set a heating function and temperature first. The oven turns off automatically.
www.electrolux.com 5. Press to confirm. When the function ends, a signal sounds. The function stays on if you change the heating function. 7.4 Time Extension The function: Time Extension makes the heating function continue after the end of Duration. Applicable to all heating functions with Duration or Weight Automatic. 1. When the cooking time ends, a signal sounds. Press any symbol. The display shows the message. 2. Press to turn on or to cancel. 3. Set the length of the function. 4. Press . 8.
ENGLISH 17 Wire shelf and baking tray together: Push the baking tray between the guide bars of the shelf support and the wire shelf on the guide bars above. Baking tray: Push the baking tray between the guide bars of the shelf support. Small indentation at the top increase safety. The indentations are also anti-tip devices. The high rim around the shelf prevents cookware from slipping of the shelf. 10. ADDITIONAL FUNCTIONS 10.1 Favourites The first letter flashes.
www.electrolux.com 10.2 Using the Child Lock • When the Child Lock is on, the oven cannot be turned on accidentally. 1. Press 2. Press and at the same time until the display shows a message. To turns off the Child Lock function repeat step 2. 10.3 Function Lock This function prevents an accidental change of the heating function. You can turn it on only when the oven works. 1. Turn on the oven. 2. Set a heating function or setting. 3. Press again and again until the display shows: Function Lock. 4.
ENGLISH 19 the oven, the cooling fan can continue to operate until the oven cools down. 11. HINTS AND TIPS WARNING! Refer to Safety chapters. The temperature and baking times in the tables are guidelines only. They depend on the recipes and the quality and quantity of the ingredients used. 11.1 Cooking recommendations Your oven may bake or roast differently to the oven you had before. The below tables provide you with the standard settings for temperature, cooking time and shelf position.
www.electrolux.com 11.3 Microwave suitable cookware and materials For the microwave use only suitable cookware and materials. Use below table as a reference. Cookware / Material Microwave function Defrost‐ ing Heating, Cooking Microwave Combi function Ovenproof glass and porcelain with no metal components, e.g.
ENGLISH 11.4 Advice for special heating functions of the oven Keep Warm 11.5 Baking • • The function allows you to keep food warm. The temperature is set automatically to 80 °C. • Plate Warming The function allows you to warm plates and dishes before serving. The temperature is set automatically to 70 °C. 21 • Place plates and dishes in stacks evenly on the wire shelf. Use the first shelf position. After half of the warming time switch their places. Use the lower temperature the first time.
www.electrolux.com 11.
ENGLISH Food Function Tempera‐ ture (°C) Time (min) Shelf posi‐ tion Swiss Roll1) Conventional Cooking 180 - 200 10 - 20 2 Cake with crumble top‐ True Fan ping (dry) Cooking 150 - 160 20 - 40 1 Buttered almond cake / Conventional Cooking sugar cakes1) 190 - 210 20 - 30 2 Fruit flans (made with yeast dough / sponge mixture)2) True Fan Cooking 150 - 160 35 - 55 1 Fruit flans (made with yeast dough / sponge mixture)2) Conventional Cooking 170 35 - 55 1 Fruit flans made with short p
www.electrolux.com Food Function Tempera‐ ture (°C) Time (min) Shelf posi‐ tion Puff pastries1) True Fan Cooking 170 - 180 20 - 30 1 Rolls1) Conventional Cooking 190 - 210 10 - 25 2 Small cakes / Small cakes1) True Fan Cooking 160 20 - 35 3 Small cakes / Small cakes1) Conventional Cooking 170 20 - 35 2 1) Preheat the oven. 11.
ENGLISH 25 Food Temperature (°C) Time (min) Shelf posi‐ tion Dry streusel cake 150 - 160 30 - 45 1/3 1) Preheat the oven.
www.electrolux.com 11.
ENGLISH 27 11.13 Roasting tables Beef Food Func‐ tion Quantity (kg) Pot roast Conven‐ 1 - 1.5 tional Cooking Power (Watts) Tempera‐ ture (°C) Time (min) Shelf po‐ sition 200 230 60 - 80 1 Pork Food Func‐ tion Quantity (kg) Power (Watts) Tempera‐ ture (°C) Time (min) Shelf po‐ sition Shoulder, Turbo neck, ham Grilling joint 1 - 1.5 200 160 - 180 50 - 70 1 Meat loaf Turbo Grilling 0.75 - 1 200 160 - 170 35 - 50 1 Pork knuckle (pre‐ cooked) Turbo Grilling 0.
www.electrolux.com Food Func‐ tion Quantity (kg) Power (Watts) Tempera‐ ture (°C) Time (min) Shelf position Chicken poulard Turbo Grilling 1 - 1.5 200 190 - 210 30 - 45 1 Duck Turbo Grilling 1.5 - 2 200 180 - 200 45 - 65 1 Quantity (kg) Power (Watts) Tempera‐ ture (°C) Time (min) Shelf position 200 210 - 220 30 - 45 1 Fish (steamed) Food Func‐ tion Whole fish Con‐ 1 - 1.
ENGLISH 29 Grill Food Temperature (°C) Time (min) 1st side 2nd side Roast beef, medium 210 - 230 30 - 40 30 - 40 1 Filet of beef, medium 230 20 - 30 20 - 30 1 Back of pork 210 - 230 30 - 40 30 - 40 1 Back of veal 210 - 230 30 - 40 30 - 40 1 Back of lamb 210 - 230 25 - 35 20 - 35 1 Whole Fish, 500 - 1000 g 210 - 230 15 - 30 15 - 30 1 11.15 Frozen foods • Remove the food packaging. Put the food on a plate. • Shelf position Do not cover it with a bowl or a plate.
www.electrolux.
ENGLISH 11.17 Preserving Use only preserve jars of the same dimensions available on the market. Do not use jars with twist-off and bayonet type lids or metal tins. Use the first shelf from the bottom for this function. Put no more than six one-litre preserve jars on the baking tray. Put approximately 1/2 litre of water into the baking tray to give sufficient moisture in the oven.
www.electrolux.com Food Temperature (°C) Time (h) Shelf position Mushrooms 50 - 60 6-8 3 Herbs 40 - 50 2-3 3 Plums 60 - 70 8 - 10 3 Apricots 60 - 70 8 - 10 3 Apple slices 60 - 70 6-8 3 Pears 60 - 70 6-9 3 11.19 Bread Baking Preheating is not recommended.
ENGLISH Defrosting meat Food Power (Watts) Time (min) Standing time (min) Steak (0.2 kg) 100 5-7 5 - 10 Minced meat (0.5 kg) 100 10 - 15 5 - 10 Food Power (Watts) Time (min) Standing time (min) Chicken (1 kg) 100 25 - 30 10 - 20 Chicken breast (0.15 kg) 100 3-5 10 - 15 Chicken legs (0.15 kg) 100 3-5 10 - 15 Food Power (Watts) Time (min) Standing time (min) Whole Fish (0.5 kg) 100 10 - 15 5 - 10 Fish fillets (0.
www.electrolux.com Reheating Food Power (Watts) Time (min) Standing time (min) Baby food in jars (0.2 kg) 300 1-2 - Baby milk (180 ml); Put spoon into the bottle 600 0:20 - 0:40 - Convenience food (0.5 kg) 600 6-9 2-5 Frozen ready meals (0.5 kg) 400 10 - 15 2-5 Milk (200 ml) 1000 1 - 1:30 - Water (200 ml) 1000 1:30 - 2 - Sauce (200 ml) 600 1-3 - Soup (300 ml) 600 3-5 - Food Power (Watts) Time (min) Standing time (min) Chocolate / Chocolate coating (0.
ENGLISH Food Ovenware Pow‐ er (Watt s) Tem‐ pera‐ ture (°C) Time Shelf (min) posi‐ tion Standing time (min) 2 chicken halves (2 x 0.55 kg) Round glass dish, Ø 26 cm 300 220 40 2 5 300 200 40 2 10 Roast pork Glass dish with strain‐ 300 neck (1.1 kg) er 200 70 1 10 Au gratin po‐ Gratin dish tatoes (1 kg) 11.21 Examples of cooking applications for power settings The data in the table is for guidance only.
www.electrolux.com Food Power (Watts) Quanti‐ Shelf po‐ Time (min) ty (kg) sition Comments Sponge cake 600 0.475 Bottom 7-9 Turn container around by 1/4, halfway through the cooking time. Meatloaf 400 0.9 2 25 - 32 Turn container around by 1/4, halfway through the cooking time. Egg custard 300 1 Bottom 18 - Meat de‐ frosting 0.5 Bottom 7-8 Turn the meat upside down halfway through the cooking time. 100 1) 1) Use wire shelf unless otherwise specified.
ENGLISH 12.1 Notes on cleaning Clean the front of the oven with a soft cloth with warm water and a mild cleaning agent. To clean metal surfaces, use a dedicated cleaning agent. Clean the oven interior after each use. Fat accumulation or other food remains may result in a fire. Clean the cavity roof carefully from food residuals and fat. Clean all accessories after each use and let them dry. Use a soft cloth with warm water and a cleaning agent. Do not clean the accessories in the dishwasher.
www.electrolux.com 13.1 What to do if... Problem Possible cause Remedy You cannot activate or op‐ erate the oven. The oven is not connected to an electrical supply or it is connected incorrectly. Check if the oven is cor‐ rectly connected to the electrical supply (refer to the connection diagram if available). The oven does not heat up. The oven is turned off. Turn on the oven. The oven does not heat up. The clock is not set. Set the clock. The oven does not heat up.
ENGLISH 13.2 Service data If you cannot find a solution to the problem yourself, contact your dealer or an Authorised Service Centre. 39 plate is on the front frame of the oven cavity. Do not remove the rating plate from the oven cavity. The necessary data for the service centre is on the rating plate. The rating We recommend that you write the data here: Model (MOD.) ......................................... Product number (PNC) ......................................... Serial number (S.N.) ......
15. www.electrolux.com CH GUARANTEE Customer Service Centres Point of Service Industriestrasse 10 5506 Mägenwil Le Trési 6 1028 Préverenges Via Violino 11 6928 Manno Morgenstrasse 131 3018 Bern Zürcherstrasse 204E 9000 St. Gallen Seetalstrasse 11 6020 Emmenbrücke Schlossstrasse 1 4133 Pratteln Comercialstrasse 19 7000 Chur Spare parts service Industriestrasse 10, 5506 Mägenwil, Tel. 0848 848 111 Specialist advice/Sale Badenerstrasse 587, 8048 Zürich, Tel.
ENGLISH 41
www.electrolux.
ENGLISH 43
867343852-B-052018 www.electrolux.