EB4SL90 EN MICROWAVE COMBI-OVEN USER MANUAL
www.electrolux.com CONTENTS 1. SAFETY INFORMATION............................................................................................ 3 2. SAFETY INSTRUCTIONS.......................................................................................... 5 3. PRODUCT DESCRIPTION.........................................................................................7 4. CONTROL PANEL.....................................................................................................8 5.
ENGLISH 1. 3 SAFETY INFORMATION Before the installation and use of the appliance, carefully read the supplied instructions. The manufacturer is not responsible if an incorrect installation and use causes injuries and damages. Always keep the instructions with the appliance for future reference. 1.
www.electrolux.com • • • • • • • • • • • • • • Do not use a steam cleaner to clean the appliance. Do not use harsh abrasive cleaners or sharp metal scrapers to clean the glass door since they can scratch the surface, which may result in shattering of the glass. If the supply cord is damaged, it must be replaced by the manufacturer, its Authorised Service Centre or similarly qualified persons in order to avoid a hazard. Do not activate the appliance when it is empty.
ENGLISH • • 5 The appliance should be cleaned regularly and any food deposits removed. Failure to maintain the appliance in a clean condition could lead to deterioration of the surface that could adversely affect the life of the appliance and possibly result in a hazardous situation. 2. SAFETY INSTRUCTIONS 2.1 Installation WARNING! Only a qualified person must install this appliance. • Remove all the packaging. • Do not install or use a damaged appliance.
www.electrolux.com • Do not let the appliance stay unattended during operation. • Deactivate the appliance after each use. • Be careful when you open the appliance door while the appliance is in operation. Hot air can release. • Do not operate the appliance with wet hands or when it has contact with water. • Do not apply pressure on the open door. • Do not use the appliance as a work surface or as a storage surface. • Open the appliance door carefully.
ENGLISH • Cut off the mains cable and discard it. • Remove the door catch to prevent children and pets to get closed in the appliance. 3. PRODUCT DESCRIPTION 3.1 General overview 1 2 3 4 4 8 5 6 3 2 1 1 2 3 4 5 6 7 8 Control panel Electronic programmer Heating element Microwave generator Lamp Fan Shelf support, removable Shelf positions 7 3.2 Accessories For cakes and biscuits. Wire shelf Glass baking tray For cookware, cake tins, roasts.
www.electrolux.com 4. CONTROL PANEL 4.1 Electronic programmer 1 2 3 4 5 6 7 8 9 10 11 Use the sensor fields to operate the appliance. Sensor field 1 2 3 - Function Comment Display Shows the current settings of the appliance. ON / OFF To activate and deactivate the appliance. Heating Functions or Assisted Cooking To choose a heating function or a menu: Assisted Cooking. To access the necessary function, touch the field once or twice after you activate the appliance.
ENGLISH Sensor field 9 10 11 Function Comment Home key To go back one level in the menu. To show the main menu, touch the field for 3 seconds. Time and additional functions To set different functions. When a heating function operates, touch the sensor field to set the timer or the functions: Function Lock, Favourite Programme, Heat + Hold, Set + Go. Minute Minder To set the function: Minute Minder. 9 4.
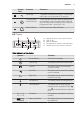
www.electrolux.com Symbol Function Fast Heat Up Indicator The function is active. It decreases the heat up time. Weight Automatic The display shows that the automatic weight system is active or that weight can be changed. Heat + Hold The function is active. 5. BEFORE FIRST USE WARNING! Refer to Safety chapters. 5.1 Initial Cleaning Remove all accessories and removable shelf supports from the appliance. Refer to "Care and cleaning" chapter. Clean the appliance before first use.
ENGLISH Symbol Menu item Application Specials Contains a list of additional heating functions. 11 Submenu for: Basic Settings Symbol Submenu Description Set Time of Day Sets the current time on the clock. Time Indication When ON, the display shows the current time when you deactivate the appliance. Set + Go When ON, in the Select Options window you can choose the function: Set + Go. Heat + Hold When ON, in the Select Options window you can choose the function: Heat + Hold.
www.electrolux.com Heating function Application Pizza Setting To bake food on 1 shelf position for a more intensive browning and a crispy bottom. Set the temperature 20 - 40 °C lower than for the function: Conventional Cooking. Conventional Cooking To bake and roast food on 1 shelf position. Slow Cooking To prepare tender, succulent roasts. Bottom Heat To bake cakes with crispy bottom and to preserve food. Grilling To grill flat food and to toast bread.
ENGLISH Heating function Application Defrost To defrost frozen food. Frozen Foods To make your convenience food like e.g. French Fries, Wedges, spring rolls crispy. 6.5 Activating a heating function 6.9 Energy saving 1. Activate the appliance. 2. Select the menu: Heating Functions. The appliance contains features which help you save energy during everyday cooking: 3. Press to confirm. 4. Set a heating function. 5. Press to confirm. 6. Set the temperature. 7. Press 13 to confirm.
www.electrolux.com can burst. With fried eggs, pierce the yolks first. • Prick food with "skin" or "peel", such as potatoes, tomatoes, sausages, with a fork several times before cooking so that the food does not burst. • For chilled or frozen food, set a longer cooking time. • Dishes which contain sauce must be stirred from time to time. • Vegetables that have a firm structure, such as carrots, peas or cauliflower, must be cooked in water. • Turn larger pieces after half the cooking time.
ENGLISH 15 Suitable cookware and materials Cookware / Material Microwave Defrost- Heating ing Cooking Grilling Ovenproof glass and porcelain (with no metal components, e. g. Pyrex, heat-proof glass) X X X X Non-ovenproof glass and porcelain 1) X -- -- -- X Glass and glass ceramic made of ovenproof / frost-proof material (e. g.
www.electrolux.com appliance or outside it, so that the heat is distributed more equally. • You get better results for rice if you use flat, wide dishes. 7.2 Microwave functions Functions Description Microwave Creates the heat directly in the food. Use it to heat pre-prepared meals and drinks, to defrost meat or fruit, and to cook vegetables and fish. Combi Use it to operate the heating function and the microwave mode together. Use it to cook food in a shorter time and brown it at the same time.
ENGLISH 7.5 Setting the Quick Start function 1. If necessary, touch the appliance. 3. Touch to set the time for the function: Duration. Refer to "Setting the clock functions". to deactivate 7.6 Examples of cooking applications for power settings 2. Touch to activate the Quick Start function. Each touch of Duration time. 17 The data in the table is for guidance only. adds 30 seconds to the You can change the microwave power (refer to "Setting the Microwave function").
www.electrolux.com Clock function Application Duration To set the length of an operation (max. 23 h 59 min). End Time To set the switch-off time for a heating function (max. 23 h 59 min). If you set the time for a clock function, the time starts to count down after 5 seconds. If you use the clock functions: Duration, End Time, the appliance deactivates the heating elements after 90 % of the set time.
ENGLISH 19 9. AUTOMATIC PROGRAMMES WARNING! Refer to Safety chapters. 9.1 Assisted Cooking with Recipe Automatic This appliance has a set of recipes you can use. The recipes are fixed and you cannot change them. 1. Activate the appliance. 2. Select the Assisted Cooking menu. Press to confirm. 3. Select the category and dish. Press to confirm. 4. Select a recipe. Press to confirm. When you use the Manual function, the appliance uses the automatic settings. You can change them as with other functions.
www.electrolux.com Wire shelf and baking tray together: Push the baking tray between the guide bars of the shelf support and the wire shelf on the guide bars above. • All accessories have small indentations at the top of the right and left side to increase safety. The indentations are also anti-tip devices. • The high rim around the shelf is a device which prevents cookware from slipping. 11. ADDITIONAL FUNCTIONS 11.
ENGLISH 21 11.2 Using the Child Lock The Child Lock prevents an accidental operation of the appliance. 1. Activate the appliance. 2. Touch and at the same time until the display shows a message. To deactivate the Child Lock function repeat step 2. 11.3 Function Lock This function prevents an accidental change of the heating function. You can activate it only when the appliance operates. • Function Lock is on when the heating function operates.
www.electrolux.com deactivate the appliance, the cooling fan can continue to operate until the appliance cools down. 12. CARE AND CLEANING WARNING! Refer to Safety chapters. 12.1 Notes on cleaning • Clean the front of the appliance with a soft cloth with warm water and a cleaning agent. • To clean metal surfaces, use a usual cleaning agent. • Clean the appliance interior after each use. Fat accumulation or other food remains may result in a fire. • Clean stubborn dirt with a special oven cleaner.
ENGLISH 23 13. TROUBLESHOOTING WARNING! Refer to Safety chapters. 13.1 What to do if... Problem Possible cause Remedy The oven does not heat up. The oven is deactivated. Activate the oven. The oven does not heat up. The clock is not set. Set the clock. The oven does not heat up. The necessary settings are not set. Make sure that the settings are correct. The oven does not heat up. The automatic switch-off is activated. Refer to "Automatic switchoff". The oven does not heat up.
www.electrolux.com Problem Possible cause Remedy The appliance is activated and does not heat up. The fan does not operate. The display shows "Demo". The demo mode is activated. 1. Deactivate the appliance. 2. Touch and hold until the appliance activates and deactivates. 3. Touch and hold and at the same time until an acoustic signal sounds and "Demo" goes out. 13.2 Service data If you cannot find a solution to the problem yourself, contact your dealer or an Authorised Service Centre.
ENGLISH min. 3 mm 14.2 Building in During installation in combustible matter, NIN SEV 1000 and fire protection guidelines and regulations of the Association of Cantonal Fire Insurance shall be strictly adhered to. 450 mm min. 20 mm min. 560 mm 21 mm 4 mm 548 mm 455 mm 446 mm 5 mm min.
www.electrolux.com 548 mm 21 mm min. 20 mm 450 mm 114 mm 455 mm 4 mm 450 mm min. 560 mm 446 mm 114 455 mm mm min. 550 mm 5 mm 567 mm 594 mm 548 mm 450 mm 21 mm min. 20 mm 114 mm 455 mm 4 mm 446 mm 450 mm 455 mm 450 mm min. 560 mm 446 mm 455 mm min.
ENGLISH H05VV-F H05RR-F min.
www.electrolux.com 14.3 Electrical connection WARNING! If service is required always disconnect the appliance from the power supply. Use a power cable of H05VV-F or higher. Install the appliance with a socket supply line. If there is no socket supply line, the fixed home electrical system must include an isolating device with at least a 3 mmcontact separation to enable a simultaneous and all-pole cut off from the 15. CH mains (according to NIN SEV 1000).
ENGLISH rechange. Les conditions de garantie ne sont pas valables en cas d’intervention d’un tiers non autorisé, de l’emploi de pièces de rechange non originales, d’erreurs de maniement ou d’installation dues à l’inobser-vation du mode d’emploi, et pour des dommages causés par des influences extérieures ou de force majeure. Garanzia Per ogni prodotto concediamo una garanzia di 2 anni a partire dalla data di consegna o dalla sua messa in funzione.
www.electrolux.
ENGLISH 31
867302003-B-052014 www.electrolux.