EB6L50DCN EB6L50DSP EB6L5DCN EB6L5DSP EN Oven User Manual
www.electrolux.com CONTENTS 1. SAFETY INFORMATION....................................................................................3 2. SAFETY INSTRUCTIONS..................................................................................4 3. PRODUCT DESCRIPTION................................................................................ 7 4. BEFORE FIRST USE......................................................................................... 7 5. DAILY USE.......................................
ENGLISH 1. 3 SAFETY INFORMATION Before the installation and use of the appliance, carefully read the supplied instructions. The manufacturer is not responsible for any injuries or damages that are the result of incorrect installation or usage. Always keep the instructions in a safe and accessible location for future reference. 1.
www.electrolux.com • • • • • • • • Always use oven gloves to remove or put in accessories or ovenware. Before carrying out any maintenance, disconnect the appliance from the power supply. Ensure that the appliance is switched off before replacing the lamp to avoid the possibility of electric shock. Do not use a steam cleaner to clean the appliance.
ENGLISH • • • • • • • • • • • • Make sure that the parameters on the rating plate are compatible with the electrical ratings of the mains power supply. Always use a correctly installed shockproof socket. Do not use multi-plug adapters and extension cables. Make sure not to cause damage to the mains plug and to the mains cable. Should the mains cable need to be replaced, this must be carried out by our Authorised Service Centre.
www.electrolux.com the appliance is in operation. Heat and moisture can build up behind a closed furniture panel and cause subsequent damage to the appliance, the housing unit or the floor. Do not close the furniture panel until the appliance has cooled down completely after use. 2.4 Care and cleaning WARNING! Risk of injury, fire, or damage to the appliance. • • • • • • • Before maintenance, deactivate the appliance and disconnect the mains plug from the mains socket.
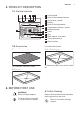
ENGLISH 3. PRODUCT DESCRIPTION 3.1 General overview 1 2 3 4 5 6 5 4 3 2 1 12 1 2 3 4 7 5 6 8 7 9 8 10 9 11 10 11 12 Control panel Knob for the heating functions Power lamp / symbol Display Knob for the temperature Temperature indicator / symbol Heating element Lamp Fan Shelf support, removable Cavity embossment Shelf positions 3.2 Accessories For cakes and biscuits. Wire shelf Grill- / Roasting pan For cookware, cake tins, roasts. To bake and roast or as a pan to collect fat. Baking tray 4.
www.electrolux.com Clean the oven and the accessories before first use. Put the accessories and the removable shelf supports back to their initial position. 5. DAILY USE WARNING! Refer to Safety chapters. 5.1 Retractable knobs To use the appliance, press the control knob. The control knob comes out. 5.2 Turning the oven on and off 1. Turn the knob for the oven functions to select an oven function. 2. Turn the knob for the temperature to select a temperature. 3.
ENGLISH Oven func‐ tion Moist Fan Baking Bottom Heat BakingPlus Fast Grilling 9 Application Oven func‐ tion This function is de‐ signed to save energy during cooking. For more information refer to "Hints and tips" chap‐ ter, Moist Fan Baking. The oven door should be closed during cook‐ ing so that the function is not interrupted and to ensure that the oven operates with the high‐ est energy efficiency possible.
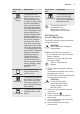
www.electrolux.com WARNING! Make sure that the oven is cold before you remove the remaining water from the cavity embossment. 5.5 Display A B C A. Function indicators B. Time display C. Function indicator 5.6 Buttons Sensor field / Button Function Description MINUS To set the time. CLOCK To set a clock function. PLUS To set the time. 6. CLOCK FUNCTIONS 6.1 Clock functions table Clock function Application TIME OF DAY To set, change or check the time of day.
ENGLISH Press the or to set the correct time. After approximately five seconds, the flashing stops and the display shows the time of day you set. To change the time of day press again and again until starts to flash. 6.3 Setting the DURATION 1. Set an oven function and temperature. again and again until 2. Press starts to flash. 3. Press time. or The display shows to set the DURATION . 4. When the time ends, flashes and an acoustic signal sounds. The appliance deactivates automatically. 5.
www.electrolux.com Push the shelf between the guide bars of the shelf support and make sure that the feet point down. Wire shelf and baking tray / deep pan together: Push the baking tray / deep pan between the guide bars of the shelf support and the wire shelf on the guide bars above. Baking tray/ Deep pan: Push the baking tray / deep pan between the guide bars of the shelf support. Small indentation at the top increase safety. The indentations are also anti-tip devices.
ENGLISH 13 Use the baking tray. Use the second shelf position. Food Water in the cavity embossment (ml) Temperature (°C) Time (min) Cookies, scones, croissants 100 150 - 180 10 - 20 Focaccia 100 200 - 210 10 - 20 Pizza 100 230 10 - 20 Bread rolls 100 200 20 - 25 Bread 100 180 35 - 40 Plum cake, apple pie, cinnamon rolls baked in a cake mould. 100 - 150 160 - 180 30 - 60 Frozen ready meals Preheat the empty oven for 10 minutes. Use the second shelf position.
www.electrolux.com • Food Roast pork Tem‐ pera‐ ture (°C) Tim e (min ) 180 65 80 • 9.3 Baking • • Use the lower temperature the first time. You can extend baking times by 10 – 15 minutes if you bake cakes on more than one shelf position. Cakes and pastries at different heights do not always brown equally. There is no need to change the temperature setting if an unequal browning occurs. The differences equalize during baking. Trays in the oven can twist during baking.
ENGLISH 15 9.5 Baking on one level: Baking in tins Food Function Temperature (°C) Time (min) Shelf position Ring cake / Brioche True Fan Cooking 150 - 160 50 - 70 1 Madeira cake / Fruit cakes True Fan Cooking 140 - 160 70 - 90 1 Flan base short pastry True Fan Cooking 170 - 1801) 10 - 25 2 Flan base True Fan sponge mixture Cooking 150 - 170 20 - 25 2 Cheesecake 170 - 190 60 - 90 1 Top / Bottom Heat 1) Preheat the oven.
www.electrolux.com Food Function Fruit flans made with short pastry Yeast cakes with delicate toppings (e.g. quark, cream, custard) Tempera‐ ture (°C) Time (min) Shelf po‐ sition True Fan Cooking 160 - 170 40 - 80 3 Top / Bottom Heat 40 - 80 3 160 - 1801) 1) Preheat the oven. 2) Use a deep pan.
ENGLISH 17 Food Function Temperature (°C) Time (min) Shelf position Vegetables au gratin1) Turbo Grilling 160 - 170 15 - 30 1 Baguettes top‐ ped with mel‐ ted cheese True Fan Cook‐ 160 - 170 ing 15 - 30 1 Sweet bakes Top / Bottom Heat 180 - 200 40 - 60 1 Fish bakes Top / Bottom Heat 180 - 200 30 - 60 1 Stuffed vegeta‐ True Fan Cook‐ 160 - 170 bles ing 30 - 60 1 1) Preheat the oven. 9.7 Moist Fan Baking For best results follow the baking times listed in the table below.
www.electrolux.com Cakes / pastries / breads on baking trays Food Temperature (°C) Time (min) Cream puffs / Eclairs 160 - 1801) Dry streusel cake 150 - 160 Shelf position 2 positions 3 positions 25 - 45 1/4 - 30 - 45 1/4 - 1) Preheat the oven.
ENGLISH Food Temperature (°C) Time (min) Shelf position Apple cake, cov‐ ered 150 - 170 50 - 60 1 Vegetable pie 160 - 180 50 - 60 1 Unleavened bread 230 - 2501) 10 - 20 2 Puff pastry flan 160 - 1801) 45 - 55 2 Flammekuchen (Pizza-like dish from Alsace) 230 - 2501) 12 - 20 2 Piroggen (Russian version of calzone) 180 - 2001) 15 - 25 2 19 1) Preheat the oven. 2) Use a deep pan. 9.10 Roasting Use heat-resistant ovenware.
www.electrolux.com Pork Food Quantity (kg) Function Tempera‐ ture (°C) Time (min) Shelf posi‐ tion Shoulder / Neck / Ham joint 1 - 1.5 Turbo Grill‐ ing 160 - 180 90 - 120 1 Chop / Spare rib 1 - 1.5 Turbo Grill‐ ing 170 - 180 60 - 90 1 Meatloaf 0.75 - 1 Turbo Grill‐ ing 160 - 170 50 - 60 1 Pork knuckle (precooked) 0.
ENGLISH Poultry Food Quantity (kg) Function Tempera‐ ture (°C) Time (min) Shelf posi‐ tion Poultry por‐ tions 0.2 - 0.25 each Turbo Grill‐ ing 200 - 220 30 - 50 1 Half chicken 0.4 - 0.5 each Turbo Grill‐ ing 190 - 210 35 - 50 1 Chicken, poulard 1 - 1.5 Turbo Grill‐ ing 190 - 210 50 - 70 1 Duck 1.5 - 2 Turbo Grill‐ ing 180 - 200 80 - 100 1 Goose 3.5 - 5 Turbo Grill‐ ing 160 - 180 120 - 180 1 Turkey 2.5 - 3.
www.electrolux.com 9.13 Frozen Foods Use the function True Fan Cooking.
ENGLISH Stone fruit Food Temperature (°C) Cooking time until Continue to cook simmering (min) at 100 °C (min) Pears / Quinces / Plums 160 - 170 35 - 45 Food Temperature (°C) Cooking time until Continue to cook simmering (min) at 100 °C (min) Carrots1) 160 - 170 50 - 60 5 - 10 Cucumbers 160 - 170 50 - 60 - Mixed pickles 160 - 170 50 - 60 5 - 10 Kohlrabi / Peas / Asparagus 160 - 170 50 - 60 15 - 20 10 - 15 Vegetables 1) Leave standing in the oven after it is deactivated. 9.
www.electrolux.com 9.16 Information for test institutes Tests according to EN 60350-1:2013 and IEC 60350-1:2011. Baking on one level.
ENGLISH Food Function Temperature (°C) Time (min) Shelf posi‐ tion Toast Grilling max 1-3 5 Beef Steak Grilling max 24 - 301) 4 25 1) Turn halfway through. Fast Grilling Preheat the empty oven for 3 minutes. Grill with the maximum temperature setting. Food Time (min) Shelf position 1st side 2nd side Burgers 8 - 10 6-8 4 Toast 1-3 1-3 4 10. CARE AND CLEANING WARNING! Refer to Safety chapters. 10.
www.electrolux.com 1. Pull the front of the shelf support away from the side wall. 2. Pull the rear end of the shelf support away from the side wall and remove it. 1 2 Install the removed accessories in the opposite sequence. 10.4 Oven ceiling WARNING! Deactivate the appliance before you remove the heating element. Make sure that the appliance is cold. There is a risk of burns. Remove the shelf supports. You can fold down the heating element on the oven ceiling to clean the oven ceiling easily.
ENGLISH 6. Hold the door trim (B) on the top edge of the door at the two sides and push inwards to release the clip seal. 2 27 1. Turn off the oven. Wait until the oven is cooled down. 2. Disconnect the oven from the mains. 3. Put a cloth on the bottom of the cavity. The top lamp 1. Turn the lamp glass cover to remove it. B 1 7. Pull the door trim to the front to remove it. 8. Hold the door glass panels on their top edge one by one and pull them up out of the guide. 2. Clean the glass cover. 3.
www.electrolux.com 11.1 What to do if... Problem Possible cause Remedy You cannot activate or op‐ The oven is incorrectly erate the oven. The display connected to an electrical shows “400” and an acous‐ supply. tic signal sounds. Check if the oven is cor‐ rectly connected to the electrical supply (refer to the connection diagram if available). The oven does not heat up. The oven is deactivated. Activate the oven. The oven does not heat up. The clock is not set. Set the clock.
ENGLISH 11.2 Service data If you cannot find a solution to the problem yourself, contact your dealer or an Authorised Service Centre. plate is on the front frame of the oven cavity. Do not remove the rating plate from the oven cavity. The necessary data for the service centre is on the rating plate. The rating We recommend that you write the data here: Model (MOD.) ......................................... Product number (PNC) ......................................... Serial number (S.N.) ..........
www.electrolux.com 12.2 Energy saving The oven contains features which help you save energy during everyday cooking. General hints Make sure that the oven door is closed properly when the oven operates. Do not open the door too often during cooking. Keep the door gasket clean and make sure it is well fixed in its position. Use metal dishes to improve energy saving. When possible, do not preheat the oven before you put the food inside.
ENGLISH 14. ENVIRONMENTAL CONCERNS Recycle materials with the symbol . Put the packaging in relevant containers to recycle it. Help protect the environment and human health by recycling waste of electrical and electronic appliances. Do not dispose of appliances marked with the symbol with the household waste. Return the product to your local recycling facility or contact your municipal office.
867344101-B-132018 www.electrolux.