EB6SL80QCN EB6SL80QSP FR Four Notice d'utilisation
www.electrolux.com TABLE DES MATIÈRES 1. INFORMATIONS DE SÉCURITÉ....................................................................... 3 2. CONSIGNES DE SÉCURITÉ............................................................................. 5 3. DESCRIPTION DE L'APPAREIL........................................................................ 8 4. UTILISATION DE L'APPAREIL.......................................................................... 9 5. AVANT LA PREMIÈRE UTILISATION.........................
FRANÇAIS 1. 3 INFORMATIONS DE SÉCURITÉ Avant d'installer et d'utiliser cet appareil, lisez soigneusement les instructions fournies. Le fabricant ne pourra être tenu pour responsable des blessures et dégâts résultant d'une mauvaise installation ou utilisation. Conservez toujours les instructions dans un lieu sûr et accessible pour vous y référer ultérieurement. 1.
www.electrolux.com 1.2 Sécurité générale • • • • • • • • • • • • L'appareil doit être installé et le câble remplacé uniquement par un professionnel qualifié . AVERTISSEMENT : L'appareil et ses parties accessibles deviennent chauds pendant son fonctionnement. Veillez à ne pas toucher les éléments chauffants. Utilisez toujours des gants de cuisine pour retirer ou enfourner des accessoires ou des plats allant au four.
FRANÇAIS 5 2. CONSIGNES DE SÉCURITÉ 2.1 Installation AVERTISSEMENT! L'appareil doit être installé uniquement par un professionnel qualifié. • • • • • • • • • Retirez l'intégralité de l'emballage. N'installez pas et ne branchez pas un appareil endommagé. Suivez scrupuleusement les instructions d'installation fournies avec l'appareil. Soyez toujours vigilants lorsque vous déplacez l'appareil car il est lourd. Utilisez toujours des gants de sécurité et des chaussures fermées.
www.electrolux.com • • • • • • • • Éteignez l'appareil après chaque utilisation. Soyez prudent lors de l'ouverture de la porte de l'appareil lorsque celui-ci est en fonctionnement. De l'air brûlant peut s'en échapper. N'utilisez jamais cet appareil avec les mains mouillées ou lorsqu'il est en contact avec de l'eau. N'exercez jamais de pression sur la porte ouverte. N'utilisez jamais l'appareil comme plan de travail ou comme plan de stockage. Ouvrez prudemment la porte de l'appareil.
FRANÇAIS • • • • • endommagées. Contactez le service après-vente agréé. Soyez prudent lorsque vous démontez la porte de l'appareil. La porte est lourde ! Nettoyez régulièrement l'appareil afin de maintenir le revêtement en bon état. Nettoyez l'appareil avec un chiffon doux humide. Utilisez uniquement des produits de lavage neutres. N'utilisez pas de produits abrasifs, de tampons à récurer, de solvants ni d'objets métalliques.
www.electrolux.com • • Avant de changer l'ampoule, débranchez l'appareil de la prise secteur. N'utilisez que des ampoules ayant les mêmes spécifications . • • • 2.8 Maintenance • • Pour réparer l'appareil, contactez un service après-vente agréé. Utilisez exclusivement des pièces d'origine. Débranchez l'appareil de l'alimentation électrique. Coupez le câble d'alimentation au ras de l'appareil et mettez-le au rebut.
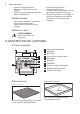
FRANÇAIS 9 Plat à rôtir Sonde alimentaire Pour cuire et rôtir ou à utiliser comme plat pour recueillir la graisse. Pour mesurer la température à l'intérieur des aliments. 4. UTILISATION DE L'APPAREIL 4.1 Bandeau de commande 1 2 3 4 5 6 Fonction Commentaire 1 Marche/Arrêt Pour allumer et éteindre l'appareil. 2 Éclairage Pour allumer et éteindre l'éclairage. 3 Affichage Affiche les réglages actuels de l'appareil. Pour ajuster les réglages et naviguer dans le menu.
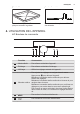
www.electrolux.com 4.2 Affichage Après avoir allumé l'appareil, l'affichage indique le mode de cuisson. 150°C A. B. C. D. E. Rappel Minuteur progressif Mode de cuisson et température Options ou Heure Durée et Fin d'une fonction ou Sonde alimentaire F. Menu 14:05 L'affichage avec un nombre maximal de fonctions réglées : A BC D E F Menu 170°C 25min 1h 15m 85°C Options 5. AVANT LA PREMIÈRE UTILISATION AVERTISSEMENT! Reportez-vous aux chapitres concernant la sécurité. 5.
FRANÇAIS Lorsque la dureté de l'eau dépasse les valeurs du tableau, remplissez le bac à eau avec de l'eau en bouteille. Pour vérifier le niveau de dureté de l'eau que vous utilisez, utilisez des bandes de test ou contactez votre compagnie des eaux. 11 Pour régler le degré de dureté de l'eau dans le menu : Réglages de base / Dureté de l'eau. 6. UTILISATION QUOTIDIENNE AVERTISSEMENT! Reportez-vous aux chapitres concernant la sécurité. 6.1 Modes De Cuisson Activation/désactivation des modes de cuisson. 1.
www.electrolux.com Mode de cuisson Utilisation Décongélation Vous pouvez utiliser cette fonction pour décon‐ geler des aliments surgelés comme des légu‐ mes et des fruits. Le temps de décongélation dépend de la quantité et de l'épaisseur des ali‐ ments surgelés. Gratiner Pour des plats tels que des lasagnes ou un gratin de pommes de terre. Également pour gratiner et faire dorer. Levée de pâte/pain Pour une levée contrôlée des pâtes à levure avant la cuisson.
FRANÇAIS Mode de cuisson Chaleur tournante hu‐ mide 13 Utilisation Cette fonction est conçue pour économiser de l'énergie en cours de cuisson. Pour plus d'in‐ formations, reportez-vous au paragraphe « Chaleur tournante humide » du chapitre « Conseils ». Durant cette cuisson, la porte du four doit rester fermée pour éviter d'interrom‐ pre la fonction, et pour garantir une consom‐ mation d'énergie optimale.
www.electrolux.com AVERTISSEMENT! Utilisez uniquement de l'eau froide du robinet. N'utilisez pas d'eau filtrée (déminéralisée) ou distillée. N'utilisez pas d'autres liquides. Ne versez pas de liquides inflammables ni d'alcool dans le bac à eau. 1. Appuyez sur le couvercle du bac à eau pour l'ouvrir. 2. Remplissez le bac à eau d'eau froide jusqu'au niveau maximal (environ 950 ml) jusqu'à ce que le signal sonore retentisse ou que le message s'affiche.
FRANÇAIS Sous-menu Description Renforcée Nettoyage par pyrolyse. 3 h pour un four très sale. Détartrage Procédure de nettoyage du tartre dans le circuit du générateur de vapeur. Rinçage La procédure de rinçage et de nettoyage du circuit du générateur de vapeur après une utilisation fré‐ quence des fonctions vapeur. Vidange du réservoir Procédure pour éliminer l'eau résiduelle du bac à eau après avoir utilisé les fonctions de vapeur.
www.electrolux.com Sous-menu pour : Configuration Sous-menu Description Langue Règle la langue de l'affichage. Heure actuelle Pour régler l'heure et la date. Tonalité touches Active et désactive la tonalité des touches sensiti‐ ves. Il est impossible de désactiver la tonalité de la touche MARCHE/ARRET et STOP. Son alarme/erreur Active et désactive les tonalités de l'alarme. Volume Alarme Permet de régler le volume des tonalités des tou‐ ches et des signaux sonores par paliers.
FRANÇAIS Viande Porc Poisson Filet-mi‐ gnon Frais Fumé Poisson en‐ Petit tier À point Rôti Jambon Grand Rôti À l'étuvée Jarret, précuit Bâtonnets de poisson Catégorie d'aliments: Garnitures / plats au four Travers Veau Gratins de poisson Filet-mi‐ gnon Plats Garnitures Rôti Potatoes/ Pomme quartier Jarret Agneau Rôti Potatoes/ Pomme Quartier Râble Gigot Gibier Chevreuil Râble Galettes de pommes de t.
www.electrolux.com Catégorie d'aliments: Gâteaux salés Plat Frais Fine Épaisse Pizza Surgelé Fine Épaisse En-cas Glacé Quiche Fine Baguette Ciabatta Pain blanc Pain com‐ plet Pain de sei‐ gle Pain aux céréales Pain Pain sans levain Tresse brio‐ chée Surgelé Baguette Pain Précuite Frais Petits pains Surgelé Précuite Plat Gâteau (moule) Gâteau aux amandes Tarte aux pommes Gâteau au fromage blanc Tarte aux pommes, couv.
FRANÇAIS Plat Plat Gâteau sur plaque Petites pâ‐ tisseries Strudel aux pommes surg. Petits gâ‐ teaux Choux à la crème Brownies Gâteau au fromage blanc Éclairs Brioche de Noël aux fruits (Stol‐ len) Muffins Tarte aux fruits Macarons Tresses feuilletées Pâte sablée Pâtisseries feuilletées Pâte à gé‐ noise Biscuits sa‐ blés Pâte levée Génoise/ Gâteau Sa‐ voie Cocotte, su‐ cré 6.
www.electrolux.com Options Description Set + Go Pour régler une fonction et l'activer ulté‐ rieurement. Une fois la fonction sélection‐ née, le message « Set&Go active » s'affi‐ che. Appuyez sur la touche Départ pour l'activer. Lorsque cette fonction est acti‐ vée, le message disparaît de l'affichage et le four se met en marche. Veuillez no‐ ter que cette fonction est uniquement dis‐ ponible avec certains modes de cuisson, et uniquement si la Durée/Fin est réglée. 6.
FRANÇAIS 21 8. UTILISATION DES ACCESSOIRES AVERTISSEMENT! Reportez-vous aux chapitres concernant la sécurité. 8.1 Sonde alimentaire 3/4 de la Sonde alimentaire soient à l'intérieur de l'aliment. 3. Branchez la fiche de la Sonde alimentaire dans la prise, à l'avant de l'appareil. La Sonde alimentaire mesure la température à l'intérieur des aliments. L'appareil s'éteint lorsque la température réglée est atteinte.
www.electrolux.com Catégorie d'aliments : ragoût 1. Allumez le four. 2. Versez la moitié des ingrédients dans un plat à gratin. 3. Introduisez la pointe de la Sonde alimentaire exactement au centre du ragoût. La Sonde alimentaire doit être stabilisé à un endroit en cours de cuisson. Pour y parvenir, utilisez un ingrédient solide. Utilisez le bord du plat pour soutenir la poignée en silicone de la Sonde alimentaire. L'extrémité de la Sonde alimentaire ne doit pas toucher le fond du plat. 8.
FRANÇAIS Grille métallique et plateau de cuisson / plat à rôtir ensemble : Poussez le plateau de cuisson /plat à rôtir entre les rails du support de grille et glissez la grille métallique entre les rails se trouvant juste au-dessus. 23 Les petites indentations sur le dessus apportent plus de sécurité. Les indentations sont également des dispositifs anti-bascule. Le rebord élevé de la grille empêche les ustensiles de cuisine de glisser. 9. FONCTIONS SUPPLÉMENTAIRES 9.
www.electrolux.com 10.
FRANÇAIS 25 Plat Température (°C) Durée (min) Positions des grilles Gratin De Pâtes 120 - 130 15 - 20 2 Riz 120 - 130 15 - 20 2 Quenelles 120 - 130 15 - 20 2 1) 1) Les durées de cuisson sont fournies à titre indicatif uniquement. 10.3 Cuisson • • • La première fois, utilisez la température la plus basse. Le temps de cuisson peut être prolongé de 10 à 15 minutes, si vous cuisez des gâteaux sur plusieurs niveaux.
www.electrolux.com Résultats de cuisson Cause probable Solution La coloration du gâ‐ teau n'est pas homo‐ gène. Température du four trop élevée et durée de cuis‐ son trop courte. Diminuez la température du four et allongez le temps de cuisson. La préparation est mal ré‐ partie. Étalez la préparation de façon homogène sur le plateau de cuisson. Le gâteau n'est pas Température de cuisson cuit à la fin de la durée trop basse. de cuisson.
FRANÇAIS Plat Fonction 27 Température (°C) Durée (min) Positions des grilles Choux à la crè‐ Cuisson par me/éclairs convection 190 - 2101) 20 - 35 3 Gâteau roulé 180 - 2001) 10 - 20 3 Gâteaux avec Chaleur tour‐ garniture de ty‐ nante pe crumble (sec) 150 - 160 20 - 40 3 Gâteau aux amandes et au beurre / gâ‐ teaux au sucre Cuisson par convection 190 - 2101) 20 - 30 3 Gâteaux aux fruits Cuisson par convection 180 35 - 55 3 Gâteau à base de levure à garniture (par ex.
www.electrolux.com 10.
FRANÇAIS 29 Gâteaux/Petites pâtisseries/Pains sur plateaux de cuisson Plat Température (°C) Durée (min) Positions des grilles 2 positions 3 positions Choux à la crè‐ 160 - 1801) me/éclairs 25 - 45 1/4 - Crumble sec 30 - 45 1/4 - Température (°C) Durée (min) Positions des grilles Pâte sablée / biscuits à base de génoise 150 - 160 Meringues 150 - 160 1) Préchauffez le four.
www.electrolux.
FRANÇAIS Plat Température (°C) 31 Durée (min) Positions des gril‐ les Tarte aux pommes, 150 - 170 couv. 50 - 60 1 Tourte aux légumes 160 - 180 50 - 60 1 Pain sans levain 210 - 2301) 10 - 20 2 Quiche à pâte feuil‐ 160 - 1801) letée 45 - 55 2 Flammekuche 210 - 2301) 15 - 25 2 Raviolis Russes 180 - 2001) 15 - 25 2 1) Préchauffez le four. 2) Utilisez un plat à rôtir. 10.11 Rôtissage Utilisez des plats résistant à la chaleur.
www.electrolux.com Porc Plat Quantité (kg) Fonction Température (°C) Durée (min) Épaule/collet/ jambon à l'os 1 - 1.5 Gril + Chaleur tournante 150 - 170 90 - 120 Côtelette/côte le‐ vée 1 - 1.5 Gril + Chaleur tournante 170 - 190 30 - 60 Pâté à la viande 0.75 - 1 Gril + Chaleur tournante 160 - 170 50 - 60 Jarret de porc (précuit) 0.
FRANÇAIS 33 Volaille Plat Quantité (kg) Fonction Température (°C) Durée (min) Morceaux de volaille 0.2 - 0.25 Gril + Chaleur tournante 200 - 220 30 - 50 Demi-poulet 0.4 - 0.5 Gril + Chaleur tournante 190 - 210 40 - 50 Poulet, poular‐ de 1 - 1.5 Gril + Chaleur tournante 190 - 210 50 - 70 Canard 1.5 - 2 Gril + Chaleur tournante 180 - 200 80 - 100 Oie 3.5 - 5 Gril + Chaleur tournante 160 - 180 120 - 180 Dinde 2.5 - 3.
www.electrolux.com Gril Fort Préchauffez toujours le four à vide pendant 3 minutes. Réglez le gril à la température maximale. Plat Durée (min) Positions des gril‐ les 1re face 2e face Filet de porc 10 - 12 6 - 10 4 Saucisses 10 - 12 6-8 4 Filet/Steaks de veau 7 - 10 6-8 4 Toasts avec garni‐ ture 6-8 - 4 10.
FRANÇAIS 35 Plats préparés surgelés Plat Fonction Température (°C) Durée (min) Positions des grilles Pizza surgelée Cuisson par convection comme indiqué comme indiqué 3 sur l'emballage sur l'emballage Frites1) (300 600 g) Cuisson par convection ou Gril + Chaleur tournante 200 - 220 Baguettes Cuisson par convection comme indiqué comme indiqué 3 sur l'emballage sur l'emballage Gâteaux aux fruits Cuisson par convection comme indiqué comme indiqué 3 sur l'emballage sur l'emballage comme indiq
www.electrolux.com Utilisez le premier niveau en partant du bas du four pour cette fonction. Ne mettez pas plus de six bocaux à conserves d'un litre sur le plateau de cuisson. Remplissez les bocaux au même niveau et enclenchez le système de fermeture. Lorsque le liquide contenu dans les pots commence à frémir (au bout d'environ 35 à 60 minutes pour des pots d'un litre), éteignez le four ou réduisez la température à 100 °C (reportez-vous au tableau). Les bocaux ne doivent pas se toucher.
FRANÇAIS 37 laissez refroidir pendant une nuit pour terminer le séchage.
www.electrolux.com 10.
FRANÇAIS Volaille Température à cœur du plat (°C) Moins À Point Plus Poulet (entier / moitié / blanc) 80 83 86 Canard (entier / moitié) Dinde (entière / blanc) 75 80 85 Canard (magret) 60 65 70 Poisson (saumon, truite, san‐ dre) Température à cœur du plat (°C) Moins À Point Plus Poisson (entier / gros / vapeur) Poisson (entier / gros / rôti) 60 64 68 Ragoût - Légumes précuits Température à cœur du plat (°C) Moins À Point Plus Ragoût de courgettes, Ragoût de brocolis, Ragoût de f
www.electrolux.com Cuisson sur un seul niveau. Cuisson dans des moules Plat Fonction Génoise allégée Génoise allégée Température (°C) Durée (min) Positions des grilles Chaleur tournante 140 - 150 35 - 50 2 Voûte 160 35 - 50 2 Tarte aux pommes Chaleur tournante 160 (2 moules de 20 cm de diamètre, décalés en diagonale) 60 - 90 2 Tarte aux pommes Voûte (2 moules de 20 cm de diamètre, décalés en diagonale) 70 - 90 1 Durée (min) Positions des grilles 180 Cuisson sur un seul niveau.
FRANÇAIS Plat Fonction Température (°C) Durée (min) Positions des grilles Toasts Grill max 1-3 5 Steaks de bœuf Grill max 24 - 301) 4 41 1) Retournez à la moitié du temps. Gril Fort Préchauffez toujours le four à vide pendant 3 minutes. Réglez le gril à la température maximale. Plat Durée (min) Positions des gril‐ les 1re face 2e face Steaks hachés 8 - 10 6-8 4 Toasts 1-3 1-3 4 11. ENTRETIEN ET NETTOYAGE AVERTISSEMENT! Reportez-vous aux chapitres concernant la sécurité. 11.
www.electrolux.com 2. Écartez l'avant du support de grille de la paroi latérale. 3. Sortez les supports de la prise arrière. Réinstallez les supports de grille en répétant cette procédure dans l'ordre inverse. 11.4 Nettoyage par pyrolyse ATTENTION! Retirez tous les accessoires et les supports de grille amovibles. Ne versez pas d'eau dans le réservoir d'eau durant le processus de nettoyage par pyrolyse.
FRANÇAIS AVERTISSEMENT! Lorsque le nettoyage est terminé, le four est très chaud. Laissez-le refroidir. Risque de brûlure ! Lorsque le nettoyage est terminé, la porte reste verrouillée pendant la phase de refroidissement du four. Certaines fonctions du four ne sont pas disponibles. 11.5 Nettoyage Conseillé Lorsque le rappel s'affiche, il est nécessaire de nettoyer l'appareil. Lancez la fonction Nettoyage par pyrolyse. 11.
www.electrolux.com 11.8 Système de génération de vapeur - Rinçage Retirez tous les accessoires. 2. Appuyez complètement sur les leviers de blocage (A) sur les deux charnières de la porte. Sélectionnez la fonction dans le menu : Nettoyage. L'interface utilisateur vous guidera pour lancer la procédure. La durée de la fonction est d'environ 30 minutes. Avec cette fonction, l'éclairage est éteint. 1. Placez le plateau de cuisson sur le premier gradin. 2.
FRANÇAIS Installez d'abord le plus petit des panneaux, puis le plus grand, et terminez par la porte. AVERTISSEMENT! Assurez-vous que les panneaux en verre sont insérés dans la bonne position, car la surface de la porte pourrait surchauffer. Veillez à replacer les panneaux de verre (C, B et A) dans le bon ordre. Commencez par insérer le panneau C, lequel dispose d'un carré imprimé du côté gauche, et d'un triangle imprimé du côté droit. Vous trouverez également ces symboles gravés sur le cadre de la porte.
www.electrolux.com 12. EN CAS D'ANOMALIE DE FONCTIONNEMENT AVERTISSEMENT! Reportez-vous aux chapitres concernant la sécurité. 12.1 En cas d'anomalie de fonctionnement Problème Cause probable Solution Vous ne pouvez pas allu‐ mer le four ni le faire fonc‐ tionner. Le four n'est pas branché à une source d'alimentation électrique ou le branche‐ ment est incorrect. Vérifiez que le four est cor‐ rectement branché à une source d'alimentation élec‐ trique (reportez-vous au schéma de branchement).
FRANÇAIS Problème Cause probable Solution Un code d'erreur ne figu‐ rant pas dans ce tableau s'affiche. Une anomalie électrique est survenue. • • De la vapeur et de la con‐ densation se forment sur les aliments et dans la ca‐ vité du four. Le plat est resté trop long‐ temps dans le four. 47 Éteignez le four à l'aide du fusible de l'habitation ou du disjoncteur situé dans la boîte à fusibles, puis allumez-le de nou‐ veau.
www.electrolux.com 12.2 Données de maintenance Si vous ne trouvez pas de solution au problème, veuillez contacter votre revendeur ou un service après-vente agréé. signalétique. La plaque signalétique se trouve sur l'encadrement avant de la cavité du four. Ne retirez pas la plaque signalétique de la cavité du four. Les informations à fournir au service après-vente figurent sur la plaque Nous vous recommandons de noter ces informations ici : Modèle (MOD.) .........................................
FRANÇAIS Conseils généraux Assurez-vous que la porte du four est correctement fermée lorsque le four est en marche. En cours de la cuisson, n'ouvrez pas la porte. Nettoyez régulièrement le joint de la porte pour qu'il reste propre et assurez-vous qu'il est toujours bien fixé, dans la bonne position. Utilisez des plats en métal pour augmenter les économies d'énergie . Si possible, ne préchauffez pas le four avant d'y introduire vos aliments.
www.electrolux.com Points de vente de rechange Industriestrasse 10, 5506 Mägenwil,Tel. 0848 848 111 Conseil technique/Vente Badenerstrasse 587, 8048 Zürich, Tel. 044 405 81 11 Garantie Nous octroyons sur chaque produit 2 ans de garantie à partir de la date de livraison ou de la mise en service au consommateur (documenté au moyen d’une facture, d’un bon de garantie ou d’un justificatif d’achat). Notre garantie couvre les frais de mains d’œuvres et de déplacement, ainsi que les pièces de rechange.
FRANÇAIS 51
867343972-B-082018 www.electrolux.