
User manual


3
4
4
60º
5
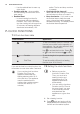
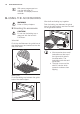
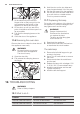
2. At the same time push the door
hinges as far as they can go into the
two recesses at the bottom of the
appliance on the left and the right.
3. Lift the door up until you are at the
point of resistance and then open it as
far as possible.
4. Fully lock the clamping levers on the
hinges.
5. Close the door of the appliance.
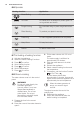
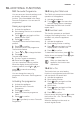
11.6 Removing the oven door
Remove the door to clean the inner side of
the appliance more easily.
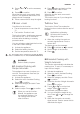
WARNING!
Be careful when you remove
the door from the appliance.
The door is heavy.
1. Open the door fully.
2. Fully release the clamping levers on
the hinges.
3
4
2
3. Hold the door on the two sides and
close it approximately 3/4 of the way.
4. Pull the door away from the appliance.
5. Put the door with the outer side down
on a soft cloth on a stable surface.
This is to prevent scratches.
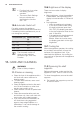
11.7 Replacing the lamp
Put a cloth on the bottom of the interior of
the appliance. It prevents damage to the
lamp glass cover and the cavity.
WARNING!
Danger of electrocution!
Disconnect the fuse before
you replace the lamp.
The lamp and the lamp glass
cover can be hot.
1. Deactivate the appliance.
2. Remove the fuses from the fuse box
or deactivate the circuit breaker.
The side lamp
1. Remove the left shelf support to get
access to the lamp.
2. Use a Torx 20 screwdriver to remove
the cover.
3. Remove and clean the metal frame
and the seal.
4. Replace the lamp with a halogen, 230
V, 40 W, 300 °C heat resistant lamp.
5. Install the metal frame and the seal.
Tighten the screws.
6. Install the left shelf support.
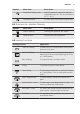
12. TROUBLESHOOTING
WARNING!
Refer to Safety chapters.
12.1 What to do if...
Problem Possible cause Remedy
The oven does not heat up. The oven is deactivated. Activate the oven.
The oven does not heat up. The clock is not set. Set the clock.
www.electrolux.com20