EBCSL7 ................................................ .............................................
www.electrolux.com CONTENTS 1. 2. 3. 4. 5. 6. 7. 8. 9. 10. 11. 12. 13. 14. SAFETY INFORMATION . . . . . . . . . . . . . . . . . . . . . . . . . . . . . . . . . . . . . . . . . . . . . . . . . . . 3 SAFETY INSTRUCTIONS . . . . . . . . . . . . . . . . . . . . . . . . . . . . . . . . . . . . . . . . . . . . . . . . . . 4 PRODUCT DESCRIPTION . . . . . . . . . . . . . . . . . . . . . . . . . . . . . . . . . . . . . . . . . . . . . . . . . 6 BEFORE FIRST USE . . . . . . . . . . . . . . . . . . . . . . . . .
ENGLISH 3 1. SAFETY INFORMATION Before the installation and use of the appliance, carefully read the supplied instructions. The manufacturer is not responsible if an incorrect installation and use causes injuries and damages. Always keep the instructions with the appliance for future reference. 1.1 Children and vulnerable people safety WARNING! Risk of suffocation, injury or permanent disability.
www.electrolux.com • Before maintenance cut the power supply. • Do not use harsh abrasive cleaners or sharp metal scrapers to clean the glass door since they can scratch the surface, which may result in shattering of the glass. • To remove the shelf supports first pull the front of the shelf support and then the rear end away from the side walls. Install the shelf supports in the opposite sequence.
ENGLISH • Do not pull the mains cable to disconnect the appliance. Always pull the mains plug. • Use only correct isolation devices: line protecting cut-outs, fuses (screw type fuses removed from the holder), earth leakage trips and contactors. • The electrical installation must have an isolation device which lets you disconnect the appliance from the mains at all poles. The isolation device must have a contact opening width of minimum 3 mm. 2.
www.electrolux.com cleaning pads, solvents or metal objects. • If you use an oven spray, obey the safety instructions on the packaging. • Do not clean the catalytic enamel (if applicable) with any kind of detergent. • Only use lamps with the same specifications. 2.4 Internal light • Disconnect the appliance from the mains supply. • Cut off the mains cable and discard it. • Remove the door catch to prevent children and pets to get closed in the appliance.
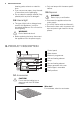
ENGLISH 7 Baking tray For cakes and biscuits. Glass dish with 2 grill inserts Sponge For absorbing residual water from the steam generator. 4. BEFORE FIRST USE WARNING! Refer to the Safety chapters. 4.2 First Connection 4.1 Initial Cleaning • Remove all parts from the appliance. • Clean the appliance before first use. Refer to chapter "Care and Cleaning".
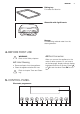
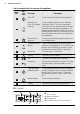
www.electrolux.com Use the sensor fields to operate the appliance Sensor field Number Function Comment ON / OFF To activate and deactivate the appliance. Heating Functions or Assisted Cooking To set a heating function or an Assisted Cooking function. To set the necessary function, touch the sensor field one or two times after you activate the appliance.
ENGLISH 9 Other indicators in the display Symbol Function Minute Minder The function operates. Time of day The display shows the time of day. Duration The display shows the necessary time for cooking. End Time The display shows when the cooking time is completed. Time indication The display shows how long a heating function operates. Press and at the same time to have the time go back to zero. Heat up indicator The display shows the temperature in the appliance.
www.electrolux.com Symbol Menu item Description Steam Cleaning Procedure for cleaning with steam. Basic Settings It contains a list of other settings. Specials Contains a list of additional heating functions. Submenu for: Basic Settings Symbol Submenu Application Set Time of Day It sets the current time on the clock. Time Indication When ON, the display shows the current time after you deactivate the appliance.
ENGLISH 11 Submenu for: Sous-vide cooking Symbol Menu item Description Sous-vide cooking mode It uses the steam for meat, fish, seafood, vegetables and fruits. Set the temperature 50 °C — 95 °C. Sous-vide recipes It contains a list of automatic programmes. Sous-vide cooking has its start in the Sous-vide technology, which in French means ‘under vacuum’. The name refers to a method of cooking in vacuum sealed plastic pouches at low temperatures. 6.
www.electrolux.com Heating function Application Au Gratin For dishes such as lasagna or potato gratin. Also to gratinate and to brown. Dough Proving For controlled rising of yeast dough before baking. Plate Warming To preheat your plate for serving. Preserving To preserve vegetables in glasses and liquid (e.g. mixed pickles). Keep Warm To keep food warm. Defrost To defrost frozen food. 6.4 Activating a heating function 1. Activate the appliance. 2. Select the Heating Functions menu.
ENGLISH 6. Optional: finish the food with a final searing or grilling for e.g. meat to achieve a nice crust and the typical roast flavour.
www.electrolux.com Symbol Function End Time Description To set the switch-off time for a heating function (max. 23 h 59 min). If you set the time for a clock function, the time starts to count down after 5 seconds. If you use the clock functions Duration and End Time , the appliance deactivates the heating elements after 90 % of the set time. The appliance uses the residual heat to continue the cooking process until the time ends (3 - 20 minutes). Setting the clock functions Set a heating function.
ENGLISH 8.1 Assisted Cooking with Recipe Automatic This appliance has a set of recipes you can use. Recipes are fixed and you cannot change them. Activating the function: 1. Activate the appliance. 2. Select the Assisted Cooking menu. Press OK to confirm. 3. Select the category and dish. Press OK to confirm. 4. Select Recipe Automatic . Press OK to confirm. When you use the Manual function, the appliance uses automatic settings. You can change them as with other functions. 15 Activating the function: 1.
www.electrolux.com Wire shelf: Push the shelf between the guide bars of the shelf support and make sure that the feet point down. Wire shelf and baking tray together: Push the baking tray between the guide bars of the shelf support and the wire shelf on the guide bars above. • All accessories have small indentations at the bottom of the right and left edges to increase safety. Always make sure that these indentations are at the rear of the appliance. The indentations are also anti-tip devices.
ENGLISH 3. Select your favourite programme name. Press OK to confirm. to go to Favourite Programme Press directly. You can also use it when the appliance is deactivated (for selected models only). 10.2 Child Lock 10.4 SET + GO The SET + GO function lets you set a heating function (or programme) and use it later with one press of the sensor field. Activating the function: 1. Activate the appliance. 2. Set the heating function. The Child Lock prevents an accidental operation of the appliance. 3.
www.electrolux.com 10.7 Cooling fan When the appliance operates, the cooling fan activates automatically to keep the surfaces of the appliance cool. If you deactivate the appliance, the cooling fan can continue to operate until the appliance cools down. 11. CARE AND CLEANING WARNING! Refer to the Safety chapters. Notes on cleaning: • Clean the front of the appliance with a soft cloth with warm water and a cleaning agent. • To clean metal surfaces, use a usual cleaning agent.
ENGLISH 19 11.2 Shelf supports You can remove the shelf supports to clean the side walls. Removing the shelf supports 1. Pull the support up and out of the front catch carefully. Installing the shelf supports To install the shelf support follow the procedure in the opposite order. 11.3 Steam generation system CAUTION! Dry the steam generator after each use. Soak up water with the sponge. Remove the limescale residue with water and vinegar.
www.electrolux.com 11.4 Removing / inserting the door Remove the door to clean the inner side of the appliance. CAUTION! Put the door with the outer side down on a soft and level surface to prevent scratches. WARNING! Pull the door away from the appliance. The door is heavy! Removing the door 1. Open the door as far as it goes. 2. Lift up the clamping levers on both door hinges fully. 3.
ENGLISH 21 12. WHAT TO DO IF… WARNING! Refer to the Safety chapters. Problem Possible cause Remedy The appliance does not heat up. The appliance is deactivated. Activate the appliance. The appliance does not heat up. The clock is not set. Set the clock. The appliance does not heat up. The necessary settings are not set. Make sure that the settings are correct. The appliance does not heat up. The Child Lock is activated. Refer to "Activating and deactivating the Child Lock function".
www.electrolux.com min. 3 mm To lift the appliance, do not use the door handle. WARNING! During installation in combustible matter, NIN SEV 1000 and fire protection guidelines and regulations of the Association of Cantonal Fire Insurance shall be strictly adhered to. 2. 3. Installation 1. Place the appliance in front of the recess and connect the mains plug. 420 ca.50 A 567 20 252 N 550 A 548 A A = Appliance N = Recess N min.
ENGLISH 13.1 Electrical connection Let a qualified electrician connect the appliance to the electricity supply. Use a power cable of the type H05VV-F or higher. Install the appliance with a socket supply line. If there is no socket supply line, the fixed home electrical system must include an isolating device with at least a 3 mmcontact separation to enable a simultane- 14. CH 23 ous and all-pole cut off from the mains (according to NIN SEV 1000).
www.electrolux.com Garanzia Per ogni prodotto concediamo una garanzia di 2 anni a partire dalla data di consegna o dalla sua messa in funzione. (fa stato la data della fattura, del certificato di garanzia o dello scontrino d’acquisto) Nella garanzia sono comprese le spese di manodopera, di viaggio e del materiale.
ENGLISH 25
www.electrolux.
ENGLISH 27
892961721-A-472013 www.electrolux.