user manual Oven EB GL4
electrolux Electrolux. Thinking of you. Share more of our thinking at www.electrolux.com Contents Safety instructions.................................. 3 Description of the Appliance .................. 4 Before Using for the first time ................. 6 Using the Oven ...................................... 7 Uses, Tables and Tips ............................ 13 Cleaning and Care................................. What to do if …..................................... Disposal ............................
electrolux 3 1 Safety instructions Electrical safety • This appliance must be only connected by a registered electrician. • In the event of a fault or damage to the appliance: Take the fuses out or switch off. • Repairs to the appliance must only be carried out by qualified service engineers. Considerable danger may result from improper repairs. If repairs become necessary, please contact our Customer Services or your dealer. Child Safety • Never leave children unsupervised when the appliance is in use.
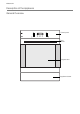
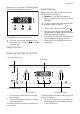
electrolux Description of the Appliance General Overview Control panel Door handle Full glass door Appliance drawer
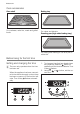
electrolux 5 Control Panel Temperature Pilot Light Time display Oven Power Indicator Oven Functions Temperature selector Clock function buttons Oven Features Top heat and heating elements Fat trap Oven lighting Shelf positions Oven lighting Fan heating element Fan Bottom heating element, removable Aluminium base plate Oven shelf runners, removable
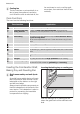
electrolux Oven accessories Oven shelf Baking tray For cookware, cake tins, roasts and grilled foods. For cakes and biscuits. Roasting pan (high-sided baking tray) For baking and roasting or use as a pan to collect fat. Before Using for the first time Setting and changing the time 1. 3 The oven only operates when the time has been set. 2. When the appliance has been connected to the electrical supply or when there has been a power cut, the function indicator Time of day flashes automatically.
electrolux 7 After approx. 5 seconds, the flashing stops and the clock displays the time set. Initial Cleaning Before using the oven for the first time you should clean it thoroughly. 1 Caution: Do not use any caustic or abrasive cleaners. The surface could be damaged. 3 To clean metal fronts use commercially available cleaning agents. 1. 2. The appliance is now ready to use. 3 The time can only be changed if no automatic function (Duration or End ) has been set. 3. 4.
electrolux 3 Cooling fan The fan switches on automatically in order to keep the appliance’s surfaces cool. When the oven is switched off, the fan continues to run to cool the appliance down, then switches itself off automatically. Oven Functions The oven has the following functions: Oven function Light Application Using this function you can light up the oven interior, e.g. for cleaning. Convection with ring To bake on three oven levels maximum at the same time.
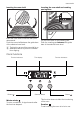
electrolux 9 Inserting the oven shelf: Inserting the oven shelf and roasting pan together Insert the oven shelf so that the feet point downwards. Push the oven shelf between the guide bars of the selected oven level. Lay the oven shelf on the roasting pan. Push the roasting pan between the guide bars of the selected oven level. 3 The high rim around the oven shelf is an additional device to prevent cookware from slipping.
electrolux End To set the switch-off time for an oven function. Time of day To set, change or check the time (See also section “Before Using for the First Time”). 2. Using the or button set the desired Countdown (max. 2 hours 30 minutes). 3 How to use the clock functions • After a function has been selected, the corresponding function indicator flashes for about 5 seconds. During this period, the desired times can be set using the or button.
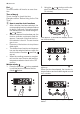
electrolux 11 Duration 1. Press the Selection button repeatedly until the function indicator Duration flashes. When the time has elapsed, the function indicator flashes, an audible signal sounds for 2 minutes and the oven switches itself off. 2. 3. Using the or button set the desired cooking time. The signal and the programme can be stopped by pressing any button. End 1. Press the Selection button repeatedly until the function indicator End flashes. After approx.
electrolux After approx. 5 seconds the display returns to showing the current time. 1. The function indicator End lights up. When the time has elapsed, the function indicator flashes, an audible signal sounds for 2 minutes and the oven switches itself off. In this example, 1 hour. 2. Using the End function, set the time at which the dish should be ready. 3. In this case 14:05:00. The function indicators Duration and End light up and the current time is shown in the display.
electrolux 13 In this case, at 13:05:00. And switches itself off again when the cooking time entered has elapsed. In this case, at 14:05. Uses, Tables and Tips Baking Oven function: Convection with ring heating element or Conventional Baking tins • For Conventional dark metal and non-stick tins are suitable. • For Convection with ring heating element bright metal tins are also suitable. Oven levels • Baking with Conventional is possible on one oven level.
electrolux • Moist recipes (for example, pizzas, fruit flans, etc.) are baked on one level. • Cakes and pastries at different heights may brown at an uneven rate at first. If this occurs, please do not change the temperature setting. Different rates of browning even out as baking progresses. • Your new oven may bake or roast differently to your previous appliance.
electrolux 15 Type of baking Oven level Temperature °C Time Mins.
electrolux Type of baking Oven function Oven level Temperature °C Time Mins. Small cakes (20per tray) Convection with ring heating element 3 1401) 20-30 Small cakes (20per tray) Conventional 3 1701) 20-30 Temperature in °C Time Mins.
electrolux 17 Tips on baking Baking results Possible cause Remedy The cake is not browned enough at the bottom Wrong oven level Place cake lower in the oven The cake sinks (becomes soggy, lumpy, streaky) Oven temperature too high Use a slightly lower setting Baking time too short Set a longer baking time Baking times cannot be reduced by setting higher temperatures Too much liquid in the mixture Use less liquid Pay attention to mixing times, especially if using mixing machines Oven temperature
electrolux Bakes and gratins table Dish Oven function Shelf position Temperature °C Time Mins.
electrolux 19 • • If required, turn the roast (after 1/2 - 2/3 of the cooking time). Baste large roasts and poultry with their juices several times during roasting. This will give better roasting results. • You can switch the oven off about 10 minutes before the end of the roasting time, in order to utilise the residual heat. Roasting table Type of meat Quantity Ovenfunction Shelf position Temperature °C 1 200-250 Time Mins. Beef Pot roast 1-1.5 kg Conventional 120-150 per cm.
electrolux Type of meat Quantity Ovenfunction Shelf position Temperature °C Time Mins. Poultry Poultry portions 200-250g each Convection grilling 1 200-220 30-50 Half chicken 400-500g each Convection grilling 1 190-210 35-50 Chicken, poulard 1-1.5 kg Convection grilling 1 190-210 50-70 Duck 1.5-2 kg Convection grilling 1 180-200 80-100 Goose 3.5-5 kg Convection grilling 1 160-180 120-180 Turkey 2.5-3.
electrolux 21 Grilling time Food to be grilled Toast Oven level 1) Toast with topping 1st side 2nd side 3 4-6 mins. 3-5 mins. 3 6-8 mins. --- 1) Do not pre-heat • Defrosting Oven function: Defrost ture setting) (no tempera- • • Unwrap the food and place it on a plate on the oven shelf. Do not cover with a plate or bowl, as these can substantially lengthen the defrosting time. For defrosting, place the shelf in the 1st oven level from the bottom. Defrosting table Defrosting time mins.
electrolux Food to be dried Temperature in °C Oven level 1 level 2 levels Time in hours (Guideline) Vegetables Beans 60-70 3 1/4 6-8 Peppers (strips) 60-70 3 1/4 5-6 Vegetables for soup 60-70 3 1/4 5-6 Mushrooms 50-60 3 1/4 6-8 Herbs 40-50 3 1/4 2-3 Plums 60-70 3 1/4 8-10 Apricots 60-70 3 1/4 8-10 Apple slices 60-70 3 1/4 6-8 Pears 60-70 3 1/4 6-9 Fruit Making preserves Oven function: Bottom heat • For preserving, use only commercially available preserv
electrolux 23 Preserve Temperature in°C Cooking time until Continue to cook simmering at 100°C in mins. in mins. Vegetables Carrots1) 160-170 50-60 5-10 Cucumbers 160-170 50-60 --- Mixed pickles 160-170 50-60 15 Kohlrabi, peas, asparagus 160-170 50-60 15-20 1) Leave standing in oven when switched off Cleaning and Care 1 Warning: First switch off the appliance and let it cool down before carrying out any cleaning.
electrolux Shelf Support Rails The shelf support rails on the left and right hand sides of the oven can be removed for cleaning the side walls. Removing the shelf support rails To re-insert, first hook the rail into place at the back (1) and then insert the front and press into place (2). Fat trap First pull the front of the rail away from the oven wall (1) and then unhitch at the back (2). The fat trap is almost maintenance free.
electrolux 25 2. Rotate the fat trap to the left from the oven roof (see illustration). 2. 3. If necessary: replace with 25 watt, 230 V, 300 °C heat-resistant oven lighting. Refit the glass cover. Changing side oven light/Cleaning glass cover 3. 4. Wash the fat trap in hot water with washing-up liquid and a soft brush or simply wash in the dishwasher. With stubborn dirt, soak for a while in hot water with soap suds. Reassembly in reverse order.
electrolux Removing the heating elements. You can remove the top and bottom heating elements to clean the oven cavity. In this case proceed as follows for possible cleaning actions: 1 Ensure that the oven has cooled down sufficiently so that you can touch heating elements safely! There is a risk of burns! 1. Hold the heat element with two hands at the front. 2. Pull the heating element out of the plug connection to the front.t 3. 2. Undo the clamping levers (A) on both door hinges fully. 3.
electrolux 27 en. Let the door slide down as far as it will go. 2. Open the oven door as far as it will go. 3. Fold up the clamping levers (A) on both door hinges back into their original positions. 4. Close the oven door.
electrolux What to do if … Problem The oven does not heat up The oven lighting is not operating Possible cause Remedy The oven is not switched on Switch the oven on The clock is not set Set the current time on the clock The required settings have not been set Check the settings The house wiring fuse (in the fuse box) has tripped Check the fuse If the fuses trip several times, please call a qualified electrician Top heat grill heating element inserted incorrectly Top heat grill heating eleme
electrolux 29 1 Warning: So that the old appliance can no longer cause any danger, make it unusable before disposing of it. To do this, disconnect the appliance from the mains supply and remove the mains cable from the appliance.
electrolux Installation Instructions Installing the oven 1 Installation into flammable material must 1. comply with NIN 2005, Chapter 4.2.2 of the VKF (Association of Cantonal Fire Insurers) fire protection guidelines and regulations. Pull the appliance drawer out as far as it will go, take hold of it and remove it. enable a simultaneous and all-pole cut off from the mains, according to NIN 2000. For connecting to appliance directly to the mains, use a minimum cable length of 120cm. 1.
electrolux 31 Garantie/Kundendienst, Garantie/service-clientèle, Garanzia/Servizio clienti, Guarantee/Customer Service Centres Servicestellen Points de Service Servizio dopo vendita Point of Service 5506 Mägenwil/Zürich Industriestrasse 10 9000 St. Gallen Zürcherstrasse 204 e 4052 Basel St.
electrolux Service In the event of technical faults, please first check whether you can remedy the problem yourself with the help of the operating instructions (section “What to do if…”). If you were not able to remedy the problem yourself, please contact the Customer Care Department or one of our service partners. In order to be able to assist you quickly, we require the following information: – – – Model description Product number (PNC) Serial number (S No.
www.electrolux.com www.electrolux.