user manual Built-In Electric Oven EBK GL4X
We were thinking of you when we made this product
electrolux 3 Welcome to the world of Electrolux Thank you for choosing a first class product from Electrolux, which hopefully will provide you with lots of pleasure in the future. The Electrolux ambition is to offer a wide variety of quality products that make your life more comfortable. You will find some examples on the cover in this manual. Please take a few minutes to study this manual so that you can take advantage of the benefits of your new machine.
electrolux contents Contents Safety instructions Description of the Appliance Before Using for the first time Using the Oven Uses, Tables and Tips Cleaning and Care What to do if … Installation Instructions Disposal Service 5 7 9 11 22 38 45 46 48 50 The following symbols are used in this user manual: 1 3 2 Important information concerning your personal safety and information on how to avoid damaging the appliance.
safety instructions electrolux 5 Safety instructions Electrical safety • This appliance must be only connected by a registered electrician. • In the event of a fault or damage to the appliance: Take the fuses out or switch off. • Repairs to the appliance must only be carried out by qualified service engineers. Considerable danger may result from improper repairs. If repairs become necessary, please contact our Customer Services or your dealer.
electrolux safety instructions How to avoid damage to the appliance • Do not line the oven with aluminium foil and do not place baking trays, pots, etc. on the oven floor, as the heat that builds up will damage the oven enamel. • Fruit juices dripping from the baking tray will leave stains, which you will not be able to remove. For very moist cakes, use a deep tray. • Do not put any strain on the oven door when open. • Never pour water directly into the oven when it is hot.
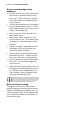
description of the appliance electrolux 7 Description of the Appliance General Overview Control panel Door handle Full glass door Control Panel Temperature Pilot Light Time display Oven Power Indicator Oven Functions Temperature selector Clock function buttons
electrolux description of the appliance Oven Features All interior oven walls are coated with a special enamel (catalytic coating). Top heat and heating elements Fat trap Oven lighting Shelf positions Fat Filter Oven lighting Fan heating element Fan Bottom heating element, removable Aluminium base plate Oven shelf runners, removable Oven accessories Oven shelf For cookware, cake tins, roasts and grilled foods. Baking tray For cakes and biscuits.
before using for the first time electrolux 9 Before Using for the first time Setting and changing the time The oven only operates when the time has been set. When the appliance has been connected to the electrical supply or when there has been a power cut, the function indicator Time flashes automatically. 1. To change a time that has already been set, press the Selection button repeatedly until the function indicator Time flashes. 2. Using the or current time. button, set the After approx.
electrolux before using for the first time Initial Cleaning You should clean the oven before using it for the first time. Caution: Do not use any caustic, abrasive cleaners! The surface could be damaged. To clean the external parts of the oven, only use a cloth well wrung out with warm water to which a little washing up liquid has been added or a commercially available cleaner specifically designed for this purpose.
using the oven electrolux 11 Using the Oven Switching the Oven On and Off Oven Power Indicator Time display Temperature Pilot Light Clock function buttons Oven Functions 1. Turn the oven functions dial to the desired function. 2. Turn the temperature selector to the desired temperature. The power indicator is lit as long as the oven is in operation. The temperature pilot light is lit as long as the oven is heating up. 3.
electrolux using the oven Oven Functions The oven has the following functions: Oven function Application Light Using this function you can light up the oven interior, e.g. for cleaning. Convection with ring heating element For baking on up to three oven levels at the same time. Set the oven temperatures 20-40 °C lower than when using Conventional. Pizza setting For baking on one oven level dishes that require more intensive browning and a crispy base.
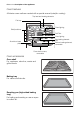
using the oven electrolux 13 Inserting the Oven Shelf, Baking Tray and Roasting Pan Shelf runner safety and anti-tip device As a shelf runner safety device, all insertable components have a small curved indentation at the bottom on the right and left-hand edge. Always insert insertable components so that this indentation is at the back of the oven interior. This indentation is also important for preventing the insertable components from tipping.
electrolux using the oven Inserting the oven shelf and roasting pan together Lay the oven shelf on the roasting pan. Push the roasting pan between the guide bars of the selected oven level.
using the oven electrolux 15 Inserting/Removing the Fat Filter Only use the fat filter when roasting to protect the rear heating elements from fat splashes. Inserting the fat filter Hold the fat filter by the grip and insert the two mounts downwards into the opening on the rear wall of the oven (fan opening). Taking out the fat filter Hold the fat filter by the grip and unhook it.
electrolux using the oven Clock Functions Function Indicators Button Time display Selector Button Countdown To set a countdown. A signal sounds after the time has elapsed. This function does not affect the functioning of the oven. Cook time To set how long the oven is to be in use. End time To set when the oven is to switch off again. Time To set, change or check the time (See also section “Before Using for the First Time”).
using the oven electrolux 17 How to use the clock functions • After a function has been selected, the corresponding function indicator flashes for about 5 seconds. During this period, the desired times can be set using the or button. • When the desired time has been set, the function indicator continues to flash for approx. 5 seconds. After that the function indicator is then lit. The set time begins to run. • Press any of the buttons to stop the audible signal.
electrolux using the oven Countdown 1. Press the Selection button repeatedly until the function indicator Countdown flashes. 2. Using the or button set the desired Countdown (max. 2 hours 30 minutes). After approx. 5 seconds the display shows the time remaining. The function indicator Countdown lights up. When the time has elapsed, the function indicator flashes and an audible signal sounds for 2 minutes. The signal can be stopped by pressing any button.
using the oven electrolux 19 Cook time 1. Press the Selection button repeatedly until the function indicator Cook time flashes. 2. Using the or button set the desired cooking time. After approx. 5 seconds the display returns to showing the current time. The function indicator Cook time lights up. When the time has elapsed, the function indicator flashes, an audible signal sounds for 2 minutes and the oven switches itself off. 3. The signal and the programme can be stopped by pressing any button.
electrolux using the oven End time 1. Press the Selection button repeatedly until the function indicator End time flashes. 2. Using the or button set the desired switch-off time. After approx. 5 seconds the display returns to showing the current time. The function indicator End time lights up. When the time has elapsed, the function indicator flashes, an audible signal sounds for 2 minutes and the oven switches itself off. 3. The signal and the programme can be stopped by pressing any button.
using the oven electrolux 21 Cook time bined and End time com- Cook time and End time can be used simultaneously, if the oven is to be switched on and off automatically at a later time. 1. Using the Cook time function, set the time required for cooking the dish. In this example, 1 hour. 2. Using the End time function, set the time at which the dish should be ready. In this case 14:05:00. The function indicators Cook time and End time light up and the current time is shown in the display.
electrolux uses, tables and tips Uses, Tables and Tips Baking Oven function: Convection with ring heating element or Conventional Baking tins • For Conventional dark metal and non-stick tins are suitable. • For Convection with ring heating element bright metal tins are also suitable. 1 baking tray: e.g. oven level 3 1 cake tin: e.g. oven level 1 2 baking trays: z. g., oven levels 1 and 3 3 baking trays: oven levels 1, 3 and 5 Oven levels • Baking with Conventional is possible on one oven level.
uses, tables and tips electrolux 23 General instructions • Insert the tray with the bevel at the front. • With Conventional or Convection with ring heating element you can also bake with two tins next to one another on the oven shelf at the same time. This does not significantly increase baking time. When frozen foods are used the trays inserted may distort during cooking. This is due to the large difference in temperature between the freezing temperature and the temperature in the oven.
electrolux uses, tables and tips Baking table Baking on one oven level Type of baking Oven function Oven Temperature level °C Time Mins.
uses, tables and tips electrolux 25 Type of baking Oven function Oven Temperature level °C Time Mins.
electrolux uses, tables and tips Type of baking Oven function Oven Temperature level °C Time Mins.
uses, tables and tips electrolux 27 Baking on more than one oven level Type of baking Convection with ring heating element Convection with ring heating element Temperature in °C Time Mins.
electrolux uses, tables and tips Tips on Baking Baking results Possible cause Remedy The cake is not browned Wrong oven level enough underneath Place cake lower The cake sinks (becomes Oven temperature too high soggy, lumpy, streaky) Baking time too short Use a slightly lower setting Cake is too dry Cake browns unevenly Cake does not cook in the baking time given Set a longer baking time Baking times cannot be reduced by setting higher temperatures Too much liquid in the mixture Use less liqu
uses, tables and tips electrolux 29 Pizza setting table Shelf position Temperature °C Time Mins.
electrolux uses, tables and tips Bakes and gratins table Dish Pasta bake Lasagne Vegetables au Shelf position Temperature °C Time Mins.
uses, tables and tips electrolux 31 Roasting Oven function: Conventional Convection grilling or Roasting dishes • Any heat-resistant ovenware is suitable to use for roasting (please read the manufacturer's instructions). • Large roasting joints can be roasted directly in the roasting tray or on the oven shelf with the roasting tray placed below it. • For all lean meats, we recommend roasting these in a roasting tin with a lid. This will keep the meat more succulent.
electrolux uses, tables and tips Roasting table Type of meat Quantity Ovenfunction Shelf position Temperature °C Time Mins. 1 200-250 120-150 Beef Pot roast 1-1.5 kg Conventional per cm. of thickness Roast beef or fillet - rare per cm. of thickness Convection grilling 1 1902001) 5-6 - medium per cm. of thickness Convection grilling 1 180-190 6-8 - well done per cm. of thickness Convection grilling 1 170-180 8-10 Shoulder, neck, ham joint 1-1.
uses, tables and tips electrolux 33 Type of meat Shelf position Temperature °C Time Mins. Quantity Ovenfunction Poultry portions 200-250g each Convection grilling 1 200-220 30-50 Half chicken 400-500g each Convection grilling 1 190-210 35-50 Chicken, poulard 1-1.5 kg Convection grilling 1 190-210 50-70 Duck 1.5-2 kg Convection grilling 1 180-200 80-100 Goose 3.5-5 kg Convection grilling 1 160-180 120-180 Turkey 2.5-3.
electrolux uses, tables and tips Grill sizes Oven function: Grill or Dual grill with maximum temperature setting Important: Always grill with the oven door closed. The empty oven should always be pre-heated with the grill functions for 5 minutes. • For grilling, place the shelf in the recommended shelf position. • Always insert the tray for collecting the fat into the first shelf position from the bottom. • The grilling times are guidelines.
uses, tables and tips electrolux 35 Defrosting Oven function: Defrost (no temperature setting) • Unwrap the food and place it on a plate on the oven shelf. • Do not cover with a plate or bowl, as these can substantially lengthen the defrosting time. • For defrosting, place the shelf in the 1st oven level from the bottom. Defrosting table Defrosting time mins. Further defrosting time (mins.
electrolux uses, tables and tips Drying Oven function: Convection with ring heating element • Use oven shelves covered with greaseproof paper or baking parchment. • You get a better result if you switch the oven off halfway through the drying time, open the door and leave the oven to cool down overnight. • After this, finish drying the food to be dried.
uses, tables and tips electrolux 37 Making preserves Oven function: Bottom heat • For preserving, use only commercially available preserve jars of the same size. • Jars with twist-off or bayonet type lids and metal tins are not suitable. • When making preserves, the first shelf position from the bottom is the one most used. • Use the shelf for making preserves. There is enough room on this for up to six 1-litre preserving jars. • The jars should all be filled to the same level and clamped shut.
electrolux cleaning and care Cleaning and Care Warning: First switch off the appliance and let it cool down before carrying out any cleaning. Warning: For safety reasons, do not clean the appliance with steam blasters or high-pressure cleaners. Attention: Do not use any corrosive cleaning fluids, sharp objects or stain removers. Do not clean the glass oven door with abrasive fluids or metal scrapers, which could scratch the surface. The glass could crack and shatter.
cleaning and care electrolux 39 Shelf Support Rails Removing the shelf support rails First pull the front of the rail away from the oven wall (1) and then unhitch at the back (2). Fitting the shelf support rails Important! The rounded ends of the guide rails must be pointing forwards! To re-insert, first hook the rail into place at the back (1) and then insert the front and press into place (2).
electrolux cleaning and care Fat trap The fat trap is almost maintenance free. However, certain residues may occur due to the frequent preparation of very fatty foods. In this case proceed as follows for possible cleaning actions: Important: On the heating elements of the oven roof, there is a risk of burns! Ensure that the oven has cooled down sufficiently so that you can touch heating elements safely 1. Pull the top heating elements out of the plug connection to the front (see illustration). 2.
cleaning and care electrolux 41 Oven Lighting Warning: Risk of electric shock! Prior to changing the oven light bulb: – Switch off the oven! – Disconnect from the electricity supply. Place a cloth on the oven floor to protect the oven light and glass cover. Changing the oven light bulb/ cleaning the glass cover 1. Remove the glass cover by turning it anti-clockwise and then clean it. 2. If necessary: replace with 25 watt, 230 V, 300 °C heatresistant oven lighting. 3. Refit the glass cover.
electrolux cleaning and care Changing side oven light/Cleaning glass cover 1. Remove the left shelf support rail. 2. Remove the glass cover with the aid of a narrow, blunt implement (e.g., teaspoon) and clean it. 3. If necessary: replace bulb with a 25 watt, 230 V, 300 °C heat-resistant, oven light bulb. 4. Refit the glass cover. 5. Insert the shelf support rail.
cleaning and care electrolux 43 Oven door For easier cleaning of the oven interior the oven door of your appliance can be taken off its hinges. Removing the oven door from its hinges 1. Open the oven door as far as it will go. 2. Undo the clamping levers (A) on both door hinges fully. 3. Close the oven door as far as the first position (approx. 45°). 4. Take hold of the oven door with a hand on each side and pull it away from the oven at an upwards angle (Take care: It is heavy).
electrolux cleaning and care Hanging the oven door back on its hinges 1. From the handle side take hold of the oven door with a hand on each side and hold at an angle of approx. 45°. Position the recesses on the bottom of the oven door on the hinges on the oven. Let the door slide down as far as it will go. 2. Open the oven door as far as it will go. 3. Fold up the clamping levers (A) on both door hinges back into their original positions. 4. Close the oven door.
what to do if … electrolux 45 What to do if … Problem The oven does not heat up Possible cause Remedy The oven is not switched on Switch the oven on The clock is not set Set the current time on the clock The required settings have not Check the settings been set The house wiring fuse (in the fuse box) has tripped Check the fuse If the fuses trip several times, please call a qualified electrician Top heat grill heating element inserted incorrectly Top heat grill heating element inserted correctly
electrolux installation instructions Installation Instructions Installing the oven When installing into combustible material, NIN 2005, chapter 4.2.2 and the fire protection guidelines and their provisions set by the Association of Swiss Fire Insurance Companies must be strictly observed. 1. Insert the oven into the recess so that the front is flush. Make sure that the cable does not become caught when sliding into place. 2. Secure the oven each side with a minimum of 2 screws (Detail A).
installation instructions electrolux 47 Electrical connection/power supply The oven must be connected to the electricity supply by a designated electrician. Use a H05VV-F type power cable or higher. The appliance must be installed with a socket supply line, otherwise the fixed home electrical system must include an isolating device with at least a 3mm-contact separation to enable a simultaneous and all-pole cut off from the mains, according to NIN 2000.
electrolux disposal Disposal Packaging material The packaging materials are environmentally friendly and can be recycled. The plastic components are identified by markings, e.g. >PE<, >PS<, etc. Please dispose of the packaging materials in the appropriate container at the community waste disposal facilities. Where should you take your old machines? You can return these to any shop selling new machines or dispose of them at official S.EN.S collection points or official S.EN.S recycling facilities.
electrolux 49 Garantie/Kundendienst, Garantie/service-clientèle, Garanzia/Servizio clienti, Guarantee/Customer Service Centres Servicestellen 5506 Mägenwil/Zürich Industriestrasse 10 9000 St.
electrolux service Service In the event of technical faults, please first check whether you can remedy the problem yourself with the help of the operating instructions (section “What to do if…”). If you were not able to remedy the problem yourself, please contact the Customer Care Department or one of our service partners. In order to be able to assist you quickly, we require the following information: – Model description – Product number (PNC) – Serial number (S No.
www.electrolux.com www.electrolux.