EBKSL7CN EBKSL7SP EN STEAM OVEN USER MANUAL
www.electrolux.com CONTENTS 1. SAFETY INFORMATION...................................................................................... 3 2. SAFETY INSTRUCTIONS.....................................................................................4 3. PRODUCT DESCRIPTION................................................................................... 7 4. CONTROL PANEL............................................................................................... 8 5. BEFORE FIRST USE....................
ENGLISH 1. 3 SAFETY INFORMATION Before the installation and use of the appliance, carefully read the supplied instructions. The manufacturer is not responsible for any injuries or damages that are the result of incorrect installation or usage. Always keep the instructions in a safe and accessible location for future reference. 1.
www.electrolux.com • • • • • • • • Before carrying out any maintenance, disconnect the appliance from the power supply. Ensure that the appliance is switched off before replacing the lamp to avoid the possibility of electric shock. Do not use a steam cleaner to clean the appliance. Do not use harsh abrasive cleaners or sharp metal scrapers to clean the glass door since they can scratch the surface, which may result in shattering of the glass.
ENGLISH • Make sure not to cause damage to the mains plug and to the mains cable. Should the mains cable need to be replaced, this must be carried out by our Authorised Service Centre. • Do not let mains cables touch or come near the appliance door, especially when the door is hot. • The shock protection of live and insulated parts must be fastened in such a way that it cannot be removed without tools. • Connect the mains plug to the mains socket only at the end of the installation.
www.electrolux.com furniture panel until the appliance has cooled down completely after use. 2.4 Steam Cooking WARNING! Risk of burns and damage to the appliance. • Released Steam can cause burns: – Be careful when you open the appliance door when the function is activated. Steam can release. – Open the appliance door with care after the steam cooking operation. 2.5 Care and cleaning WARNING! Risk of injury, fire, or damage to the appliance.
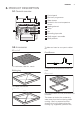
ENGLISH 7 3. PRODUCT DESCRIPTION 3.1 General overview 1 2 3 4 1 2 3 4 5 5 6 4 10 3 7 2 8 1 5 6 7 8 9 10 Control panel Electronic programmer Water drawer Socket for the core temperature sensor Heating element Lamp Fan Descaling pipe outlet Shelf support, removable Shelf positions 9 3.2 Accessories Wire shelf For cookware, cake tins, roasts. Baking tray To bake and roast or as a pan to collect fat. Food Sensor To measure the temperature inside the food. Steam set For cakes and biscuits.
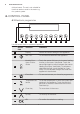
www.electrolux.com chicken breast. The set is not suitable for food that needs to soak in the water e.g. rice, polenta, pasta. 4. CONTROL PANEL 4.1 Electronic programmer 1 2 3 4 5 6 7 8 9 10 11 Use the sensor fields to operate the appliance. Sensor field 1 2 3 4 5 6 7 8 - Function Comment Display Shows the current settings of the appliance. ON / OFF To activate and deactivate the appliance.
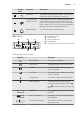
ENGLISH Sensor field 9 10 11 Function Comment Back key To go back one level in the menu. To show the main menu, touch the field for 3 seconds. Time and additional functions To set different functions. When a heating function operates, touch the sensor field to set the timer or the functions: Function Lock, Favourites, Heat + Hold, Set + Go. You can also change the settings of the core temperature sensor. Minute Minder To set the function: Minute Minder. 4.2 Display A 9 B C E D A. B. C. D.
www.electrolux.com Symbol Function Weight Automatic The display shows that the automatic weight system is active or that weight can be changed. Heat + Hold The function is active. 5. BEFORE FIRST USE WARNING! Refer to Safety chapters. 5.1 Initial Cleaning Refer to "Care and cleaning" chapter. Clean the appliance and the accessories before first use. Put the accessories and the removable shelf supports back to their initial position. 5.
ENGLISH 2. Put all the reaction zones of the strip into the water for approximately 1 second. Do not put the strip into the running water! 3. Shake the strip to remove the excess of the water. 4. After 1 minute check the hardness of the water according to the table below. The colours of the reaction zones continue to change after 1 minute. Do not consider this in the measurement. 5. Set the hardness of the water in the menu: Basic Settings.
www.electrolux.com Symbol Menu item Application Specials Contains a list of additional heating functions. VarioGuide Contains recommended oven settings for a wide choice of dishes. Select a dish and start the cooking process. The temperature and time are only guidelines for a better result and can be adjusted. They depend on the recipes and the quality and quantity of the used ingredients.
ENGLISH Symbol Submenu Description Factory Settings Resets all settings to factory settings. 6.3 Submenu for: SousVide Cooking 13 "under vacuum". The name refers to a method of cooking in vacuum sealed plastic pouches at low temperatures. This technique has its start in the Sousvide technology, which in French means Symbol Menu item Description SousVide Cooking Uses the steam for cooking meat, fish, seafood, vegetables and fruits. Set the temperature 50 °C - 95 °C.
www.electrolux.com 6.5 Heating Functions Heating function Application True Fan Cooking To bake on up to three shelf positions at the same time and to dry food. Set the temperature 20 - 40 °C lower than for the function: Conventional Cooking. Pizza Setting To bake food on one shelf position for a more intensive browning and a crispy bottom. Set the temperature 20 - 40 °C lower than for the function: Conventional Cooking. Slow Cooking To prepare tender, succulent roasts.
ENGLISH Heating function 15 Application Bread Baking Use this function to prepare bread and bread rolls with a very good professional-like result in terms of crispiness, colour and crust gloss. Humidity Cooking You can choose between three manual cooking functions with different levels of humidity. These functions combine steam and hot air. They cover cooking with different levels of steam. Full Steam For steaming vegetables, side dishes or fish.
www.electrolux.com Heating function Application Drying To dry sliced fruit (e.g. apples, plums, peaches) and vegetables (e.g. tomatoes, zucchini, mushrooms). Yogurt Function Use this function to prepare yoghurt. The lamp in this function is off. Dough Proving Steam humidifying action improves and speeds up the dough proving, prevents surface drying and keeps the dough elastic. Steam Regenerating Food reheating with steam prevents surface drying.
ENGLISH Dish Dish Whole Turkey Veal Knuckle Veal Food Category: Meat Prime Boiled Beef Leg of Lamb Braised meat Roast Lamb Meat Loaf Rare Roast Beef Lamb Lamb Joint, medium Lamb Joint, medi- Medium um Medium Hare • Leg of Hare • Saddle of Hare • Saddle of Hare Well Done Rare Well Done Venison • Haunch of Venison • Saddle of Venison Chipolatas Roast Game Medium Game Spare Ribs Pork Knuckle, precooked Pork Saddle of Lamb Rare Well Done Scandinavian Beef Loin of Veal Roast Veal
www.electrolux.
ENGLISH Dish Dish Bread Crown Black Salsify - White Bread Cabbage Turnip Stripes - Brown Bread White Haricot Beans - Rye Bread Savoy Cabbage - Yeast Plait Bread Wholegrain Bread Unleavened Bread Bread/Rolls, frozen Food Category: Vegetables Dish Food Category: Custards/Terrines Dish Egg Custard - Flan Caramel - Terrine - Broccoli, Florets - Broccoli, whole - Cauliflower, Florets - Cauliflower, whole - Eggs, hard boiled Carrots - Eggs, baked Courgette Slices - Asparagus, g
www.electrolux.com Food category Dish Yeast Dumplings, sweet - Rice - Tagliatelle, fresh - Polenta - Beef • Beef fillet, medium • Beef fillet, well done Meat When it is necessary to change the weight or the core temperature of the dish, use or values.
ENGLISH When you fill the water drawer from the water tap, carry the drawer in the horizontal position in order to avoid water spilling. 3. Press to confirm. 4. Select a heating function. 5. Press to confirm. 6. Set the temperature. 7. Press 21 to confirm. MAX In case the default settings are not changed, the appliance starts automatically. 6.10 Water drawer MAX A F When you fill the water drawer, insert it in the same position. Push the front button until the water drawer is inside the appliance.
www.electrolux.com 5. Set a steam heating function and the temperature. 6. If necessary, set the function: Duration or: End Time . The steam appears after approximately 2 minutes. When the appliance reaches the set temperature, the signal sounds. When the water drawer is running out of water, the signal sounds and the water drawer needs to be refilled to continue the steam cooking as described above. The signal sounds at the end of the cooking time. 7. Turn off the appliance. 8.
ENGLISH 6.13 Heat-up indicator 23 Do not put food in the oven when the Fast heat up function operates. When you activate a heating function, the bar on the display comes on. The bar shows that the temperature increases. When temperature is reached the buzzer sounds 3 times and the bar flashes and then disappears. To activate the function, hold for 3 seconds. The heat-up indicator alternates. 6.15 Residual heat 6.
www.electrolux.com 2. Press again and again until the display shows the necessary clock function and the related symbol. 3. Set the temperature above 80 °C. 3. Press time. to confirm. 5. Press When the function ends, an acoustic signal sounds. The function stays on if you change the heating functions. or to set the necessary to confirm. 4. Press When the time ends, an acoustic signal sounds. The appliance deactivates. The display shows a message. 5. Press any symbol to stop the signal. 7.
ENGLISH The core temperature sensor must stay in the meat and in the socket during the cooking. 1. Turn on the appliance. 2. Put the tip of the core temperature sensor into the centre of the meat. 3. Put the plug of the core temperature sensor into the socket at the front of the appliance. 25 9.2 Inserting the accessories Wire shelf: Push the shelf between the guide bars of the shelf support and make sure that the feet point down.
www.electrolux.com 10. ADDITIONAL FUNCTIONS 10.1 Favourites 10.2 Using the Child Lock You can save your favourite settings, such as duration, temperature or heating function. They are available in the menu: Favourites. You can save 20 programmes. When the Child Lock is on, the appliance cannot be activated accidentally. Saving a programme 1. Activate the appliance. 2. Set a heating function or an automatic programme. 3. Touch again and again until the display shows: SAVE. 4. Press to confirm.
ENGLISH 27 10.6 Brightness of the display • Function Lock is on when the heating function operates. • The menu: Basic Settings lets you activate and deactivate the function: Set + Go. There are two modes of display brightness: Temperature (°C) Switch-off time (h) 30 - 115 12.5 • Night brightness - when the appliance is deactivated, the brightness of the display is lower between 10 PM and 6 AM. • Day brightness: – when the appliance is activated.
www.electrolux.com 11.3 Removing the shelf supports Before maintenance, make sure that the appliance is cool. There is a risk of burns. To clean the appliance, remove the shelf supports. 1. Pull carefully the supports up and out of the front catch. 1 3 2 2. Pull the front end of the shelf support away from the side wall. 3. Pull the supports out of the rear catch. Install the shelf supports in the opposite sequence. 11.4 Steam Cleaning Remove as much dirt as possible manually.
ENGLISH You can enable / disable the function: Cleaning Reminder in the menu: Basic Settings. 11.6 Cleaning the water drawer Remove the water drawer from the appliance. 1. Remove the lid of the water drawer. Lift the cover in correspondence with the protrusion in the rear. 29 11.7 Steam generation system Descaling When the steam generator operates, there is an accumulation and deposition of limestone inside because of calcium contents in the water.
www.electrolux.com Remove the grill- / roasting pan after the end of the procedure. If the function: Descaling is not performed in the correct way, the display will show a message to repeat it. If the appliance is humid and wet, wipe it out with a dry cloth. Let the appliance dry fully with the door open. 11.8 Descaling reminder 11.10 Removing and installing the door You can remove the door to clean it. WARNING! Be careful when you remove the door from the appliance. The door is heavy. 1.
ENGLISH WARNING! Danger of electrocution! Disconnect the fuse before you replace the lamp. The lamp and the lamp glass cover can be hot. 1. Deactivate the appliance. 2. Remove the fuses from the fuse box or deactivate the circuit breaker. The top lamp 1. Turn the lamp glass cover counterclockwise to remove it. 31 2. Remove the metal ring and clean the glass cover. 3. Replace the lamp with a halogen, 230 V, 40 W, 300 °C heat resistant lamp. 4. Attach the metal ring to the glass cover. 5.
www.electrolux.com Problem Possible cause Remedy The oven does not heat up. The fuse is blown. Make sure that the fuse is the cause of the malfunction. If the fuse is blown again and again, contact a qualified electrician. The lamp does not operate. The lamp is defective. Replace the lamp. The display shows F111. The plug of the core temperature sensor is not correctly installed into the socket. Put the plug of the core temperature sensor as far as possible into the socket.
ENGLISH Problem Possible cause Remedy The descaling procedure is interrupted before it finishes. The function was stopped by the user. Repeat the procedure. 33 There is no water inside the You did not fill the water Check if the a descaling grill- / roasting pan after the drawer to the maximum lev- agent / water is present in descaling procedure. el. the water drawer body. Repeat the procedure. There is dirty water on the bottom of the cavity after the descaling cycle.
www.electrolux.com We recommend that you write the data here: Model (MOD.) ......................................... Product number (PNC) ......................................... Serial number (S.N.) ......................................... 13. INSTALLATION WARNING! Refer to Safety chapters. 13.1 Lifting the appliance To lift the appliance, do not use the door handle. min. 3 mm 13.
ENGLISH B A A A A A ~50 mm 180 mm A A N 600 mm 442 mm 115 mm 5/6= 635 mm 6/6= 762 mm 105 mm D N 600 mm A 595 mm 180 mm A 595 mm 435 mm ~50 mm A N min. A 580 mm 567 mm A 549 mm N 550 (-0,+1) mm 3. Use a minimum of 2 screws to attach the oven on the 2 sides (A). N min. 550 mm 20 mm A 567 mm A 549 mm N 550(-0,+1) mm 3. Use a minimum of 2 screws to attach the oven on the 2 sides (A).
www.electrolux.com electrical connection that is accessible and outside the coordination room. The length of the connection cable must be approximately 120 cm with lines connected directly to the mains. Only a qualified person can connect the appliance to the electricity supply. 3 1. Do the electrical connections as in the connection illustration.
ENGLISH Energy Efficiency Index 81.2 Energy efficiency class A+ Energy consumption with a standard load, conventional mode 1.09 kWh/cycle Energy consumption with a standard load, fanforced mode 0.69 kWh/cycle Number of cavities 1 Heat source Electricity Volume 70 l Type of oven Built-In Oven Mass EN 60350-1 - Household electric cooking appliances - Part 1: Ranges, ovens, steam ovens and grills - Methods for measuring performance. 14.
15. www.electrolux.com CH GUARANTEE Customer Service Centres Point of Service Industriestrasse 10 5506 Mägenwil Le Trési 6 1028 Préverenges Via Violino 11 6928 Manno Morgenstrasse 131 3018 Bern Zürcherstrasse 204E 9000 St. Gallen Seetalstrasse 11 6020 Emmenbrücke Schlossstrasse 1 4133 Pratteln Comercialstrasse 19 7000 Chur Spare parts service Industriestrasse 10, 5506 Mägenwil, Tel. 0848 848 111 Specialist advice/Sale Badenerstrasse 587, 8048 Zürich, Tel.
ENGLISH 39
867326185-C-132017 www.electrolux.