EBL5DEEVSP EN Oven User Manual
www.electrolux.com CONTENTS 1. SAFETY INFORMATION....................................................................................3 2. SAFETY INSTRUCTIONS..................................................................................4 3. PRODUCT DESCRIPTION................................................................................ 7 4. BEFORE FIRST USE......................................................................................... 7 5. DAILY USE.......................................
ENGLISH 1. 3 SAFETY INFORMATION Before the installation and use of the appliance, carefully read the supplied instructions. The manufacturer is not responsible for any injuries or damages that are the result of incorrect installation or usage. Always keep the instructions in a safe and accessible location for future reference. 1.
www.electrolux.com • • • • • • • • • Always use oven gloves to remove or put in accessories or ovenware. Before carrying out any maintenance, disconnect the appliance from the power supply. Ensure that the appliance is switched off before replacing the lamp to avoid the possibility of electric shock. Do not use a steam cleaner to clean the appliance.
ENGLISH 2.2 Electrical connection 2.3 Use WARNING! Risk of fire and electric shock. • • • • • • • • • • • • • • All electrical connections should be made by a qualified electrician. The appliance must be earthed. Make sure that the parameters on the rating plate are compatible with the electrical ratings of the mains power supply. Always use a correctly installed shockproof socket. Do not use multi-plug adapters and extension cables.
www.electrolux.com • • • • Use a deep pan for moist cakes. Fruit juices cause stains that can be permanent. This appliance is for cooking purposes only. It must not be used for other purposes, for example room heating. Always cook with the oven door closed. If the appliance is installed behind a furniture panel (e.g. a door) make sure the door is never closed when the appliance is in operation.
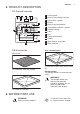
ENGLISH 3. PRODUCT DESCRIPTION 3.1 General overview 1 2 3 4 5 6 7 5 8 4 13 3 9 2 1 10 11 12 3.2 Accessories 1 2 3 4 5 6 7 8 9 10 11 12 13 Control panel Knob for the heating functions Power lamp / symbol Display Knob for the temperature Temperature indicator / symbol Heating element Lamp Fan Cavity embossment Drawer Shelf support, removable Shelf positions Grill- / Roasting pan Wire shelf For cookware, cake tins, roasts. Baking tray To bake and roast or as a pan to collect fat.
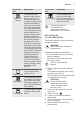
www.electrolux.com 4.1 Initial Cleaning Remove all accessories and removable shelf supports from the oven. Refer to "Care and cleaning" chapter. Clean the oven and the accessories before first use. Put the accessories and the removable shelf supports back to their initial position. 5. DAILY USE WARNING! Refer to Safety chapters. 5.1 Retractable knobs To use the appliance, press the control knob. The control knob comes out. 5.2 Turning the oven on and off 1.
ENGLISH Oven func‐ tion Moist Fan Baking Bottom Heat BakingPlus Fast Grilling 9 Application Oven func‐ tion This function is de‐ signed to save energy during cooking. For more information refer to "Hints and tips" chap‐ ter, Moist Fan Baking. The oven door should be closed during cook‐ ing so that the function is not interrupted and to ensure that the oven operates with the high‐ est energy efficiency possible.
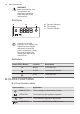
www.electrolux.com WARNING! Make sure that the oven is cold before you remove the remaining water from the cavity embossment. 5.5 Display A B C A. Function indicators B. Time display C. Function indicator If you do not use the appliance for 3 minutes, the brightness of the display decreases to lower the power consumption. When you press a button, the display goes back to the active mode. 5.6 Buttons Sensor field / Button Function Description MINUS To set the time.
ENGLISH Clock function 11 Application MINUTE MIND‐ ER To set countdown time. This function has no effect on the operation of the appliance. You can set the MINUTE MINDER at any time, also when the appliance is off. 6.2 Setting the time. Changing the time You must set the time before you operate the oven. flashes when you connect the The appliance to the electrical supply, when there was a power cut or when the timer is not set. 6.
www.electrolux.com 6.6 Setting the MINUTE MINDER 6.7 Cancelling the clock functions 1. Press again and again until starts to flash. 1. Press the again and again until the necessary function indicator starts to flash. 2. Press or to set the necessary time. The Minute Minder starts automatically after 5 seconds. 3. When the set time ends, an acoustic signal sounds. Press any button to stop the acoustic signal. 4.
ENGLISH 13 8. ADDITIONAL FUNCTIONS 8.1 Cooling fan When the oven operates, the cooling fan turns on automatically to keep the surfaces of the oven cool. If you turn off the oven, the cooling fan can continue to operate until the oven cools down. 9. HINTS AND TIPS WARNING! Refer to Safety chapters. The temperature and baking times in the tables are guidelines only. They depend on the recipes and the quality and quantity of the ingredients used. 9.
www.electrolux.com Food Water in the cavity embossment (ml) Temperature (°C) Time (min) Croissants 150 170 - 180 15 - 25 Lasagna 200 180 - 200 35 - 50 Food regeneration Use the second shelf position. Use 100 ml of water. Food Tem‐ pera‐ ture (°C) Tim e (min ) Set the temperature to 110 °C. Food Time (min) Chicken 210 60 80 Bread rolls 10 - 20 Roast pork 180 Bread 15 - 25 65 80 Focaccia 15 - 25 9.
ENGLISH Baking results Possible cause The cake sinks and The oven temperature is becomes soggy, lumpy too high. or streaky. The baking time is too short. 15 Remedy The next time you bake, set a slightly lower oven temperature. Set a longer baking time. You cannot decrease baking times by setting higher temperatures. There is too much liquid in Use less liquid. Be careful with the mixture. mixing times, especially if you use a mixing machine. The cake is too dry. The cake browns un‐ evenly.
www.electrolux.com Cakes / pastries / breads on baking trays Food Function Tempera‐ ture (°C) Time (min) Shelf po‐ sition Plaited bread / Bread crown Top / Bottom Heat 170 - 190 30 - 40 3 Christmas stollen Top / Bottom Heat 160 - 1801) 50 - 70 2 Bread (rye bread): 1. First part of baking pro‐ cedure. 2. Second part of baking procedure. Top / Bottom Heat 1. 2301) 2. 160 180 1. 20 1 2.
ENGLISH Food Function Temperature (°C) 17 Time (min) Shelf position Pastries made True Fan Cook‐ 80 - 100 with egg white / ing Meringues 120 - 150 3 Macaroons True Fan Cook‐ 100 - 120 ing 30 - 50 3 Biscuits made with yeast dough True Fan Cook‐ 150 - 160 ing 20 - 40 3 Puff pastries True Fan Cook‐ 170 - 1801) ing 20 - 30 3 Rolls True Fan Cook‐ 1601) ing 10 - 25 3 Rolls Top / Bottom Heat 190 - 2101) 10 - 25 3 1) Preheat the oven. 9.
www.electrolux.com 9.7 Moist Fan Baking For best results follow the baking times listed in the table below.
ENGLISH Food Temperature (°C) Time (min) Macaroons 100 - 120 Biscuits made with yeast dough 19 Shelf position 2 positions 3 positions 40 - 80 1/4 - 160 - 170 30 - 60 1/4 - Puff pastries 170 - 1801) 30 - 50 1/4 - Rolls 180 20 - 30 1/4 - 1) Preheat the oven. 9.
www.electrolux.com Put some water in the tray to prevent the meat juices or fat from burning. Meat with crackling can be roasted in the roasting tin without the lid. Turn the roast after 1/2 - 2/3 of the cooking time. • • • roast lean meat in the roasting tin with the lid or use roasting bag. roast meat and fish in large pieces (1 kg or more). baste large roasts and poultry with their juices several times during roasting. To keep meat more succulent: 9.
ENGLISH Lamb Food Quantity (kg) Function Tempera‐ ture (°C) Time (min) Shelf posi‐ tion Leg of 1 - 1.5 lamb / Roast lamb Turbo Grill‐ ing 150 - 170 100 - 120 1 Saddle of lamb 1 - 1.5 Turbo Grill‐ ing 160 - 180 40 - 60 1 Quantity (kg) Function Tempera‐ ture (°C) Time (min) Shelf posi‐ tion Game Food Saddle / Leg up to 1 of hare Top / Bottom 2301) Heat 30 - 40 1 Saddle of venison 1.5 - 2 Top / Bottom 210 - 220 Heat 35 - 40 1 Haunch of venison 1.
www.electrolux.com 9.12 Grilling • • • • • Always grill with the maximum temperature setting. Set the shelf into the shelf position as recommended in the grilling table. Always set the pan to collect the fat into the first shelf position. Grill only flat pieces of meat or fish. Always preheat the empty oven with the grill functions for 5 minutes. CAUTION! Always grill with the oven door closed.
ENGLISH 9.14 Preserving - Bottom Heat • • • • • Use only preserve jars of the same dimensions available on the market. Do not use jars with twist-off and bayonet type lids or metal tins. Use the first shelf from the bottom for this function. Put no more than six one-litre preserve jars on the baking tray. Fill the jars equally and close with a clamp.
www.electrolux.com Vegetables Food Temperature (°C) Time (h) Beans 60 - 70 Peppers Shelf position 1 position 2 positions 6-8 3 1/4 60 - 70 5-6 3 1/4 Vegetables for sour 60 - 70 5-6 3 1/4 Mushrooms 50 - 60 6-8 3 1/4 Herbs 40 - 50 2-3 3 1/4 Temperature (°C) Time (h) Shelf position Plums 60 - 70 Apricots Fruit Food 1 position 2 positions 8 - 10 3 1/4 60 - 70 8 - 10 3 1/4 Apple slices 60 - 70 6-8 3 1/4 Pears 60 - 70 6-9 3 1/4 9.
ENGLISH 25 Food Function Temperature (°C) Time (min) Short bread / Pastry stripes True Fan Cooking 140 25 - 40 Short bread / Pastry stripes Top / Bottom Heat 1601) 20 - 30 Small cakes (20 per tray) True Fan Cooking 1501) 20 - 35 Small cakes (20 per tray) Top / Bottom Heat 1701) 20 - 30 1) Preheat the oven. Multilevel Baking.
www.electrolux.com 10. CARE AND CLEANING WARNING! Refer to Safety chapters. 10.1 Notes on cleaning Clean the front of the oven with a soft cloth with warm water and a mild cleaning agent. To clean metal surfaces, use a dedicated cleaning agent. Clean the oven interior after each use. Fat accumulation or other food remains may result in a fire. The risk is higher for the grill pan. Clean all accessories after each use and let them dry. Use a soft cloth with warm water and a cleaning agent.
ENGLISH 27 6. Hold the door trim (B) on the top edge of the door at the two sides and push inwards to release the clip seal. 2 B 1 The heating element folds down. 3. Clean the oven ceiling. 4. Install the heating element in the opposite sequence. 7. Pull the door trim to the front to remove it. 8. Hold the door glass panels on their top edge one by one and pull them up out of the guide. Install the heating element correctly above the supports on the inner walls of the appliance. 5.
www.electrolux.com The top lamp 4. Install the glass cover. 1. Turn the lamp glass cover to remove it. The side lamp 2. Clean the glass cover. 3. Replace the lamp with a halogen, 230 V, 40 W, 300 °C heat resistant lamp. 1. Remove the left shelf support to get access to the lamp. 2. Use a Torx 20 screwdriver to remove the cover. 3. Remove and clean the metal frame and the seal. 4. Replace the lamp with a halogen, 230 V, 25 W, 300 °C heat resistant lamp. 5. Install the metal frame and the seal.
ENGLISH Problem Possible cause 29 Remedy There is no good cooking You did not activate the performance using the Ba‐ BakingPlus function. kingPlus function. Refer to "Activating the Ba‐ kingPlus function". There is no good cooking You did not fill the cavity performance using the Ba‐ embossment with water. kingPlus function. Refer to "Activating the Ba‐ kingPlus function". The water in the cavity em‐ The temperature is too low. Set the temperature at bossment does not boil. least to 110 °C.
www.electrolux.com Energy consumption with a standard load, fanforced mode 0.69 kWh/cycle Number of cavities 1 Heat source Electricity Volume 71 l Type of oven Built-In Oven Mass 42.8 kg EN 60350-1 - Household electric cooking appliances - Part 1: Ranges, ovens, steam ovens and grills - Methods for measuring performance. end of the cooking time, depending on the duration of the cooking. The residual heat inside the oven will continue to cook. 12.
ENGLISH 31 Point of Service Morgenstrasse 131 3018 Bern Zürcherstrasse 204E 9000 St. Gallen Seetalstrasse 11 6020 Emmenbrücke Schlossstrasse 1 4133 Pratteln Comercialstrasse 19 7000 Chur Spare parts service Industriestrasse 10, 5506 Mägenwil, Tel. 0848 848 111 Specialist advice/Sale Badenerstrasse 587, 8048 Zürich, Tel.
867344463-B-132018 www.electrolux.