
User manual


5www.electrolux.com
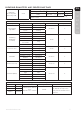
CNT
CNS
KR
ID
TH
VN
EN
• Donotexceedthemaximumfillingvolumeasindicatedontheappliances.
• Donotusethisappliancetostirpaint.Danger,couldresultinanexplosion.
• Donotletthepowercordcomeintocontactwithhotsurfacesorhangovertheedgeofatableorcounter.
• NeveruseaccessoriesorpartsmadebyothermanufacturersnotrecommendedorsoldbyElectrolux
as it may cause a risk of injury to persons.
• Thisapplianceisforindooruseonly.
• Thisapplianceisintendedfordomesticuseonly.Electroluxwillnotacceptanyliabilityforpossible
damage caused by improper or incorrect use.
GETTING STARTED
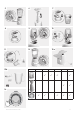
1. Before using the blender for the first time, make sure all the packaging has been removed before
operatingtheappliance.Washallpartsexceptforthemotorbase(G).
1a.Forglassjugmodel:Ensurethattherubberseal(E)isproperlyplacedonthebladeassembly(F).Invert
thejug(D)tohaveitsbasefacingupward.Turnthebladeassemblyoverandinsertitintothejugbaseby
aligningitsslotswiththecatchesonthejugbase.Turnthebladeassemblyanti-clockwisetolockitsecurely.
1b.Forplasticjugmodel:Attachthebladeassembly(M)tothebottomofthejug(D).Fixitfirmlyby
turning it anti-clockwise.
Caution! The blades are very sharp!
2.Place the motor housing on a flat surface.Ensurethespeedselector(H)issetto“OFF” before placing
thejug(D)onthemotorbase(G).Placethejugonthemotorbase.Thereare2possiblepositions,
handleontherightorontheleft.Rotateclockwiseuntilitlocks.Theblenderisdesignedwithasafety
lockingsystem.Whenthearrowonthejug(
) is aligned with the arrow ( ) on the motor base, the
jugislockedinposition.Theblenderwilloperateonlyifthejugorthegrinderislockedcorrectly.Putthe
ingredients in the jug. (Do not exceed the maximum capacity indicated on the jug.)
Processing hot liquids: allowhotliquidstocooldownuntillukewarmbeforefillingthejug.Fillthejug
only half full and start processing on low speed.
3.Close the lid and insert the measuring cup (A) in the filler hole and lock into position. Do not operate
the blender if the lid is not locked in.
4. Start the blenderbyturningthespeedselector(H)clockwise.Startatlowspeed,thenprogresstoahigher
speedifrequired.TousethePULSEfunction,turnthespeedselectortoPULSEpositionandrelease.
Forheavyload,pleaseremovehalfofthecontentsandprocessthemin2batches.
5.Icecrushing:Turnthespeedselector(H)toPULSEpositionandholdfor3-5secondsseveraltimesuntil
you obtain a satisfactory result. You can add more ice through the filler hole while the blender is running.
The PULSE function allows greater control when blending, e.g. when chopping nuts or chocolates,
or crushing ice.
6.Tomakejuice:Insertthefilter(K)*asillustrated.Makesureitfitscorrectly.Addfruitsinthefilter*,close
the lid (B) and process as usual. Caution! Always remove the seed from stone fruits such as plums,
peaches, apricots, avocados before processing them in the blender.
USING THE GRINDER*
Thegrinder*consistsofagrinderbowl(L)andabladeassembly(M).Itcanbeusedtochopnuts,dried
fruit, bread crumbs, garlic, onions etc.
7.Makesuretheunitisunpluggedandthespeedselector(H)issetto“OFF”beforeplacingthegrinder
onthemotorbase(G).Turnthegrinderupsidedownandcarefullyremovethebladeassembly(M)by
turning it anti-clockwise. Fill the grinder bowl with the desired ingredients. Do not fill more than half full.
8. Attached the blade assembly (M) to the grinder bowl (L) by turning the blade assembly clockwise.
NOTE: Ifitisnottightlyattachedtogethertheblenderwillnotworkduetoasafetymechanism.
9.Turnthegrindertherightwayupandlockintoplaceonthemotorbase(G)byturningclockwise.
Plug in the appliance and select the desired speed setting. Caution! Do not operate the grinder
continuouslyformorethan30seconds.Forbetterresults,usethePULSEsetting.
* Specifications vary by model