EBSL4CN EBSL4SP EN OVEN USER MANUAL
www.electrolux.com CONTENTS 1. SAFETY INFORMATION...................................................................................... 3 2. SAFETY INSTRUCTIONS.....................................................................................4 3. PRODUCT DESCRIPTION................................................................................... 7 4. CONTROL PANEL............................................................................................... 8 5. BEFORE FIRST USE....................
ENGLISH 1. 3 SAFETY INFORMATION Before the installation and use of the appliance, carefully read the supplied instructions. The manufacturer is not responsible for any injuries or damages that are the result of incorrect installation or usage. Always keep the instructions in a safe and accessible location for future reference. 1.
www.electrolux.com • • • • • • • • • Before carrying out any maintenance, disconnect the appliance from the power supply. Ensure that the appliance is switched off before replacing the lamp to avoid the possibility of electric shock. Do not use a steam cleaner to clean the appliance. Do not use harsh abrasive cleaners or sharp metal scrapers to clean the glass door since they can scratch the surface, which may result in shattering of the glass.
ENGLISH • The appliance must be earthed. • Make sure that the parameters on the rating plate are compatible with the electrical ratings of the mains power supply. • Always use a correctly installed shockproof socket. • Do not use multi-plug adapters and extension cables. • Make sure not to cause damage to the mains plug and to the mains cable. Should the mains cable need to be replaced, this must be carried out by our Authorised Service Centre.
www.electrolux.com the door is never closed when the appliance is in operation. Heat and moisture can build up behind a closed furniture panel and cause subsequent damage to the appliance, the housing unit or the floor. Do not close the furniture panel until the appliance has cooled down completely after use. 2.4 Care and cleaning WARNING! Risk of injury, fire, or damage to the appliance. • Before maintenance, deactivate the appliance and disconnect the mains plug from the mains socket.
ENGLISH 3. PRODUCT DESCRIPTION 3.1 General overview 1 2 3 4 5 6 5 4 10 3 7 2 1 1 Control panel 2 Electronic programmer 3 Heated drawer indicator (selected models only) 4 Socket for the core temperature sensor 5 Heating element 6 Lamp 7 Fan 8 Drawer 9 Shelf support, removable 10 Shelf positions 8 9 3.2 Accessories Grill- / Roasting pan Wire shelf For cookware, cake tins, roasts. Baking tray For cakes and biscuits. To bake and roast or as a pan to collect fat.
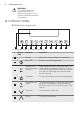
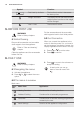
www.electrolux.com WARNING! The storage drawer can become hot when the appliance operates. Do not store any flammable materials in the drawer. 4. CONTROL PANEL 4.1 Electronic programmer 1 2 3 4 5 6 7 8 9 10 11 Use the sensor fields to operate the appliance. Sensor field 1 2 3 4 5 6 7 - Function Comment Display Shows the current settings of the appliance. ON / OFF To turn on and off the appliance.
ENGLISH Sensor field 8 9 10 11 Function Comment OK To confirm the selection or setting. Back key To go back one level in the menu. To show the main menu, press the field for 3 seconds. Time and additional functions To set different functions. When a heating function operates, press the sensor field to set the timer or the functions: Function Lock, Favourites, Heat + Hold, Set + Go. You can also change the settings of the core temperature sensor. Minute Minder To set the function: Minute Minder.
www.electrolux.com Symbol Function Fast Heat Up Indicator The function is active. It decreases the heat up time. Weight Automatic The display shows that the automatic weight system is active or that weight can be changed. Heat + Hold The function is active. 5. BEFORE FIRST USE Put the accessories and the removable shelf supports back to their initial position. WARNING! Refer to Safety chapters. 5.2 First Connection 5.
ENGLISH Symbol Menu item Application Specials Contains a list of additional heating functions. 11 Submenu for: Basic Settings Symbol Submenu Description Set Time of Day Sets the current time on the clock. Time Indication When ON, the display shows the current time when you deactivate the appliance. Fast heat up When ON, the function decreases the heat-up time. Set + Go To set a function and activate it later with a press of any symbol on the control panel.
www.electrolux.com 6.3 Heating Functions Heating function Application Pizza Setting To bake food on one shelf position for a more intensive browning and a crispy bottom. Set the temperature 20 - 40 °C lower than for the function: Conventional Cooking. Conventional Cooking To bake and roast food on one shelf position. Slow Cooking To prepare tender, succulent roasts. Bottom Heat To bake cakes with crispy bottom and to preserve food. Moist Fan Baking To bake breads, cakes and cookies.
ENGLISH 13 6.4 Specials Heating function Application Au Gratin For dishes such as lasagna or potato gratin. Also to gratinate and brown. Dough Proving For controlled rising of yeast dough before baking. Plate Warming To preheat plates for serving. Preserving To make vegetable preserves such as pickles. Drying To dry sliced fruit (e.g. apples, plums, peaches) and vegetables (e.g. tomatoes, zucchini, mushrooms). Keep Warm To keep food warm.
www.electrolux.com 7. CLOCK FUNCTIONS 7.1 Clock functions table Clock function Application Minute Minder To set a countdown (max. 2 h 30 min). This function has no effect on the operation of the appliance. You can also activate it when the appliance is deactivated. Use or to activate the function. Press to set the minutes and to start. Duration To set the length of an operation (max. 23 h 59 min). End Time To set the switch-off time for a heating function (max. 23 h 59 min).
ENGLISH The function stays on if you change the heating functions. 7.4 Time Extension The function: Time Extension makes the heating function continue after the end of Duration. 15 1. When the cooking time ends, an acoustic signal sounds. Press any symbol. The display shows the message. 2. Press to activate or to cancel. 3. Set the length of the function. 4. Press . Applicable to all heating functions with Duration or Weight Automatic.
www.electrolux.com food is at the set temperature, the appliance deactivates. There are two temperatures to be set: • the oven temperature (minimum 120 °C), • the food core temperature. CAUTION! Use only the core temperature sensor supplied and the original replacement parts. Directions for the best results: • Ingredients should be at room temperature. • Core temperature sensor cannot be used for liquid dishes.
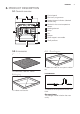
ENGLISH 3. Insert the tip of the core temperature sensor exactly in the centre of the casserole. The core temperature sensor should be stabilized in one place during baking. Use a solid ingredient to achieve that. Use the rim of the baking dish to support the silicone handle of the core temperature sensor. The tip of the core temperature sensor should not touch the bottom of a baking dish. 17 When the dish is at the set temperature, an acoustic signal sounds. The appliance deactivates automatically. 9.
www.electrolux.com Small indentation at the top increase safety. The indentations are also anti-tip devices. The high rim around the shelf prevents cookware from slipping of the shelf. 10. ADDITIONAL FUNCTIONS 10.1 Favourites 2. Select the menu: Favourites. You can save your favourite settings, such as duration, temperature or heating function. They are available in the menu: Favourites. You can save 20 programmes. 1. Activate the appliance. 2. Set a heating function or an automatic programme. 3.
ENGLISH 10.4 Set + Go The function lets you set a heating function (or a programme) and use it later with one press of any symbol. 1. Activate the appliance. 2. Set a heating function. again and again until the 3. Press display shows: Duration. 4. Set the time. again and again until the 5. Press display shows: Set + Go. 6. Press to confirm. Press any symbol (except for ) to start the function: Set + Go. The set heating function starts. When the heating function ends, an acoustic signal sounds.
www.electrolux.com • Clean all accessories after each use and let them dry. Use a soft cloth with warm water and a cleaning agent. • If you have nonstick accessories, do not clean them using aggressive agents, sharp-edged objects or a dishwasher. It can cause damage to the nonstick coating. • Dry the oven when the cavity is wet after usage. 1. Hold the heating element with two hands at the front. 2. Pull it forwards against the spring pressure and out of two holders. 11.
ENGLISH 45° 4. Hold the door with one hand on each side and pull it away from the appliance at an upwards angle. 5. Put the door with the outer side down on a soft cloth on a stable surface. This is to prevent scratches. 6. Clean the glass panel with water and soap. Dry the glass panel carefully. When the cleaning is completed, install the door. Do the above steps in the opposite sequence. 21 2. Clean the glass cover. 3. Replace the lamp with a halogen, 230 V, 40 W, 300 °C heat resistant lamp. 4.
www.electrolux.com 12.1 What to do if... Problem Possible cause Remedy You cannot activate or operate the oven. The oven is not connected to an electrical supply or it is connected incorrectly. Check if the oven is correctly connected to the electrical supply (refer to the connection diagram if available). The oven does not heat up. The oven is deactivated. Activate the oven. The oven does not heat up. The clock is not set. Set the clock. The oven does not heat up.
ENGLISH 12.2 Service data If you cannot find a solution to the problem yourself, contact your dealer or an Authorised Service Centre. the front frame of the appliance cavity. Do not remove the rating plate from the appliance cavity. The necessary data for the service centre is on the rating plate. The rating plate is on We recommend that you write the data here: Model (MOD.) ......................................... Product number (PNC) ......................................... Serial number (S.
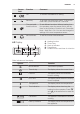
www.electrolux.com 13.2 Installing the oven under a work surface min. 20 mm A B Before the installation, connect the oven to the electrical supply. Refer to "Electrical connection". During installation in combustible matter, NIN SEV 1000 and fire protection guidelines and regulations of the Association of Cantonal Fire Insurance shall be strictly adhered to. 20 mm 1. Pull the appliance drawer out as far as it goes and remove it. 2.
ENGLISH D 400V 2N~ PE L1 L2 L3 N 1 E 400V 400V 400V 400V 400V 3N~ 25 2 3 5 4 PE L1 1 L2 N 2 3 5 4 8. Secure the cable grip. F 2. Put the connection cable into the supplied rings (E). This is to prevent the cable from rubbing against the drawer. The connection cable is on the housing side. 3. Install the cable grip (F). 4. Connect the terminal as in the illustration. 5. Put the cable into the strain relief clamp. 6. Close the mains terminal cover. 7.
www.electrolux.com Number of cavities 1 Heat source Electricity Volume 71 l Type of oven Built-In Oven Mass EN 60350-1 - Household electric cooking appliances - Part 1: Ranges, ovens, steam ovens and grills - Methods for measuring performance. 14.2 Energy saving The appliance contains features which help you save energy during everyday cooking. General hints Make sure that the oven door is closed properly when the appliance operates and keep it closed as much as possible during the cooking.
ENGLISH 27 Point of Service Morgenstrasse 131 3018 Bern Zürcherstrasse 204E 9000 St. Gallen Seetalstrasse 11 6020 Emmenbrücke Schlossstrasse 1 4133 Pratteln Comercialstrasse 19 7000 Chur Spare parts service Industriestrasse 10, 5506 Mägenwil, Tel. 0848 848 111 Specialist advice/Sale Badenerstrasse 587, 8048 Zürich, Tel.
867335767-B-132017 www.electrolux.