EBSL70 ................................................ .............................................
www.electrolux.com CONTENTS 1. 2. 3. 4. 5. 6. 7. 8. 9. 10. 11. 12. 13. 14. SAFETY INFORMATION . . . . . . . . . . . . . . . . . . . . . . . . . . . . . . . . . . . . . . . . . . . . . . . . . . . 3 SAFETY INSTRUCTIONS . . . . . . . . . . . . . . . . . . . . . . . . . . . . . . . . . . . . . . . . . . . . . . . . . . 4 PRODUCT DESCRIPTION . . . . . . . . . . . . . . . . . . . . . . . . . . . . . . . . . . . . . . . . . . . . . . . . . 6 BEFORE FIRST USE . . . . . . . . . . . . . . . . . . . . . . . . .
ENGLISH 3 1. SAFETY INFORMATION Before the installation and use of the appliance, carefully read the supplied instructions. The manufacturer is not responsible if an incorrect installation and use causes injuries and damages. Always keep the instructions with the appliance for future reference. 1.1 Children and vulnerable people safety WARNING! Risk of suffocation, injury or permanent disability.
www.electrolux.com • Do not use harsh abrasive cleaners or sharp metal scrapers to clean the glass door since they can scratch the surface, which may result in shattering of the glass. • Only use the core temperature sensor recommended for this appliance. • To remove the shelf supports first pull the front of the shelf support and then the rear end away from the side walls. Install the shelf supports in the opposite sequence. 2. SAFETY INSTRUCTIONS 2.
ENGLISH 2.2 Use WARNING! Risk of injury, burns or electric shock or explosion. • Use this appliance in a household environment. • Do not change the specification of this appliance. • Make sure that the ventilation openings are not blocked. • Do not let the appliance stay unattended during operation. • Deactivate the appliance after each use. • Be careful, when you open the appliance door while the appliance is in operation. Hot air can release.
www.electrolux.com WARNING! Risk of electrical shock. • Before replacing the lamp, disconnect the appliance from the power supply. • Only use lamps with the same specifications. • Disconnect the appliance from the mains supply. • Cut off the mains cable and discard it. • Remove the door catch to prevent children and pets to get closed in the appliance. 2.5 Disposal WARNING! Risk of injury or suffocation. 3.
ENGLISH 7 Grill- / Roasting pan To bake and roast or as a pan to collect fat. Core temperature sensor To measure how far the food is cooked. Glass dish with 2 grill inserts Sponge For absorbing residual water from the steam generator. 4. BEFORE FIRST USE WARNING! Refer to the Safety chapters. 4.1 Initial Cleaning • Remove all parts from the appliance. • Clean the appliance before first use. Refer to chapter "Care and Cleaning". 4.
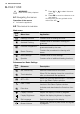
www.electrolux.com 5. CONTROL PANEL Electronic programmer 1 2 3 4 5 6 7 8 9 10 11 Use the sensor fields to operate the appliance Number Sensor field 1 - Function Comment Display Shows the current settings of the appliance. ON / OFF To activate and deactivate the appliance. Heating Functions or Assisted Cooking To choose a heating function or an Assisted Cooking function.
ENGLISH Number Sensor field Function Comment Time and additional functions To set different functions. When a heating function operates, touch the sensor field to set the timer, Child Lock, Favourite Programme memory, Heat + Hold or Set + Go , or to change the settings of the Core Temperature Sensor (for select models only). Minute Minder To set the Minute Minder . 10 11 5.
www.electrolux.com 6. DAILY USE WARNING! Refer to the Safety chapters. 6.1 Navigating the menus Operation of the menus: 1. Activate the appliance. 2. Press or to select the menu option. 3. Press OK to move to submenu or accept setting. At every point you can get back to the . main menu with 6.2 The menus in overview Main menu Symbol Menu item Application Heating Functions Contains a list of heating functions. Assisted Cooking Contains a list of automatic cooking programmes.
ENGLISH Symbol Submenu Description Key Tones Activates and deactivates the tone of the touch fields. It is not possible to deactivate the tone of the ON / OFF touch field. Alarm/Error Tones Activates and deactivates the alarm tones. Cleaning Assistant Helps you with the cleaning procedure. Service Shows the software version and configuration. Factory Settings Resets all settings to factory settings. 11 6.
www.electrolux.com Heating function Application Quarter Steam + Heat To bake bread, roast large pieces of meat or to warm up chilled and frozen meals. Half Steam + Heat To steam dishes with a high moisture content and to poach fish, custard royale and terrines. Full Steam To steam vegetables, fish, potatoes, rice, pasta or special side-dishes. Submenu for: Specials Heating function Application Bread Baking To bake bread. Au Gratin For dishes such as lasagna or potato gratin.
ENGLISH 5. 6. If necessary, set the function Duration or End Time . The first steam shows after approximately 2 minutes. An acoustic signal sounds when the appliance is at approximately the set temperature. The signal sounds again at the end of the cooking time. Deactivate the appliance. When the steam generator is empty, an acoustic signal sounds. When the appliance cools down, soak up all remaining water from the steam generator with the sponge.
www.electrolux.com Setting the clock functions 1. Set a heating function. 2. 3. 4. Press again and again until the display shows the necessary clock function and the related symbol. Press or to set the necessary time. Press OK to confirm. When the time ends, an acoustic signal sounds. The appliance deactivates. The display shows a message. Press a sensor field to stop the signal. • With Duration and End Time you must set the heating function and the temperature first.
ENGLISH Weight Automatic dishes Braised Meat 3. 4. Roast Game Chicken, whole Turkey, whole Duck, whole CT Sensor Automatic dishes Loin of Pork Roast Beef Scandinavian Beef Loin of Game Lamb Joint, medium Boned Poultry Whole Fish 8.2 Assisted Cooking with Recipe Automatic This appliance has a set of recipes you can use. Recipes are fixed and you cannot change them. Activating the function: 1. Activate the appliance. 2. Select the Assisted Cooking menu. Press OK to confirm. Select the category and dish.
www.electrolux.com 6. 7. The display shows core temperature sensor. 4. 5. Press or in less than 5 seconds to set the core temperature. Set the oven function and, if necessary, the oven temperature. The appliance calculates an approximate end time. An end time is different for the different quantities of the food, the set oven temperatures (minimum 120 °C) and the operating modes. The appliance calculates the end time in approximately 30 minutes.
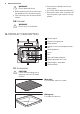
ENGLISH 17 Wire shelf and baking tray together: Push the baking try between the guide bars of the shelf support and the wire shelf on the guide bars above. • All accessories have small indentations at the top of the right and left side to increase safety. The indentations are also anti-tip devices. • The high rim around the shelf is a device which prevents cookware from slipping. 10. ADDITIONAL FUNCTIONS 10.
www.electrolux.com Deactivating the Function Lock function: 1. 2. Press two times. Press OK to confirm. 10.3 Child Lock The Child Lock prevents an accidental operation of the appliance. Activating and deactivating the Child Lock function: 1. Activate the appliance. 2. Touch and at the same time until the display shows a message. 4. 5. Set the time. Press again and again until the display shows SET + GO . 6. Press OK to confirm. To start SET + GO function, press any sensor field (except for ).
ENGLISH • If you have nonstick accessories, do not clean them using aggressive agents, sharp-edged objects or a dishwasher. It can cause a damage to the nonstick coating. 11.1 Steam Cleaning 1. 2. 3. 4. 5. 6. Remove the worst of the dirt manually. Put 250 ml of water with 3 tablespoons of vinegar directly into the steam generator. Activate the Steam Cleaning function in the main menu. The display shows the duration of the function. An acoustic signal sounds when the programme is completed.
www.electrolux.com 3. 4. Put clean water (100 - 200 ml) into the water drawer to flush the steam generation system. Remove water from the steam generator with the sponge and rub dry. 5. Keep the door open to let the appliance dry fully. 11.4 Removing / inserting the door To clean the door remove it. CAUTION! Be careful when you remove the door from the appliance. The door is heavy. There is a risk of injury or damage to the appliance. A A Removing the door Open the door as far as it goes.
ENGLISH 4. Replace the lamp with a halogen, 230 V, 25 W, 300 °C heat resistant oven lamp. 5. 6. 21 Install the metal frame and the seal. Tighten the screws. Install the left shelf support. 12. WHAT TO DO IF… WARNING! Refer to the Safety chapters. Problem Possible cause Remedy The appliance does not heat up. The appliance is deactivated. Activate the appliance. The appliance does not heat up. The clock is not set. Set the clock. The appliance does not heat up.
www.electrolux.com 13. INSTALLATION WARNING! Refer to the Safety chapters. The handle profile can be replaced to match the décor of your kitchen. The change must be done by an authorized person. Use only genuine replacement parts. min. 3 mm To lift the appliance, do not use the door handle. 13.
ENGLISH 2. A 23 Use a minimum of 2 screws to attach the appliance on the 2 sides (Detail A). 13.2 Installing the oven under a work surface Before the installation, connect the oven to the electrical supply. Refer to "Electrical connection". B 180 A A = appliance N = recess ca.50 A N 600 WARNING! Installation into flammable material must agree with NIN SEV 1000 (Association of Cantonal Fire Insurers) fire protection guidelines and regulations.
www.electrolux.com 400V 3N~ 400V 2N~ PE L1 L2 L3 N 1 Only a qualified person can connect the appliance to the electricity supply. 400V 400V 400V 400V 2 3 5 4 PE L1 L2 N 1 2 3 5 4 1. 2. Do the electrical connections as in the connection illustration. Connection diagram 400V Phase definitions: L1, L2, L3 (or R, S, T). Secure the cable grip. WARNING! If service is required always disconnect the appliance from the power supply.
ENGLISH 25 13.4 Electrical connection with the hob You can connect the oven to an independent hob from the current range of Electrolux and AEG hobs. You can purchase the necessary connection cable separately: • AK - EB/GKTC (S) 1 m for ceramic hobs. • AK - EB/GKTCi (S) 1 m for induction hobs. The hob connection socket is at the top of the oven cabinet. 14. CH GARANTIE, GARANZIA, GUARANTEE 14.
www.electrolux.com pièces de rechange non originales, d’erreurs de maniement ou d’installation dues à l’inobser-vation du mode d’emploi, et pour des dommages causés par des influences extérieures ou de force majeure. Garanzia Per ogni prodotto concediamo una garanzia di 2 anni a partire dalla data di consegna o dalla sua messa in funzione.
ENGLISH 27
892934939-D-042013 www.electrolux.