user manual Oven EBVGL5X
electrolux Electrolux. Thinking of you. Share more of our thinking at www.electrolux.
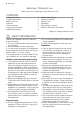
electrolux 3 • Make sure that the appliance is installed below and adjacent safe structures. • Keep the minimum distances to the other appliances and units. • The appliance cannot be positioned on a base. • Built in ovens and built in cooking surfaces are attached with special connection system. To prevent damage to the appliance, only use an appliance with the appliances from the same manufacturer. Electrical connection • The appliance must be earthed.
electrolux oven lamp. There is the risk of electrical shock! • Be careful when you remove the door from the appliance. The door is heavy! • Do not clean catalytic enamel (if applicable). Service centre • Only an approved engineer can repair or work on the appliance. Contact an approved service centre. • Use only original spare parts. Heatable drawer • The heatable drawer becomes hot during use. There is risk of burns. • Do not store any flammable materials in the appliance or in the drawer.
electrolux 5 3 4 5 6 7 8 9 10 11 12 13 14 15 16 17 Control knob for temperature Hateable drawer button Hateable drawer indicator Fat trap Top heating element Oven lamp Fan and rear wall heating element Oven lamp Bottom heating element Oven shelf runners, removable Heatable drawer Aluminium base plate Shelf positions Temperature indicator Power indicator Flat baking tray - for cakes and biscuits. Deep roasting pan - To bake and roast or as pan to collect fat.
electrolux For time change you must not set an automatic function (Duration or End ) at the same time. DAILY USE Warning! Refer to "Safety information" chapter. Switching the Oven On and Off 1. Turn the oven functions control knob to an oven function. 2. Turn the temperature control knob to a temperature. The power indicator comes on while the oven is in operation. The temperature indicator comes on while the oven temperature increases. 3.
electrolux 7 The related function indicator comes on. When the time period is completed, the function indicator flashes and an acoustic signal sounds for 2 minutes. 2. Push the Selection button again and again until necessary function indicator flashes. 3. To set the time for Minute minder , Duration or End , use " + " or " - " button. Clock function Time of day Minute minder Duration End With the functions Duration and End the oven stops automatically. 4. Push any button to stop the signal. 5.
electrolux The deep roasting pan and the oven shelf have double side edges. These edges and the shape of the guide-bars causes the anti-tilt safety for the oven accessories. Inserting the oven shelf and deep roasting pan together Put the oven shelf on the deep roasting pan. Push the deep roasting pan between the guide-bars of one of the oven levels. ADDITIONAL FUNCTIONS Cooling fan When the appliance operates, the cooling fan switches on automatically.
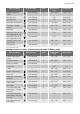
electrolux 9 Type of baking Oven function Level Temperature (°C) Time (h:min) Madeira cake/Fruit cakes Fan Cooking 1 140 - 160 1:00 - 1:20 Sponge cake Fan Cooking 1 140 0:30- 0:40 Sponge cake Conventional 1 160 0:30 - 0:40 0:20 - 0:25 Flan base - short pastry Fan Cooking 3 170-1801) Flan base - sponge mixture Fan Cooking 3 150 - 170 0:25 - 0:30 Apple pie Conventional 1 170 - 190 0:50 - 1:00 Apple pie (2 tins, Ø 20 cm, diagonally off set) Fan Cooking 1 160 1:00 - 1:20 A
electrolux Type of baking Oven function Level Temperature (°C) Time (h:min) Yeast cakes with delicate toppings (e.g.
electrolux 11 Baking on more than one level - Biscuits/small cakes/pastries/rolls Fan Cooking 2 levels Fan Cooking 3 levels Temperature (°C) Short pastry biscuits 1/3 1 / 3 /5 150 - 160 0:20 - 0:30 Viennese whirls 1/3 1 / 3 /5 140 0:30 - 0:40 Biscuits made with sponge mixture 1/3 --- 160 - 170 0:20 - 0:30 Biscuits made with egg white, meringues 1/3 --- 80 - 100 1:30 - 2:30 Macaroons 1/3 --- 100 - 120 1:00 - 1:30 Biscuits made with yeast dough 1/3 --- 160 - 170 0:30 - 0:40 P
electrolux Dish Oven function Shelf level Temperature °C Time (h:min) Convection Grilling 1 170 0:20-0:30 Sweet gratin Conventional 1 180-200 0:40-1:00 Fish gratin Conventional 1 180-200 0:40-1:00 Convection Grilling 1 160-170 0:40-1:00 Baguettes topped with melted cheese1) Stuffed vegetables 1) Pre-heat the oven Ready meals table Food to be cooked Oven function Shelf level Temperature °C Time Frozen pizza Conventional 3 refer to instructions of the manufacturer refer to
electrolux 13 Roasting Roasting dishes • Use heat-resistant ovenware to roast (please read the instructions of the manufacturer). • Large roasting joints can be roasted directly in the deep roasting pan or on the oven shelf above the deep roasting pan. (If present) • Roast lean meats in a roasting tin with a lid. This well keep the meat more succulent. • All types of meat, that can be browned or have crackling, can be roasted in the roasting tin without the lid.
electrolux Lamb Type of meat Quantity Oven function Shelf level Temperature °C Time (h:min) Leg of lamb, roast lamb 1 - 1.5 kg Convection grilling 1 150 - 170 1:40 - 2:00 Saddle of lamb 1 - 1.5 kg Convection grilling 1 160 - 180 0:40 - 1:00 Shelf level Temperature °C Time (h:min) Game Type of meat Quantity Oven function Saddle of hare, leg of hare) up to 1 kg Conventional 3 220 - 2501) 0:25 - 0:40 Saddle of venison 1.
electrolux 15 Grilling table (Grill or Dual Grill ) Food Shelf level Grilling time (h:min) 1st side 2nd side Burgers 4 0:08 - 0:10 0:06 - 0:08 Pork fillet 4 0:10 - 0:12 0:06 - 0:10 Sausages 4 0:08 - 0:10 0:06 - 0:08 Fillet steaks, veal steaks 4 0:06 - 0:07 0:05 - 0:06 Fillet of beef, roast beef (approximately 1 kg) 3 0:10 - 0:12 0:10 - 0:12 Toast1) 3 0:04 - 0:06 0:03 - 0:05 Toast with topping 3 0:06 - 0:08 --- 1) Do not pre-heat Defrosting • Put the food out of the packa
electrolux Fruit Food to be dried Temperature in °C Shelf level Time (hours) 1 level 2 levels Plums 60 - 70 3 1/4 8 - 10 Apricots 60 - 70 3 1/4 8 - 10 Apple slices 60 - 70 3 1/4 6-8 Pears 60 - 70 3 1/4 6-9 Preserving • Only use usual preserving jars of the same dimension. • Do not use jars with twist-off or bayonet type lids and metal tins. • Use the first shelf level from the bottom. • Use the baking tray. You can put six 1-litre jars maximum on it.
electrolux 17 • To clean metal surfaces use a usual cleaning agent • Clean the oven interior after each use. Thus you can remove dirt more easily and it does not burn on. • Clean stubborn dirt with a special oven cleaner. • Clean all oven accessories (with a soft cloth with warm water and cleaning agent) after each use and let them dry. • If you have nonstick accessories, do not clean them using an aggressive agents, sharp edged objects or dishwasher. It can destroy nonstick coating! 2.
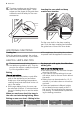
electrolux Turn the lamp glass cover counterclockwise to remove it. 2. Clean the glass cover. 3. Replace the oven lamp with applicable 300°C heat-resistant oven lamp. Important! Use the same oven lamp type. 4. Install the glass cover. 2. Rotate the fat trap to the left from the oven roof. 3. Wash the fat trap in hot water with washing-up liquid and soft brush. You can also wash it in dishwasher. With stubborn dirt, soak for a while in hot water with soap suds. 4. Insert the fat trap in reverse order.
electrolux 19 45° 3. Reassembly in reverse order. Make sure the heating element has a good fit in the connecting socket when inserting. Oven door To clean the oven door remove it. Caution! Be careful when you remove the door from the appliance. The door is heavy! Removing the oven door 1. Open the oven door as far as it goes. 2. Lift up clamping levers (A) on the two door hinges fully. 4. Hold of the oven door with one hand on each side and pull it away from the oven at an upwards angle.
electrolux 4. Close the oven door. A WHAT TO DO IF… Warning! Refer to "Safety information" chapter. Problem Possible cause Remedy The oven does not heat up The oven is not switched on Switch on the oven The oven does not heat up The clock is not set Set the clock The oven does not heat up The necessary settings are not set Control the settings The oven does not heat up The fuse in the fuse box is released Control the fuse.
electrolux 21 INSTALLATION Warning! Refer to "Safety information" chapter. Installing the oven Warning! Installation into flammable material must agree with NIN 2005, chapter 4.2.2 of the VKF (Association of Cantonal Fire Insurers) fire protection guidelines and regulations. 4. The enclosed check valve F is screwed in to the exhaust air hose. Mount the check valve F with hose to the appliance (bayonet connection). Exhaust air temperature: max. 80°C. A shortened element must be installed above the oven.
electrolux 2. Open the catch on the cord grip (detail E). 3. See the connection diagram for the terminal connection. 4. Secure the cord grip by pressing firmly on the catch (detail F). 5. Close the terminal box. 6. Fix the connection cable into the holes provided to prevent it rubbing against the drawer (detail G).
electrolux 23 Ersatzteilverkauf/Points de vente de rechange/Vendita pezzi di ricambio/ spare parts service: 5506 Mägenwil, Industriestrasse 10, Tel. 0848 848 023 Fachberatung/Verkauf/Demonstration/ Vente/Consulente (cucina)/Vendita 8048 Zürich, Badenerstrasse 587, Tel. 044 405 81 11 Garantie Für jedes Produkt gewähren wir ab Verkauf bzw. Lieferdatum an den Endverbraucher eine Garantie von 2 Jahren. (Ausweis durch Garantieschein, Faktura oder Verkaufsbeleg).
www.electrolux.