EC2830AOW1 ................................................ EN CHEST FREEZER FI SÄILIÖPAKASTIN FR CONGÉLATEUR COFFRE IT CONGELATORE A POZZO SV FRYSBOX .............................................
www.electrolux.com CONTENTS 1. 2. 3. 4. 5. 6. 7. 8. 9. 10. 11. 12. SAFETY INSTRUCTIONS . . . . . . . . . . . . . . . . . . . . . . . . . . . . . . . . . . . . . . . . . . . . . . . . . . 3 PRODUCT DESCRIPTION . . . . . . . . . . . . . . . . . . . . . . . . . . . . . . . . . . . . . . . . . . . . . . . . . 5 OPERATION . . . . . . . . . . . . . . . . . . . . . . . . . . . . . . . . . . . . . . . . . . . . . . . . . . . . . . . . . . . . 6 CONTROL PANEL . . . . . . . . . . . . . . . . . . . . . . . . . .
ENGLISH 1. 3 SAFETY INSTRUCTIONS In the interest of your safety and to ensure the correct use, before installing and first using the appliance, read this user manual carefully, including its hints and warnings. To avoid unnecessary mistakes and accidents, it is important to ensure that all people using the appliance are thoroughly familiar with its operation and safety features.
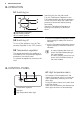
www.electrolux.com 1. • • • • Power cord must not be lengthened. 2. Make sure that the power plug is not squashed or damaged by the back of the appliance. A squashed or damaged power plug may overheat and cause a fire. 3. Make sure that you can come to the mains plug of the appliance. 4. Do not pull the mains cable. 5. If the power plug socket is loose, do not insert the power plug. There is a risk of electric shock or fire. 6.
ENGLISH circuit or insulation materials. The appliance shall not be discarded together with the urban refuse and rubbish. The insulation foam contains flammable gases: the appliance shall be disposed according to the applicable regulations to obtain from your local authorities. Avoid damaging the cooling unit, especially at the rear near the heat exchanger. The materials used on this appliance marked by the symare recyclable. bol 2.
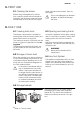
www.electrolux.com 3. OPERATION 3.1 Switching on A B C Insert the plug into the wall socket. Turn the Temperature Regulator to the Full Loaded position and let the appliance run for 24 hours to allow the correct temperature to be reached before placing food inside. Adjust the Temperature Regulator according to the quantity of the stored foods. A Temperature Regulator B Half Loaded position C Full Loaded position 3.
ENGLISH 7 5. FIRST USE 5.1 Cleaning the interior Before using the appliance for the first time, wash the interior and all internal accessories with lukewarm water and some neutral soap so as to remove the typical smell of a brand-new product, then dry thoroughly. Do not use detergents or abrasive powders, as these will damage the finish. 6. DAILY USE 6.1 Freezing fresh food 6.
www.electrolux.com 606 806 946 1061 230 1201 1336 1611 The baskets will slide into each other. The following pictures show how many baskets can be placed inside the various freezer models. You can purchase additional baskets from your local Service Centre. 7. HELPFUL HINTS AND TIPS 7.1 Hints for freezing To help you make the most of the freezing process, here are some important hints: • the maximum quantity of food which can be frozen in 24 hrs.
ENGLISH 3. 4. 5. 6. Regularly clean the appliance and the accessories with warm water and neutral soap. Clean the lid seal carefully. Fully dry the appliance. Connect the mains plug to the mains socket. Switch on the appliance. CAUTION! Do not use detergents, abrasive products, highly perfumed cleaning products or wax polishes to clean the inner side of the appliance. Prevent damage to the cooling system. There is no need to clean the compressor area.
www.electrolux.com 9. WHAT TO DO IF… CAUTION! Before troubleshooting, disconnect the power supply. Only a qualified electrician or competent person must do the troubleshooting that is not in this manual. There are some sounds during normal use (compressor, refrigerant circulation). Problem Possible cause Solution The appliance is noisy. The appliance is not supported properly. Check if the appliance stands stable (all the four feet should be on the floor).
ENGLISH Problem 11 Possible cause Solution The lid gaskets are dirty or sticky. Clean the lid gaskets. Food packages are blocking the lid. Arrange the packages in the right way, see the sticker in the appliance. The lid gaskets are dirty or sticky. Clean the lid gaskets. The valve is blocked. Check the valve. The lamp does not work. The lamp is defective. Refer to "Replacing the lamp". It is too warm in the freezer. The temperature is not set correctly. Set a lower temperature.
www.electrolux.com Problem Possible cause Solution There is no voltage in the mains socket (try to connect another appliance into it). Call an electrician. 9.1 Customer Service If your appliance is still not working properly after making the above checks, contact the nearest service centre.
ENGLISH 10.2 Electrical connection 10.3 Ventilation requirements Before plugging in, ensure that the voltage and frequency shown on the rating plate correspond to your domestic power supply. The appliance must be earthed. The power supply cable plug is provided with a contact for this purpose. If the domestic power supply socket is not earthed, connect the appliance to a separate earth in compliance with current regulations, consulting a qualified electrician.
www.electrolux.com HISSS! BLUBB! HISSS! BLUBB! BRRR! CRACK! BRRR! CRACK! 12. TECHNICAL DATA Dimensions Rising Time Height × Width × Depth (mm): Further technical information are situated in the rating plate on 876 × 946 × 665 the external right side of the ap32 hours pliance. 13. ENVIRONMENT CONCERNS Recycle the materials with the symbol . Put the packaging in applicable and electronic appliances. Do not dispose appliances marked with the symbol containers to recycle it.
SUOMI 15 SISÄLLYS 1. 2. 3. 4. 5. 6. 7. 8. 9. 10. 11. 12. TURVALLISUUSOHJEET . . . . . . . . . . . . . . . . . . . . . . . . . . . . . . . . . . . . . . . . . . . . . . . . . LAITTEEN KUVAUS . . . . . . . . . . . . . . . . . . . . . . . . . . . . . . . . . . . . . . . . . . . . . . . . . . . . . KÄYTTÖ . . . . . . . . . . . . . . . . . . . . . . . . . . . . . . . . . . . . . . . . . . . . . . . . . . . . . . . . . . . . . . KÄYTTÖPANEELI . . . . . . . . . . . . . . . . . . . . . . . . . . . . . . . . . .
www.electrolux.com 1. TURVALLISUUSOHJEET Lue tämä käyttöohje ja sen sisältämät neuvot sekä varoitukset huolellisesti ennen laitteen asentamista ja ensimmäistä käyttöä, jotta osaisit käyttää laitetta turvallisesti ja oikealla tavalla. Turhien virheiden ja onnettomuuksien välttämiseksi on tärkeää, että kaikki laitteen käyttäjät perehtyvät huolellisesti sen toimintaan ja turvallisuusominaisuuksiin.
SUOMI 1. 2. • • • • Virtajohtoa ei saa jatkaa. Varmista, että virtajohto ei joudu puristuksiin tai pääse vahingoittumaan laitteen takana. Litistynyt tai vahingoittunut virtajohto voi ylikuumentua ja aiheuttaa tulipalon. 3. Laitteen verkkovirtakytkennän on oltava hyvin ulottuvilla siten, että pistoke on helppo irrottaa pistorasiasta. 4. Älä vedä virtajohdosta pistoketta irrottaessasi. 5. Jos pistoke on löysästi kiinni virtajohdossa, älä kiinnitä sitä pistorasiaan.
www.electrolux.com keräykseen. Eristevaahto sisältää tulenarkoja kaasuja: laitteen käytöstäpoistossa ja hävittämisessä tulee noudattaa paikallisia jätehuoltomääräyksiä. Vältä vahingoit- tamasta jäähdytysyksikköä, erityisesti lämmönvaihtimen läheltä. Tässä laitteessa käytetyt, symbomerkityt materiaalit ovat lilla kierrätettäviä. 2.
SUOMI 19 3. KÄYTTÖ 3.1 Laitteen käynnistäminen A B Kiinnitä pistoke pistorasiaan. Käännä lämpötilan säädin Täysi-asentoon ja anna laitteen käydä 24 tuntia oikean lämpötilan saavuttamiseksi ennen ruokien asettamista laitteeseen. Säädä lämpötilan säädintä säilytettävän ruokamäärän mukaan. C A Lämpötilan säädin B Puolitäyttö-asento C Täysi-asento 3.2 Laitteen kytkeminen pois toiminnasta Laite kytketään pois toiminnasta kääntämällä lämpötilan säädin asentoon “OFF”. 3.
www.electrolux.com 5. ENSIMMÄINEN KÄYTTÖKERTA 5.1 Sisätilan puhdistaminen Ennen kuin otat laitteen käyttöön, pese sisäosat ja kaikki kaapin sisään sijoitettavat varusteet haalealla vedellä ja käsitiskiaineella poistaaksesi näin uudelle laitteelle tyypillisen hajun. Kuivaa pinnat ja varusteet lopuksi huolellisesti. Älä käytä puhdistusaineita tai hankaavia jauheita, sillä ne vahingoittavat pintoja. 6. PÄIVITTÄINEN KÄYTTÖ 6.
SUOMI 606 806 946 1061 230 1201 1336 1611 21 Korit liukuvat toistensa sisään. Seuraavasta kuvasta näet, kuinka monta koria voidaan asettaa sisäkkäin eri pakastinmalleissa. Voit hankkia lisäkoreja valtuutetusta huoltoliikkeestä. 7. HYÖDYLLISIÄ NEUVOJA JA VINKKEJÄ 7.1 Pakastusohjeita Seuraavassa on muutamia tärkeitä ohjeita tehokkaan pakastamisen varmistamiseksi: • 24 tunnin aikana pakastettavien elintarvikkeiden maksimimäärä on mainittu laitteen arvokilvessä.
www.electrolux.com 4. 5. 6. Kuivaa pakastin kauttaaltaan. Kiinnitä pistoke pistorasiaan. Kytke virta laitteeseen. HUOMIO Älä käytä pakastimen sisäpuolen puhdistukseen voimakkaita tai hankaavia puhdistusaineita, voimakastuoksuisia tuotteita tai kiillotusaineita. Ehkäise jäähdytysjärjestelmän vioittuminen. Kompressorialuetta ei tarvitse puhdistaa. Monet keittiön pintojen puhdistusaineet sisältävät kemikaaleja, jotka voivat vahingoittaa laitteen muoviosia.
SUOMI 23 Häiriö Mahdollinen syy Laite on äänekäs. Laite ei ole kunnolla tuettu. Tarkasta, että laite seisoo vakaasti (kaikki neljä jalkaa ovat lattialla). Korjaustoimenpide Kompressori käy jatkuvasti. Lämpötilaa ei ole säädetty oikein. Säädä lämpötila korkeammaksi. Kantta on avattu liian usein. Älä pidä kantta auki pitempään kuin on tarpeen. Kansi ei ole kunnolla kiinni. Tarkista, että kansi sulkeutuu kunnolla ja tiivisteet ovat ehjät ja puhtaat. Korkean lämpötilan hälytysmerkkivalo palaa.
www.electrolux.com Häiriö Mahdollinen syy Korjaustoimenpide Venttiili on tukossa. Tarkista venttiili. Valo ei syty. Lamppu on palanut. Lue ohjeet kohdasta Lampun vaihtaminen. Pakastimen sisällä on liian lämmintä. Lämpötilaa ei ole säädetty oikein. Säädä lämpötila alhaisemmaksi. Kansi ei sulkeudu tiukasti, tai sitä ei ole suljettu kunnolla. Tarkista, että kansi sulkeutuu kunnolla ja tiiviste on ehjä ja puhdas. Pakastinta on esijäähdytettävä riittävästi ennen pakastusta.
SUOMI 25 9.2 Lampun vaihtaminen 1. 2. 3. 4. Irrota pistoke pistorasiasta. Vaihda käytetty lamppu saman tehoiseen uuteen lamppuun, joka on tarkoitettu erityisesti kodinkoneisiin. (maksimiteho on merkitty lampun suojaan) Kiinnitä pistoke pistorasiaan. Avaa kansi. Tarkista, että valo syttyy. VAROITUS! Älä poista lampun suojusta vaihdon aikana. Älä käytä pakastinta, jos lampun suojus on viallinen tai sitä ei ole. 10. ASENNUS 10.
www.electrolux.com 11. ÄÄNET Tietynlaiset äänet kuuluvat laitteen normaaliin toimintaan (kompressori, jäähdytysaineen kierto).
SUOMI BLUBB! CRACK! BLUBB! 27 CRACK! 12. TEKNISET TIEDOT Mitat Korkeus × Leveys × Syvyys (mm): 876 × 946 × 665 Nousuaika Muut tekniset tiedot on ilmoitettu laitteen ulkopinnassa oikealla puolella sijaitsevassa tyyppikilvessä. 32 tuntia 13. YMPÄRISTÖNSUOJELU Kierrätä materiaalit, jotka on merkitty . Kierrätä pakkaus laittamalla merkillä se asianmukaiseen kierrätysastiaan. Suojele ympäristöä ja ihmisten terveyttä kierrättämällä sähkö- ja elektroniikkaromut.
www.electrolux.com SOMMAIRE 1. 2. 3. 4. 5. 6. 7. 8. 9. 10. 11. 12. INSTRUCTIONS DE SÉCURITÉ . . . . . . . . . . . . . . . . . . . . . . . . . . . . . . . . . . . . . . . . . . . . DESCRIPTION DE L'APPAREIL . . . . . . . . . . . . . . . . . . . . . . . . . . . . . . . . . . . . . . . . . . . . FONCTIONNEMENT . . . . . . . . . . . . . . . . . . . . . . . . . . . . . . . . . . . . . . . . . . . . . . . . . . . . . BANDEAU DE COMMANDE . . . . . . . . . . . . . . . . . . . . . . . . . . . . . . . . . . . .
FRANÇAIS 1. 29 INSTRUCTIONS DE SÉCURITÉ Pour votre sécurité et garantir une utilisation correcte de l'appareil, lisez attentivement cette notice, y compris les conseils et avertissements, avant d'installer et d'utiliser l'appareil pour la première fois. Pour éviter toute erreur ou accident, veillez à ce que toute personne qui utilise l'appareil connaisse bien son fonctionnement et ses fonctions de sécurité. Conservez cette notice avec l'appareil.
www.electrolux.com – évitez les flammes vives et toute autre source d'allumage – aérez soigneusement la pièce où se trouve l'appareil • Ne modifiez pas les spécifications de l'appareil. Si le câble d'alimentation est endommagé, il peut causer un court circuit, un incendie et/ou une électrocution. AVERTISSEMENT Les éventuelles réparations ou interventions sur votre appareil, ainsi que le remplacement du câble d'alimentation, ne doivent être effectuées que par un professionnel qualifié. 1.
FRANÇAIS • Avant de brancher votre appareil, laissez-le au moins 4 heures au repos afin de permettre à l'huile de refluer dans le compresseur. • Veillez à ce que l'air circule librement autour de l'appareil pour éviter qu'il ne surchauffe. Pour assurer une ventilation suffisante, respectez les instructions d'installation. • L'appareil ne doit pas être placé à proximité de radiateurs ou de cuisinières. • Assurez-vous que la prise principale est accessible une fois l'appareil installé. 1.
www.electrolux.com 2.
FRANÇAIS 33 3. FONCTIONNEMENT 3.1 Mise en marche A B Insérez la fiche dans la prise murale. Placez le thermostat sur la position Charge pleine et attendez 24 heures pour que la température à l'intérieur de l'appareil soit bonne avant d'y placer les aliments. Ajustez le thermostat selon la quantité d'aliments entreposés dans l'appareil. C A Thermostat B Position Demi-charge C Position Charge pleine 3.2 Mise à l'arrêt Pour éteindre, tournez le thermostat sur la position “OFF”. 3.
www.electrolux.com 5. PREMIÈRE UTILISATION 5.1 Nettoyage intérieur que du "neuf" puis séchez soigneusement. Avant d'utiliser l'appareil pour la première fois, nettoyez l'intérieur et tous les accessoires internes avec de l'eau tiède savonneuse pour supprimer l'odeur caractéristi- N'utilisez pas de produits abrasifs, poudre à récurer, éponge métallique pour ne pas abîmer la finition. 6. UTILISATION QUOTIDIENNE 6.
FRANÇAIS 35 6.5 Paniers de rangement A 606 Accrochez les paniers sur le bord supérieur du congélateur (A) ou placez-les à l'intérieur (B). Tournez et bloquez les poignées en fonction de ces deux positions, comme indiqué. B 806 946 1061 230 1201 1336 1611 Les paniers s'emboîtent l'un dans l'autre. Les figures suivantes vous indiquent les différentes possibilités de chargement en fonction du type d'appareil. Vous pouvez acheter des paniers supplémentaires auprès de votre service aprèsvente local.
www.electrolux.com • éviter d'ouvrir trop souvent le couvercle du congélateur et ne le laisser ouvert que le temps nécessaire. • une fois décongelés, les aliments se détériorent rapidement et ne peuvent pas être recongelés. • respecter la durée de conservation indiquée par le fabricant. 8. ENTRETIEN ET NETTOYAGE ATTENTION débrancher l'appareil avant toute opération d'entretien.
FRANÇAIS N'utilisez en aucun cas de couteau ou tout autre objet tranchant, d'objet métallique pour gratter la couche de givre, vous risquez de détériorer irrémédiablement l'évaporateur. N'utilisez aucun autre dispositif mécanique ou moyen artificiel que ceux qui sont recommandés par le fabricant pour accélérer le dégivrage de votre appareil. Une élévation de la température des denrées congelées, pendant la décongélation, peut réduire leur durée de conservation.
www.electrolux.com Anomalie Cause possible Solution Trop de produits frais ont été introduits dans l'appareil. Attendez quelques heures et vérifiez de nouveau la température. Les aliments introduits Laissez refroidir les aliments dans l'appareil étaient trop à température ambiante chauds. avant de les stocker. La température ambiante du local où est installé l'appareil est trop élevée pour permettre un fonctionnement optimal. Le voyant Alarme haute température est allumé. Il y a trop de givre.
FRANÇAIS 39 Anomalie Cause possible Solution L'ampoule ne fonctionne pas. L'ampoule est défectueuse. Consultez le paragraphe "Remplacement de l'ampoule d'éclairage". La température à l'intérieur du congélateur est trop élevée. La température n'est pas bien réglée. Choisissez une température plus basse. Le couvercle ne ferme pas Vérifiez que le couvercle hermétiquement ou n'est ferme correctement et que pas correctement fermé. le joint est en bon état et propre.
www.electrolux.com Anomalie Cause possible Solution Le dispositif de réglage de température n'est pas sur une position de fonctionnement. Mettez l'appareil en marche. La prise n'est pas alimen- Faites appel à un électricien tée (essayez de brancher qualifié. un autre appareil sur la prise). 9.
FRANÇAIS Classe Température ambiante climatique SN + 10 °C à + 32 °C N + 16 °C à + 32 °C ST + 16 °C à + 38 °C T + 16 °C à + 43 °C 10.2 Branchement électrique Contrôlez, avant de brancher l'appareil, si la tension et la fréquence indiquées sur la plaque signalétique correspondent à celles de votre réseau. L'appareil doit être relié à la terre. La fiche du câble d'alimentation comporte un logement pour mise à la terre.
www.electrolux.com SSSRRR! SSSRRR! HISSS! HISSS! BLUBB! BLUBB! CLICK! BRRR! CRACK! CLICK! BRRR! CRACK! 12. CARACTÉRISTIQUES TECHNIQUES Dimensions Hauteur × Largeur × Profondeur (mm) : 876 × 946 × 665 Temps de montée en température 32 heures Les caractéristiques techniques détaillées figurent sur la plaque signalétique située sur le côté droit à l'extérieur de l'appareil.
FRANÇAIS 43 13. EN MATIÈRE DE PROTECTION DE L'ENVIRONNEMENT Recyclez les matériaux portant le symbole . Déposez les emballages dans les électroniques. Ne jetez pas les appareils avec les ordures portant le symbole conteneurs prévus à cet effet. Contribuez à la protection de l'environnement et à votre sécurité, recyclez vos produits électriques et ménagères. Emmenez un tel produit dans votre centre local de recyclage ou contactez vos services municipaux.
www.electrolux.com INDICE 1. 2. 3. 4. 5. 6. 7. 8. 9. 10. 11. 12. ISTRUZIONI DI SICUREZZA . . . . . . . . . . . . . . . . . . . . . . . . . . . . . . . . . . . . . . . . . . . . . . . DESCRIZIONE DEL PRODOTTO . . . . . . . . . . . . . . . . . . . . . . . . . . . . . . . . . . . . . . . . . . . . USO DELL'APPARECCHIO . . . . . . . . . . . . . . . . . . . . . . . . . . . . . . . . . . . . . . . . . . . . . . . . PANNELLO DEI COMANDI . . . . . . . . . . . . . . . . . . . . . . . . . . . . . . . . . . . . .
ITALIANO 1. 45 ISTRUZIONI DI SICUREZZA Per garantire un impiego corretto e sicuro dell'apparecchio, prima dell'installazione e del primo utilizzo leggere con attenzione il libretto istruzioni, inclusi i suggerimenti e le avvertenze. Per evitare errori e incidenti, è importante garantire che tutte le persone che utilizzano l'apparecchio ne conoscano il funzionamento e le caratteristiche di sicurezza.
www.electrolux.com AVVERTENZA! Tutti i componenti elettrici (cavo di alimentazione, spina, compressore) devono essere sostituiti da un tecnico certificato o da personale d'assistenza qualificato al fine di evitare di correre rischi. 1. • • • • Non collegare prolunghe al cavo di alimentazione. 2. Evitare che il lato posteriore dell'apparecchiatura possa schiacciare o danneggiare la spina, causandone il surriscaldamento con un conseguente rischio di incendio. 3.
ITALIANO • L'apparecchiatura non deve essere collocata vicino a termosifoni o piani di cottura. • Installare l'apparecchiatura in modo che la presa rimanga accessibile. 1.6 Assistenza tecnica • Gli interventi elettrici sull'apparecchiatura devono essere eseguiti esclusivamente da elettricisti qualificati o da personale competente. • Gli interventi di assistenza devono essere eseguiti esclusivamente da tecnici autorizzati e utilizzando solo ricambi originali. 1.
www.electrolux.com 2.
ITALIANO 49 3. USO DELL'APPARECCHIO 3.1 Accensione A B C Inserire la spina nella presa a muro. Ruotare il regolatore di temperatura in posizione Pieno Carico e lasciare l'apparecchiatura in funzione per 24 ore affinché raggiunga la corretta temperatura prima di conservare gli alimenti all'interno. Impostare il regolatore di temperatura in base alla quantità di cibi conservati. A Regolatore di Temperatura B Posizione Mezzo carico C Posizione Pieno Carico 3.
www.electrolux.com 5. PRIMO UTILIZZO dei prodotti nuovi, quindi asciugare accuratamente. 5.1 Pulizia dell'interno Prima di utilizzare l'apparecchio per la prima volta, lavare l'interno e gli accessori interni con acqua tiepida e un po' di sapone neutro in modo a togliere il tipico odore Non usare detergenti corrosivi o polveri abrasive che danneggiano le finiture. 6. UTILIZZO QUOTIDIANO 6.
ITALIANO 606 806 946 1061 230 1201 1336 1611 51 I cestelli possono scorrere l'uno nell'altro. Le figure seguenti mostrano il numero di cestelli che è possibile collocare nei vari modelli del congelatore. È possibile acquistare cestelli aggiuntivi presso il centro di assistenza locale. 7. CONSIGLI E SUGGERIMENTI UTILI 7.
www.electrolux.com 8.1 Pulizia periodica 1. 2. 3. 4. 5. 6. Spegnere l'apparecchiatura. Estrarre la spina dalla presa di corrente. Lavare periodicamente l'apparecchiatura e gli accessori con acqua tiepida e sapone neutro. Pulire accuratamente la guarnizione del coperchio. Asciugare perfettamente l'apparecchiatura. Inserire la spina nella presa. Accendere l'apparecchiatura.
ITALIANO 53 9. COSA FARE SE… ATTENZIONE Prima della ricerca guasti, estrarre la spina dalla presa. Le operazioni di ricerca guasti non descritte nel presente manuale devono essere eseguite esclusivamente da elettricisti qualificati o da personale competente. Durante l'uso, alcuni rumori di funzionamento (come quelli del compressore o del circuito refrigerante) sono da considerarsi normali. Problema Possibile causa Soluzione L'apparecchiatura è rumorosa.
www.electrolux.com Problema Possibile causa Soluzione Il coperchio non è perfettamente chiuso. Controllare che il coperchio si chiuda perfettamente e che le guarnizioni siano integre e pulite. La temperatura non è regolata correttamente. Impostare una temperatura superiore. Il tappo dello scarico dell'acqua non è posizionato correttamente. Posizionare il tappo correttamente. Lo strato di brina è troppo spesso. Eliminare la brina in eccesso. Le guarnizioni del coperchio sono sporche.
ITALIANO Problema La temperatura all'interno del congelatore è troppo bassa. 55 Possibile causa Soluzione Il coperchio viene aperto frequentemente. Limitare il più possibile l'apertura del coperchio. Il coperchio è rimasto aperto a lungo. Limitare il più possibile il tempo di apertura del coperchio. La temperatura non è regolata correttamente. Impostare una temperatura superiore. L'apparecchiatura La spina non è inserita non funziona. Non si correttamente nella presa.
www.electrolux.com 10. INSTALLAZIONE 10.1 Luogo d'installazione AVVERTENZA! Qualora occorra ritirare dall'uso un'apparecchiatura con serratura, si raccomanda di rendere quest'ultima inservibile per evitare che i bambini possano chiudersi all'interno. La spina dell'apparecchiatura deve essere accessibile dopo l'installazione.
ITALIANO SSS RRR ! HISSS! OK BL SSSRRR! HISSS! BLUBB! SSSRRR! HISSS! BLUBB! UB B! CLICK! BRRR! CRACK! IC CL 57 K! BRRR! CR AC K! CLICK! BRRR! CRACK!
www.electrolux.com 12. DATI TECNICI Dimensioni Altezza x Larghezza x Profondità (mm): 876 × 946 × 665 Tempo di salita Ulteriori dati tecnici sono riportati sulla targhetta del modello applicata sul lato esterno destro dell'apparecchiatura. 32 ore 13. CONSIDERAZIONI AMBIENTALI Riciclare i materiali con il simbolo . Buttare l'imballaggio negli appositi contenitori per il riciclaggio.
SVENSKA 59 INNEHÅLL 1. 2. 3. 4. 5. 6. 7. 8. 9. 10. 11. 12. SÄKERHETSFÖRESKRIFTER . . . . . . . . . . . . . . . . . . . . . . . . . . . . . . . . . . . . . . . . . . . . . . PRODUKTBESKRIVNING . . . . . . . . . . . . . . . . . . . . . . . . . . . . . . . . . . . . . . . . . . . . . . . . . ANVÄNDNING . . . . . . . . . . . . . . . . . . . . . . . . . . . . . . . . . . . . . . . . . . . . . . . . . . . . . . . . . KONTROLLPANEL . . . . . . . . . . . . . . . . . . . . . . . . . . . . . . . . . . . . . . . .
www.electrolux.com 1. SÄKERHETSFÖRESKRIFTER För din egen säkerhet och för att du skall kunna använda produkten på korrekt sätt är det viktigt att du noggrant läser igenom denna bruksanvisning, inklusive tips och varningar, innan du installerar och använder produkten första gången. För att undvika onödiga misstag och olyckor är det viktigt att alla som använder produkten har god kännedom om dess skötsel och skyddsanordningar.
SVENSKA 1. 2. • • • • Nätkabeln får inte förlängas. Se till att stickkontakten inte kläms eller skadas av produktens baksida. En skadad stickkontakt kan överhettas och orsaka brand. 3. Se till att stickkontakten är åtkomlig när produkten har installerats. 4. Dra inte i nätkabeln. 5. Sätt inte i stickkontakten om eluttaget sitter löst. Risk för elektriska stötar eller brand föreligger. 6. Produkten får inte användas utan att innerbelysningens lampglas (i förekommande fall) sitter på plats.
www.electrolux.com ser som kan erhållas från de lokala myndigheterna. Undvik att skada kylenheten, särskilt på baksi- dan nära kondensorn. Material i denna produkt som är märkta kan återvinnas. med symbolen 2.
SVENSKA 63 3. ANVÄNDNING 3.1 Slå på A B Sätt i stickkontakten i eluttaget. Vrid temperaturreglaget till välfyllt läge och lämna produkten igång i 24 timmar för att låta den nå rätt temperatur innan du placerar mat inuti. Justera temperaturreglaget efter hur mycket livsmedel som lagras. C A Temperaturreglage B Halvfyllt läge C Välfyllt läge 3.2 Stänga av Stäng av produkten genom att vrida temperaturreglaget till “OFF”-läget. 3.
www.electrolux.com 6. DAGLIG ANVÄNDNING 6.1 Infrysning av färska livsmedel 6.3 Öppna och stänga locket Frysfacket är lämpligt för infrysning av färska livsmedel och långvarig förvaring av frysta och djupfrysta matvaror. Den största mängd mat som kan frysas inom 24 timmar anges på typskylten 5) Infrysningsprocessen tar 24 timmar. Lägg inte in andra livsmedel som skall frysas under denna period. 6.
SVENSKA 65 7. RÅD OCH TIPS 7.1 Tips om infrysning Här följer några värdefulla tips som hjälper dig att använda infrysningsfunktionen på bästa sätt: • Den maximala mängd mat som kan frysas in på 24 timmar anges på typskylten. • Infrysningsprocessen tar 24 timmar. Ytterligare mat som skall frysas in bör inte läggas in under denna period. • Frys endast in färska och rengjorda matvaror av hög kvalitet. • Dela upp maten i små portioner för en snabbare och fullständig infrysning.
www.electrolux.com 8.2 Avfrostning av frysen 8.3 Långa uppehåll Avfrosta frysen när frostlagret når en tjocklek på cirka 10-15 mm. Bästa tillfället att avfrosta frysen är när den innehåller lite eller ingen mat alls. Utför följande steg för att avlägsna frosten: 1. Stäng av frysboxen. 2. Plocka ut matvarorna ur frysen, slå in dem i flera lager med tidningspapper och lägg dem på en sval plats. 3. Låt locket stå öppet, lossa pluggen från tömningshålet och samla upp allt avfrostningsvatten på en bricka.
SVENSKA 67 Problem Möjlig orsak Åtgärd Produkten bullrar. Produkten står ostadigt. Kontrollera att produkten står stadigt (alla fyra fötterna ska ha kontakt med golvet). Kompressorn går oavbrutet. Temperaturen är felaktigt inställd. Ställ in en högre temperatur. Locket har öppnats för ofta. Låt inte locket stå öppet längre än nödvändigt. Locket är inte stängt ordentligt. Kontrollera att locket stängs ordentligt och att tätningarna är oskadda och rena.
www.electrolux.com Problem Möjlig orsak Åtgärd Belysningen fungerar inte. Lampan är trasig. Se avsnittet "Byte av lampan". Det är för varmt inuti Temperaturen är felaktigt inställd. frysen. Ställ in en lägre temperatur. Locket sluter inte tätt eller är inte stängt ordentligt. Kontrollera att locket stänger ordentligt och att tätningarna är oskadda och rena. Produkten har inte kylts tillräckligt före infrysning. Förkyl produkten tillräckligt länge.
SVENSKA 69 9.2 Byte av lampan 1. 2. 3. 4. Koppla bort produkten från eluttaget. Byt den använda lampan mot en ny lampa med samma effekt och som är avsedd för produkten. (max. effekt anges på lampskyddet) Sätt i stickkontakten i eluttaget. Öppna locket. Kontrollera att belysningen tänds. VARNING Avlägsna inte lampglaset vid tidpunkten för byte Använd inte frysboxen om lampglaset är skadat eller saknas. 10. INSTALLATION 10.
www.electrolux.com 11. BULLER Vissa ljud hörs under normal användning (kompressor, cirkulation av köldmedel).
SVENSKA BLUBB! CRACK! BLUBB! 71 CRACK! 12. TEKNISKA DATA Mått Höjd × Bredd × Djup (mm): 876 × 946 × 665 Temperaturökningstid 32 timmar Ytterligare teknisk information finner du på typskylten som sitter på höger sida utanpå produkten. 13. MILJÖSKYDD Återvinn material med symbolen . Återvinn förpackningen genom att placera den i lämpligt kärl. Bidra till att skydda vår miljö och vår hälsa genom att återvinna avfall från elektriska och elektroniska produkter.
804180597-A-192013 www.electrolux.