
Quick Start Guide

A Quick Guide to Getting Started
913531544
Rev. A
(March 2021)
Before you begin
1. Remove all packaging material and tape.
2. Make sure your burner caps are centered on the burners
and installed correctly.
3. Place the center cooktop grate first, then position the
left and right grates in place. Refer to your Use & Care
Manual for detailed instructions.
OPERATING THE BURNERS
1. Place your cookware on the burner.
2. Push in and turn the cooktop knob to the
position to ignite the burner.
3. Check the burner to make sure it has a steady
flame.
4. Once the burner is lit, keep the knob pressed in
for a few seconds. If the burner goes out, wait a
few moments and try again.
5. Turn the burner knob to adjust the flame size.
NOTE: A clicking sound will occur on all the burners
when a control knob is pushed in.
Don't cook with the knob in the position.
BURNER KNOB POSITIONS:
position
HIGH and LOW flame settings
Burner outer ring flame setting
Burner inner ring flame setting
Burner electric ignition
Gas Cooktop Basics
SETTING YOUR FLAME SIZE
The color of the flame is the key to proper
burner adjustment.
USING THE INNER AND OUTER RINGS
Once the burner is lit, it will be on the highest setting.
To lower the outer ring
setting, turn the knob to
left
.
To turn off the outer ring,
continue to turn the knob
left
.
To control only the inner
ring, push the cooktop
knob in and turn left
.
Continue to turn the knob
left to decrease the inner
ring setting.
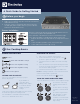
Burner Installation
A good flame is
clear, blue and
hardly visible. Adjust
or clean the burner
if flame is yellow-
orange.
Start on the highest setting and lower the setting
as needed for general cooking needs.
Use a medium or low flame when thickening
sauces or to maintain a slow boil.
All burner components must be properly installed before first use
to ensure proper ignition and gas flame size.
Place the brass coated burners in the front left and front right
zones. Place the black coated burners in all the other zones.
1. Align the burner skirt openings with the openings in the burner
base.
2. Center the flame spreader crown on the burner skirt.
3. Center and level the burner cap on top.