
Installation Instructions
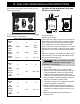


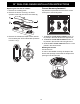
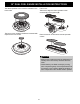

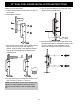


Table Of Contents

14
30” DUAL FUEL RANGE INSTALLATION INSTRUCTIONS
3. Invert the plastic regulator stem to achieve the
configuration “B” for Propane Gas and screw it in
tightly.
4. Screw the regulator stem and cap into place.
Replacing the Circular Dual Flame burners noz-
zles
1. Remove the cooktop grates.
2. Remove the burner cover (1), the flame-spreader
crown (2) and the burner skirt (3) from the burner
base (4).
3. Remove the tightening screws (5), the cover
plate (6) and the gasket (7).
4. Remove the internal (8) and external (9) nozzles
and replace them with the LPG nozzles (see
"LPG nozzles table (Pressure in W.C.P.: 10”)").
5. Refit the burner components following the above
instructions in reverse.
Replacing the Circular Single Flame burners
nozzles
1. Follow the instruction steps from 1 to 3 as written
for the Dual Flame burners.
2. Remove the external (9) nozzle and replace it
with the LPG nozzle (see "LPG nozzles table
(Pressure in W.C.P.: 10”)").
NOTE:
When converting for Propane Gas use, the pres-
sure supplied to the regulator must be between 11"
and 13" of the water column.
CAUTION This procedure must be performed
for every burner.