INSTRUCTION BOOK CHEST FREEZER ECM 2247 GB 1293167 820 41 70 55
IMPORTANT SAFETY INSTRUCTIONS These warnings are provided in the interests of your safety. Ensure that you understand them all before installing or using this appliance. Your safety is of paramount importance. If you are unsure about any of the meanings or these warnings contact the Customer Care Department. Prior to Installation Check the appliance for transport damage. Under no circumstances should a damaged appliance be installed. In the event of damage please contact your retailer.
Contents Instructions for the User Instructions for the Installer Important Safety Information 2 Technical Specifications 14 Description of the Appliance Control Panel 4 4 Installation Positioning 14 Operation Before use Starting the Appliance Temperature Control Opening/Closing the Lid Freezing Fresh Food Frozen Food Storage Thawing Baskets 5 5 5 5 6 6 6 7 Electrical Connections 15 Hints and Tips Normal Operating Sounds Food Storage Energy Saving Advice In the Event of a Power Failure 8 8 8
Description of the Appliance A - Compartment for frozen food storage B - Freezer calendar (recommended storage times for frozen foods) C - Compartment for freezing fresh foods D - Dividing wall E - Control panel F - Defrost water drain Control Panel Thermostat control knob 4 Green light
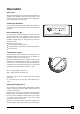
Operation Before Use Remove all packaging and securing tapes. Wash inside the appliance with lukewarm water and bicarbonate of soda (5ml to 0.5 litre of water). Do not use soap or detergent as the smell may linger. Dry thoroughly. Starting the Appliance Insert the plug into the wall socket. When the appliance is connected to the power supply the green indicator light will illuminate.
Freezing Fresh Food It is important that fresh food placed in the freezer is frozen quickly and that the food already in the freezer is heated as little as possible. If more than 3-4kg of food is to be frozen: 1. Turn the thermostat control knob to the highest setting ("Max"). The freezer will now run continuously creating a sufficient reserve of the temperature required. 2. Turn the thermostat control knob up 6-24 hours before placing new food in the freezer depending on how much food is to be frozen. 3.
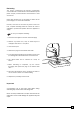
Baskets The baskets are designed for the storage of food which has already been frozen. The handles can be placed in two positions, as shown. The baskets can either be placed inside the freezer or hung on the edge of the casing. Spare baskets can be obtained from your local Service Force Centre. The following illustrations show how many baskets can be placed in various freezer models. The number above each illustration shows the width of the freezer in millimetres.
Hints & Tips Normal Operating Sounds You may hear faint gurgling or bubbling sounds when the refrigerant is pumped through the coils or tubing. When the compressor is on, the refrigerant is being pumped round and you will hear a whirring sound or pulsating noise from the compressor. A thermostat controls the compressor and you will hear a faint 'click' when the thermostat cuts in and out. Food Storage To obtain the best performance from your freezer: Do not store warm food or evaporating liquid.
Defrosting The freezer compartment will become progressively covered with frost. This should be removed with the special plastic scraper provided whenever the thickness of frost exceeds ¼". During this operation it is not necessary to switch off the power supply or to remove the foodstuffs. However, when the ice becomes very thick on the inner liner, complete defrosting should be carried out and it is advisable to perform this operation when the appliance is empty. To carry out complete defrosting: 1.
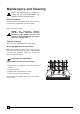
Maintenance and Cleaning Before any maintenance or cleaning is carried out you must DISCONNECT the appliance from the electricity supply Internal Cleaning Clean the inside and accessories with warm water and bicarbonate of soda (5ml to 0.5 litre of water). Rinse and dry thoroughly. NEVER use detergents, abrasive powders, highly perfumed cleaning products or wax polishes to clean the interior as these will damage the surface and leave a strong odour.
Something not Working Before: contacting your local Service Force Centre check the following point. IMPORTANT: If you call out an engineer to a fault listed below, or to repair a fault caused by incorrect use or installation, a charge will be made even if the appliance is under guarantee. SYMPTOM SOLUTION No power to the appliance (green light off) Check there is power at the socket Check there is not a power cut by checking the household lights. Check the mains fuse has not blown.
Service and Spare Parts In the event of your appliance requiring service, or if you wish to purchase spare parts, please contact your local Electrolux Service Force Centre by telephoning:- 0870 5 929929 Your telephone call will be automatically routed to the Service Force Centre covering your post code area. Before calling out an engineer, please ensure you have read the details under the heading "Something Not Working.
Guarantee Conditions We, Electrolux undertake that if within 12 months of the date of the purchase this Electrolux appliance or any part thereof is proved to be defective by reason only of faulty workmanship or materials, the company will, at our option repair or replace the same FREE OF CHARGE for labour, materials or carriage on condition that: The appliance has been correctly installed and used only on the electrical supply stated on the rating plate.
Technical Specifications Model ECM 2247 Volume (gross) litres 221 Volume (net) litres 216 88,3 Height with wheels cm Width cm 105 Depth cm 66,5 Weight kg 52 Energy consumpt./24h kWh Freezing capacity kg/24h Hold-over time hours 41 W 80 Rated power 0,58 24 this appliance complies with the following EC Directives: - 73/23/EEC of 19. 02. 1973 - Low-Voltage Directive - 89/336/EEC of 03. 05. 1989 (including Amendment Directive 92/31/EEC - EMC Directive.
Electrical Connection Any electrical work required to install this appliance should be carried out by a qualified electrician or competent person. This appliance must be earthed. The manufacturer declines any liability should these safety measures not be observed. GREEN & YELLOW E Electrical Requirements The appliance is supplied with a 13amp plug fitted. In the event of having to change the fuse in the plug supplied, a 13amp ASTA approved (BS1362) fuse must be used.
Printed by Xerox Hungary Ltd.