Before installing or using the tumble dryer, read the instruction booklet carefully, including its hints and warnings. Doing so will help ensure that your dryer will function properly and to best advantage. Anyone using the dryer should be thoroughly familiar with its instructions for use and the safety aspects. Save these instructions and make sure they remain with the dryer if it is moved or sold, so that everyone using it through its life can be properly informed on machine use and safety.
Safety information Installation and servicing ● ● To minimize the risk of fire in a tumble dryer, the following should be observed: If the dryer is installed in a bathroom, but without fixed wiring to the electrical supply, an earth leakage circuit breaker (or RCD) must be used. All installation work and other work done on the product must be carried out by a qualified technician.
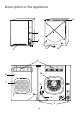
Description of the appliance 13 2 1 3 12 4 14 6 8 10 7 11 9 5 -4-
Description of the appliance 1. Door Latch (push the knob to the right to open) 2. Space for programme chart (Self-adhesive label) 3. Control panel ● Lights 3 A. Indicates the dryer is running. C B. Indicates that the water tank is full. ● Start button C. After selecting the program and drying time, press this button to start the dryer. ● A Timer knob B D. This knob is used to set both the drying time and the drying temperature required.
Instructions for use Before using the dryer for the first time Capacity (dry items) Dampen some clean pieces of unwanted cloth and dry them for about 15 minutes the very first time, to make sure that there is no dust or dirt in the dryer. (dry items) To help you load your tumble dryer correctly, here are some examples of average garment or item weights. These are based on cotton goods. 2. Open the door by pushing the knob to the right (A). 3.
Program chart Which program should I use? Timed drying This program chart is designed to help you dry your laundry correctly. The program/timer knob has two different sections, each with its own drying temperature and time scale: is used to represent cotton. Here you can set the dryer for up to 120 minutes, because cotton and thick non-synthetic fabrics need longer to dry. is used to represent synthetic fabrics and delicate items.
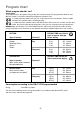
Regular care of your tumble dryer The filters For your tumble dryer to function properly, the filters need to be cleaned before or after every load dried. To clean them: 1. Open the door. A 2. Open the coarse filter upwards (Fig. A). 3. Brush the fluff off the fluff filter (Fig. B), which is under the coarse filter. Sometimes you may need to remove the fluff filter to clean it on both sides. Make sure that you put the fluff filter back correctly after cleaning, before closing the coarse filter.
Regular care of your tumble dryer Emptying the water tank If you have connected the tumble dryer directly to a waste pipe with the accessory hose, you can ignore this section. A A warning light on the control panel will come on when it is time to empty the water tank. If it is operating when this happens, the dryer will stop automatically until the tank is emptied. It is a good idea to get into the habit of emptying the tank either before or after each load. To empty the tank: 1. Open the door. B 2.
General washing and drying information Sorting Starched items Always sort loads for drying according to the type of textile (check the care labels) and how much you want to dry them. Load items loosely into the drum. Do up zip fasteners and tie loose ribbons, tapes or fabric belts. Close any tapes or fasteners on duvet covers and pillow cases to prevent smaller items from getting trapped inside. Laundry which has been starched can also be dried in a tumble dryer.
If the machine is not working Fault Check • The dryer will not start. • • • • • • Is the door properly closed? Is the electrical plug plugged in? Has the fuse blown? Have you set the timer knob properly? Is the start button pressed in? Is the water tank full? • The load is not drying properly, or is taking too long to dry. • Was the time set not long enough? • Is the drum overload? Cotton max. 3,0 kg Synthetics max.
Service Service and spare parts If a fault arises, first work through the list "If the machine is not working" to make sure that it is not a problem which you can put right yourself. If you have to call out a service engineer to remedy one of the problems in this list, you risk having to pay the call-out charge yourself. The same applies to faults caused by use of the dryer for purposes other than those for which it was intended.
Unpacking If the machine is damaged If the dryer has been damaged during transportation, you should immediately notify the company responsible for delivering it. Check that the tumble dryer is undamaged. If you discover any damage, faults or that anything is missing, you should notify the seller immediately. Never leave packaging material in a place where children may play with it. Identification of materials All materials used in packaging the dryer are environmentally-friendly.
Installation instructions Choosing where to install the dryer You can install this dryer in a number of different ways. We will show you the most suitable of these. Whichever way you install it, here are some points to bear in mind: • Always ensure that the dryer is level for optimum functioning. • The temperature in the room should not exceed +35° C when the dryer is operating. If it does, open a door or window while the dryer is on. The dryer uses the air in the room for cooling.
Installation instructions Wall mounting Different wall materials require different types of mounting hardware. Purchase mounting hardware suited to the walls in your home. Use a minimum of 3 suitable fasteners to attach your mounting console to the wall. Before deciding on the wall mounting site, it is important to check that the electrical lead will reach the wall socket once the dryer is in place. All electrical work performed on the dryer should be done by a qualified electrician or competent person.